All FAQ
Introduction
All frequently asked questions about Admin By Request in one place.
Endpoint
- Windows
- Mac
- Linux
In certain situations, Admin By Request pre-approval does not override portal or sub-setting policies that block system-file or System32 subprocesses. In practice, this means a parent application can be pre-approved and still fail if it launches a child process that is blocked by policy.
The over-arching business priority is to:
-
enforce least privilege and application control on Windows endpoints, ensuring that only approved applications can run with elevated privileges, and
-
ensure that system integrity is maintained by blocking potentially risky system subprocesses (e.g. those in System32).
Admin By Request always attempts to achieve the correct balance between user productivity (allowing necessary workflows) and security (preventing unapproved or dangerous actions), but sometimes, those priorities do conflict.
General Rule
When documenting or configuring Admin By Request pre-approvals:
-
Pre-approval is not a higher-priority override than system subprocess blocking policies.
-
If the child process is blocked by policy, the approved parent process can still fail.
-
When that happens, solve it with policy scope and settings design, not just with application pre-approval.
For more information, refer to Pre-Approval Does Not Override System Subprocess Blocking.
When matching portal sub-settings with Active Directory groups, the first group encountered will be the one that is matched, as described below.
Sub settings will overrule the global settings for the users or computers to which they apply. Both users and computers can be in Active Directory groups or organizational units.
If a user or computer hits multiple sub settings, the first in listed order that includes the setting concerned wins. Furthermore, it is better to use a full OU path rather than a partial OU path.
For example:
-
When Scope is set to \CloudObjects\GROUP1, \CloudObjects\GROUP2, only devices from GROUP1 will be shown, because it comes first in the list.
-
When Scope is set to \CloudObjects\GROUP2, \CloudObjects\GROUP1, only devices from GROUP2 will be shown, because it comes first in the list.
-
If scope is set to the full OU path \CloudObjects\GROUP1\Workstations, \CloudObjects\GROUP2\Workstations, then devices from both groups will be shown.
-
If scope is set to Workstations, then devices from both groups will be shown.
The option to upload unknown files to MetaDefender is the Cloud scan unknown files option in your portal settings (for Windows endpoints: Endpoint Privilege Management > Settings > Windows Settings > Malware > DETECT):
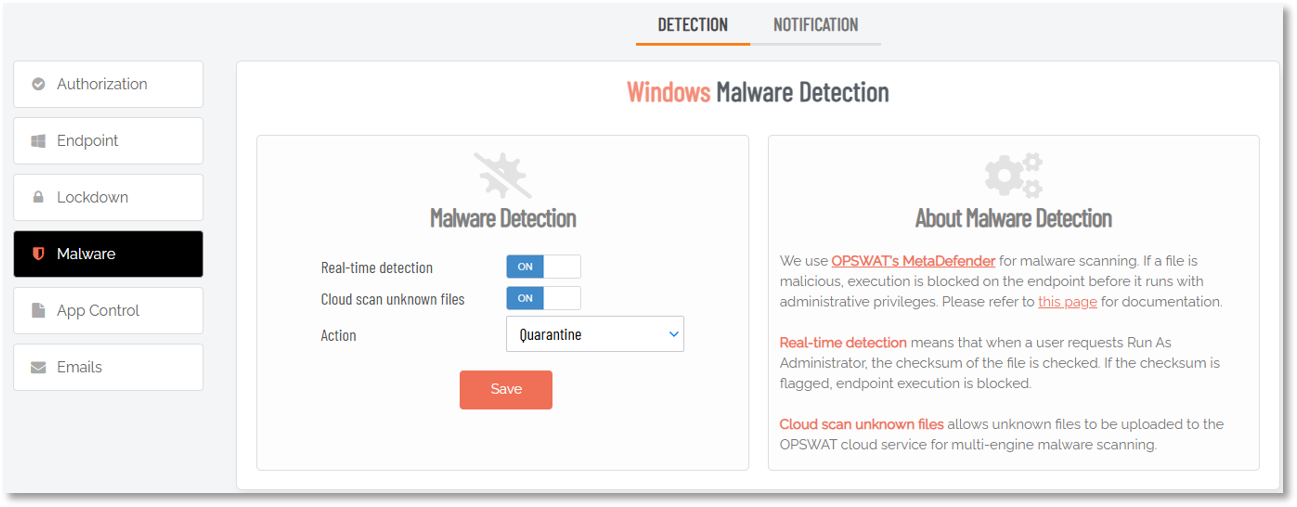
A similar setting is available for Mac endpoints.
If you turn off “Cloud scan unknown files” but leave “Real-time detection” on, only checksum lookup for the known 75% is performed and the rest must be handled by your local endpoint anti-virus product.
It is not recommended to ever disable the “Real-time detection” option, simply because there is no drawback to having it on. The extra wait time for the end user is a tenth of a second.
The file scanning flow looks like this:
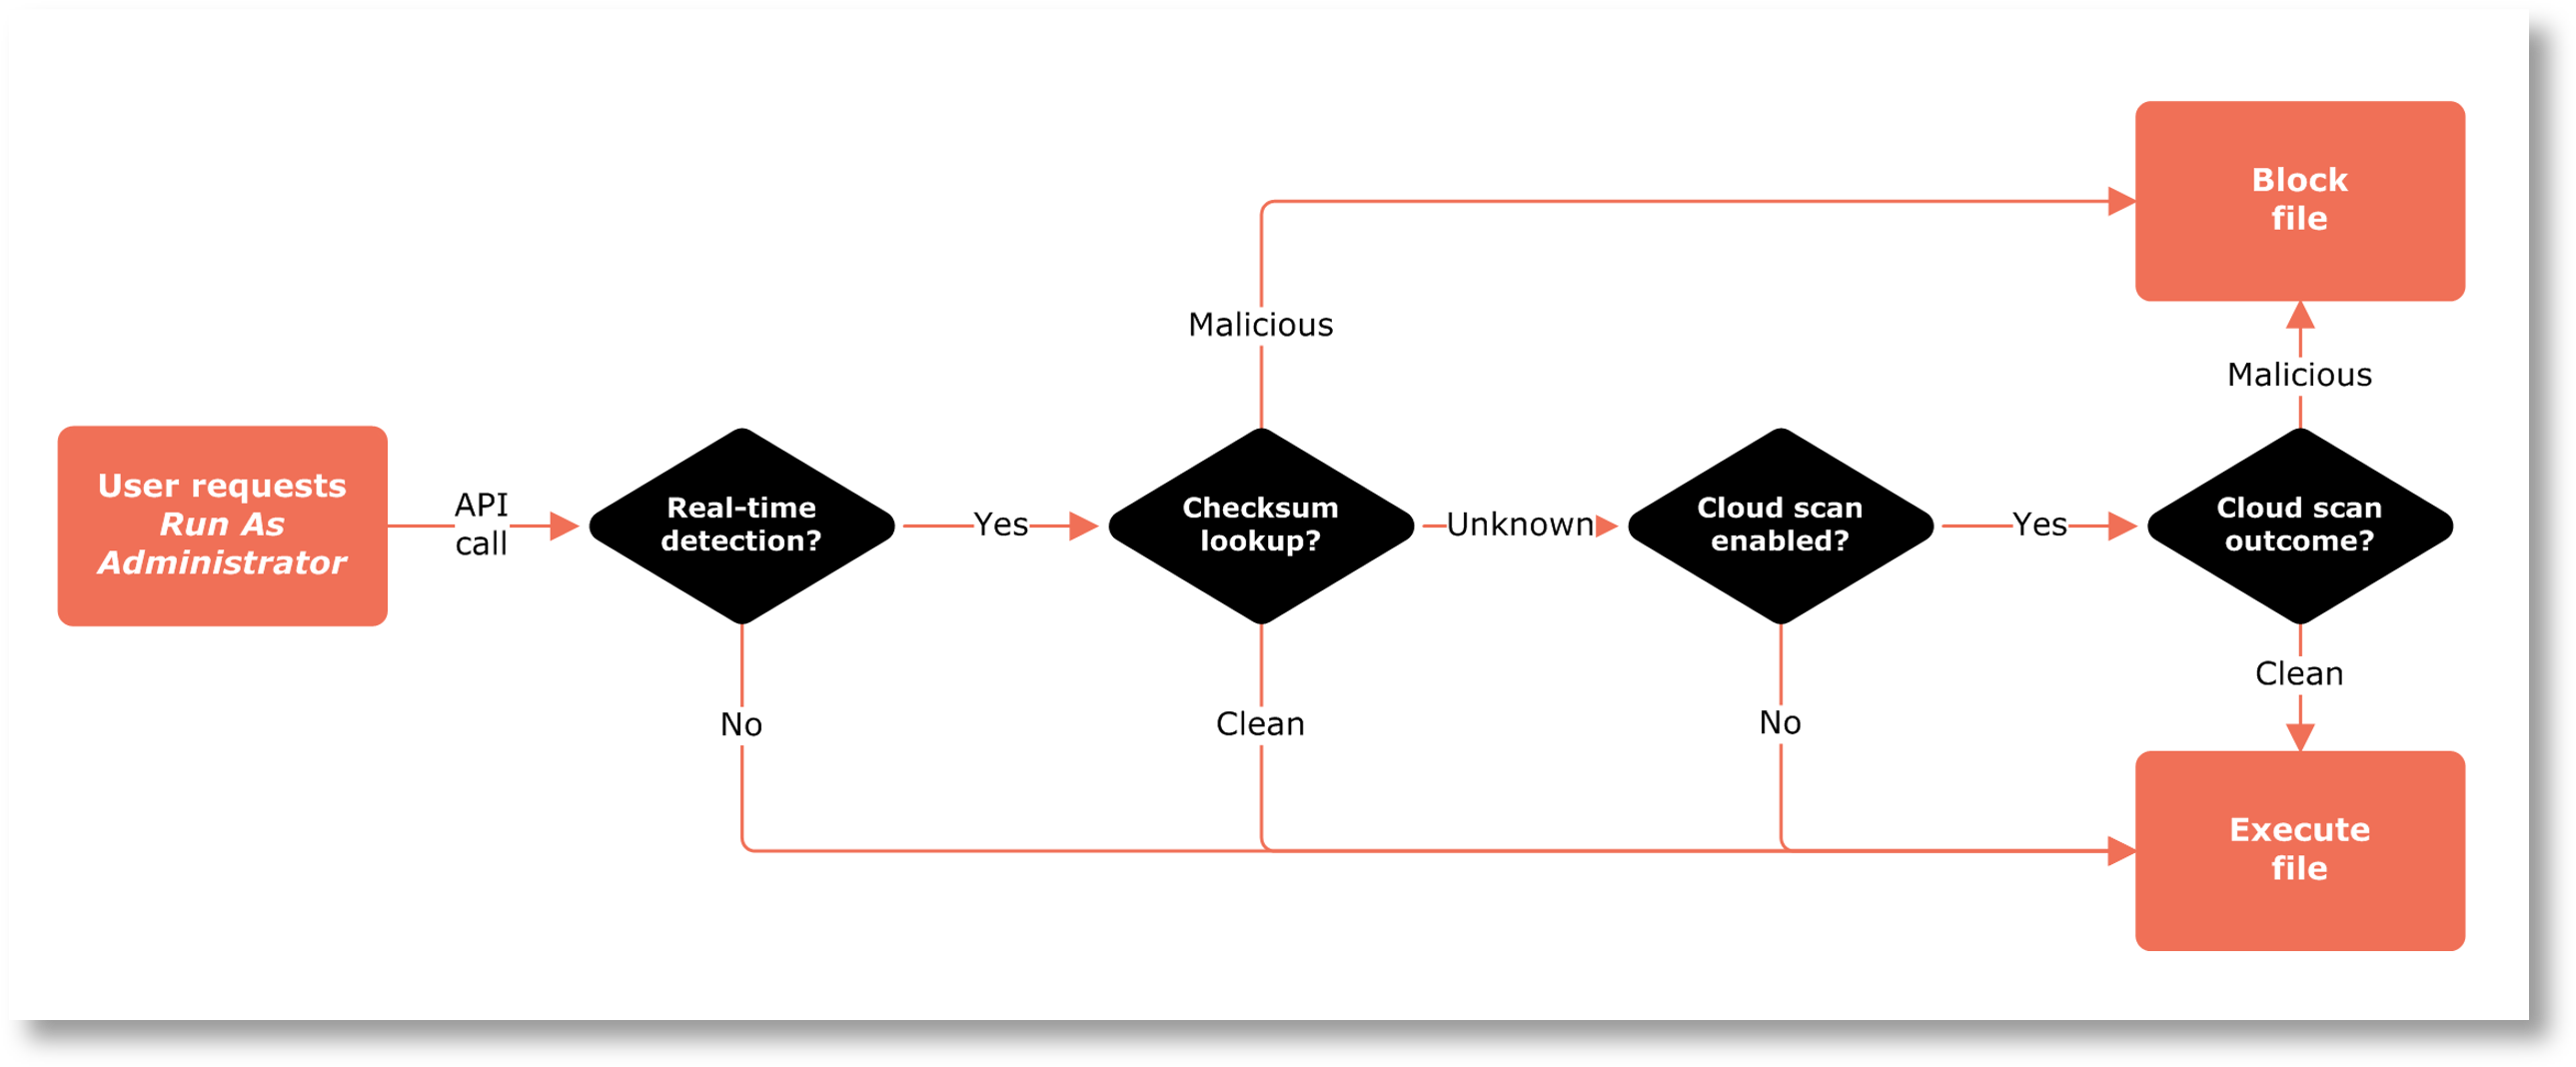
Refer to OPSWAT MetaDefender for more information.
The ABR client is downloaded as an installer file from the Internet via the ABR portal. Starting with Windows 8.6, the installer includes a browser extension, which monitors all subsequent downloads on that endpoint.
A few FAQs about this extension:
-
What does the browser extension do?
Basically, the browser extension listens for the “download finished” event in the browser. Once the event triggers, it uses Native Messaging to communicate with the ABR client and shows a toast notification with info about the downloaded file:
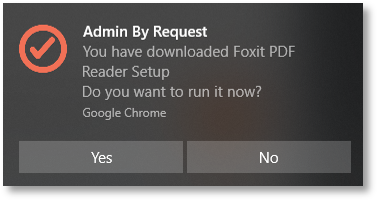
Once the user clicks the notification, the extension once again uses Native Messaging to communicate with the ABR client – telling it to trigger the flow just as if the user had opened the file via Explorer.
-
Which browsers are supported?
The extension is built for Chrome and Chromium-based browsers and Firefox:
-
For Google Chrome, the extension is fetched from the Chrome Web Store.
-
For Mozilla Firefox, the extension is fetched from the Firefox browser add-ons site.
-
For Microsoft Edge, the extension is fetched from the Edge add-ons site
-
-
How is the extension installed?
The extension is installed and configured via registry keys specific to the individual browser. This ensures that the user does not need to do anything to use the functionality of the extension.
See also browser notifications - settings and video and browser extension registry values.
On ABR for Windows Workstation, the most common causes of unexpected UAC prompts are the following:
-
Running an EXE directly from a browser download prompt.
-
Outside of Tray Tools, trying to modify settings that are classed as "Advanced System Settings".
-
Running an installer in user mode that subsequently triggers another MSI or EXE requiring elevated privileges.
-
Modifying an item that exists on the Public Desktop (e.g. a shortcut).
-
Using File Explorer to copy a file to a location that requires elevated privileges.
In addition to these, membership of the following groups is also known to cause problems in some instances:
-
Power Users
-
Network Configuration Operators
-
Group Policy Creator
As a rule, Admin By Request users who are administrators (i.e., red icon) typically do not receive ABR-style pop-ups when executing tasks that require elevated privileges. This is because the ABR client does not interfere if the logged-on user is an administrator - it simply defers to the Windows UAC pop-up. However, Admin By Request will still log everything that is done with elevated privileges.
Refer to User Account Control for more information.
Yes, Admin By Request is compatible with all build versions of Windows 11, including 24H2.
For Windows, you can uninstall a single endpoint or multiple endpoints at once:
-
Single endpoint uninstall
-
Using a PIN Code
-
Via the msi installation file
-
-
Multiple endpoints uninstall
-
Using msiexec
-
Using PsExec
-
Using a PowerShell script
-
Refer to Uninstalling Admin By Request for more information.
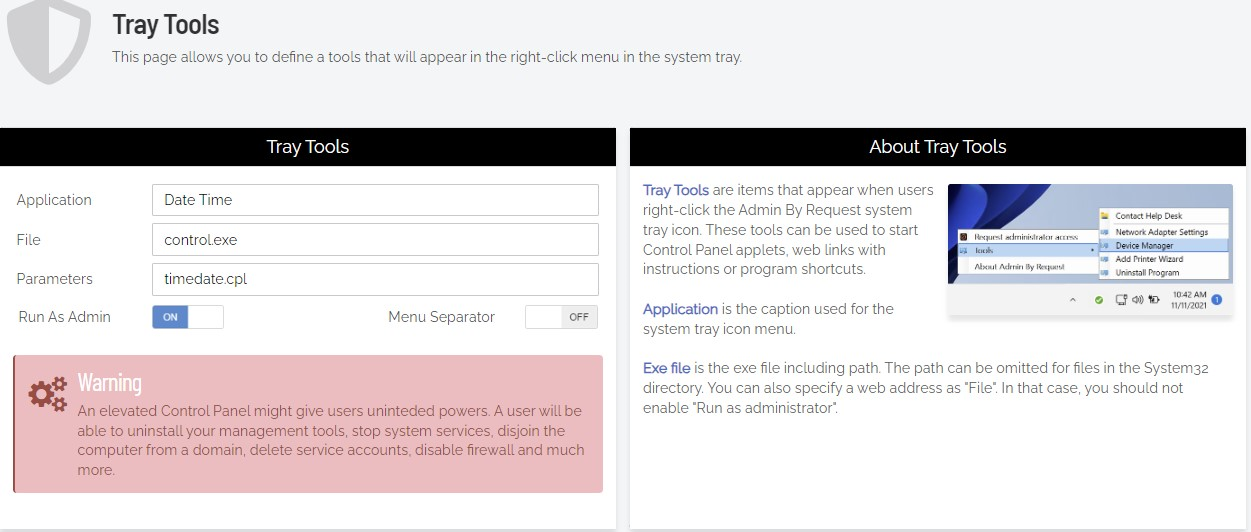
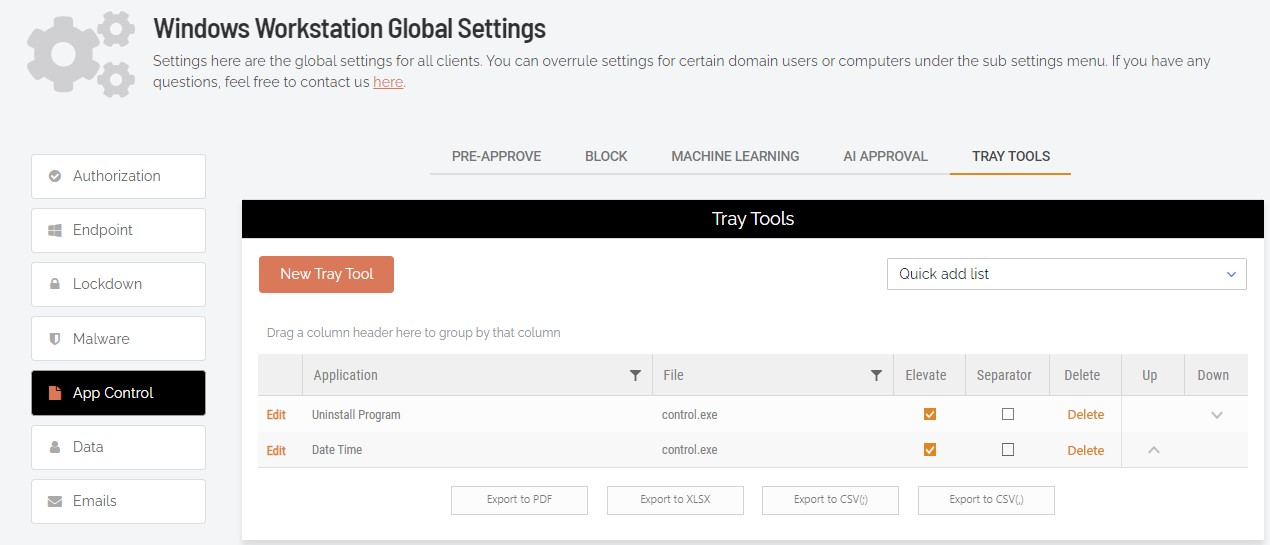
It is possible to allow users to change their local time zone on Windows computers by adding a tray tool for the Control Panel app timedate.cpl.
The tray tool menu item can then be made available to users who would otherwise be "blocked by policy".
-
In the portal, go to Endpoint Privilege Management > Settings > Windows Settings > App Control > TRAY TOOLS and click New Tray Tool.
-
In the Tray Tools panel, add the item using the following data:
-
Click Save. The new tray tool is now available:
Yes, all apps in a folder can be authorized to Run As Admin. In the Portal, select Settings > Windows Settings and then App Control from the left menu. Click New entry and in field Type, select Run As Admin location pre-approval (all files in folder tree):

Enter the Directory name (following the instructions in red) and click Save.
This is also available under Linux Settings (version 3.0), but not for Mac Settings (version 4.1), although you can pre-approve all apps from a specify Vendor under Mac Settings.
-
Uninstall via Path:
Copypsexec -s -e -h -u DOMAIN\user -p password \\REMOTECOMPUTERNAME msiexec /x "\\path\to\ABR\MSI\Admin By Request x.x.x (xxxxx) Workstation.msi (file://path/to/ABR/MSI/Admin%20By%20Request%20x.x.x%20(xxxxx)%20Workstation.msi)" /qn -
Uninstall via MSI-code:
Copypsexec -s -e -h -u DOMAIN\user -p password \\REMOTECOMPUTERNAME msiexec /x {MSI-PRODUCT-CODE} /passive -
Uninstall via Endpoint Name:
Copypsexec -s -e -h -u DOMAIN\user -p password \\REMOTECOMPUTERNAME wmic product where "name like 'admin by request%%'" call uninstall
Refer to the following for more information on Intune deployment:
ABR is supported on Azure Virtual Desktop for Windows 10 and Windows 11.
Windows Subsystem for Linux (WSL) can be used with ABR installed on the endpoint and ABR handles this as it does other applications.
Not officially.
Admin By Request version 7.4 is the last version to officially support Windows 7 (Pro and Enterprise only). If you need to use this version, login to the portal and visit our Download Archive.
While newer versions of Admin By Request might function on the Windows 7 operating system, they are not tested for compatibility, so we cannot guarantee stability.
If you experience issues with Admin By Request on Windows 7, we may be unable to resolve problems specific to that operating system.
If stability of the client is important, you should disable Auto Update on Windows 7 devices, and subsequently manually test new versions before wider implementation. Disable Auto Update in the portal at Endpoint Privilege Management > Settings > Windows Settings > Endpoint > AUTO-UPDATE.
To prevent select devices from auto updating, a registry key needs to be set that overrules the global auto update setting:
HKEY_LOCAL_MACHINE\Software\FastTrack Software\Admin By Request\Policies
The Policies key does not exist by default, so this may have to be created first.
In the Policies key, create a REG_DWORD named InternetUpdate, and set its value to either 0 (disabled) or 1 (enabled).
Note that a local administrator account is required to create/modify the registry for Admin By Request.
Please refer to Windows Settings: Red-check vs Green-check.
If the logged-in user is a member of certain "exempt" Active Directory groups, Admin By Request places the user in the workstation's Local Administrators Group, indicating this with a red/orange tray icon. You can see what the icon looks like in About Admin By Request.
As well as Local Administrators, groups that trigger this action include Domain Administrators and any group that is assigned either the Global Administrator or Azure AD Joined Device Local Administrator role.
To make sure the logged-in user does not automatically get elevated privileges (and thus has a green tray icon upon login), check that the user is not a member of any exempt Active Directory groups.
Refer to The Windows Client User Interface for more information.
The reason is that not every app requires elevated privileges to install. For applications that don't need Administrator privileges, Admin By Request will not deploy.
Admin By Request works by removing Administrator from the user's profile, and then acting as a "middle man" UAC (on windows) to provide momentary Administrator access.
PowerShell can be used to submit queries to the Admin By Request API for a range of data. Refer to Using PowerShell to Query ABR for step-by-step instructions.
Settings are covered in the Portal section:
A standard user making this selection where approval is required initiates the following sequence of events.
-
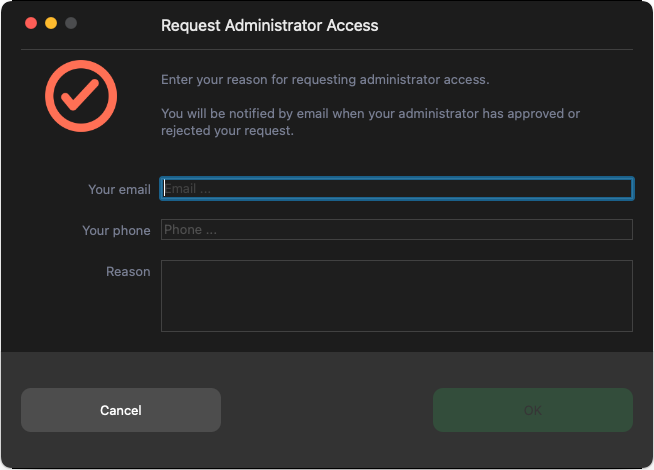
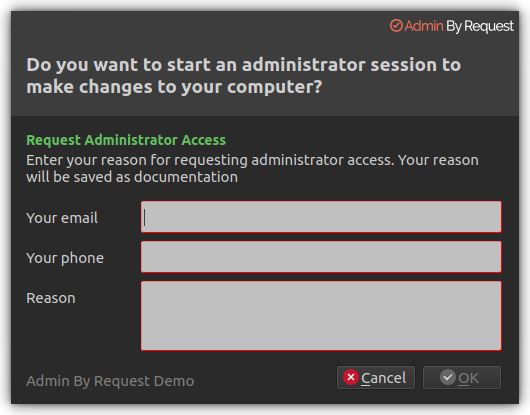
An empty Request Administrator Access form appears:

-
The user enters email, phone and reason information into the form and clicks OK.
NOTESettings in the portal control the full extent of what is displayed to the user:
-
If Code of Conduct is enabled, the user must acknowledge a Code of Conduct pop-up to continue (EPM > Settings > Windows Settings > Endpoint > INSTRUCTIONS).
-
If Require approval is OFF, the approval steps are skipped (EPM > Settings > Windows Settings > Authorization > AUTHORIZATION > Admin Session).
-
-
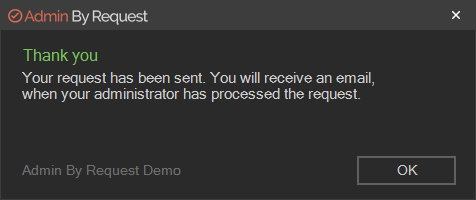
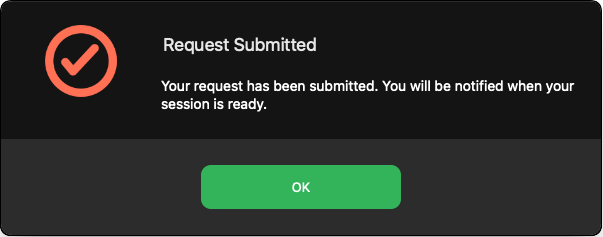
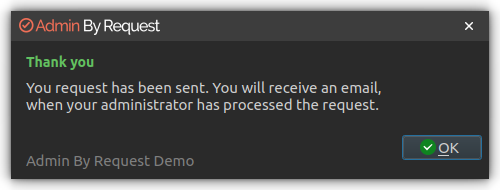
The request is submitted to the IT administration team and the user is advised accordingly:
-
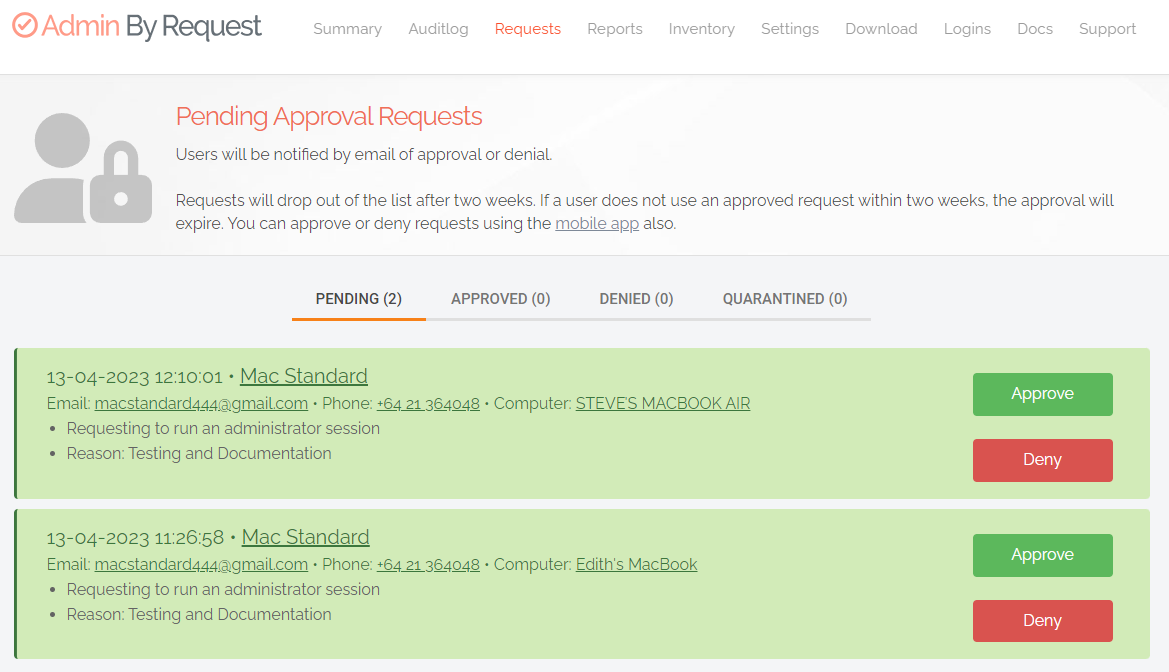
The IT administration team is notified via the Admin By Request portal that a new request for administrator access has arrived.
The following example shows how two new requests might appear in the portal:
-
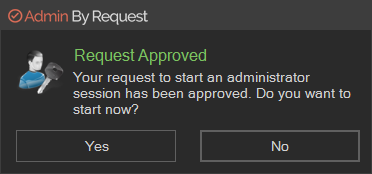
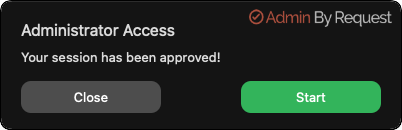
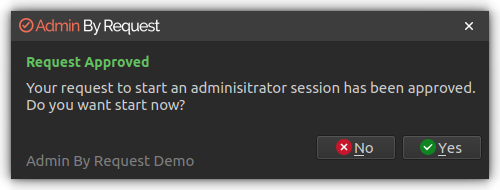
One of the team either approves or denies the request. If approved, the user is advised accordingly:
-
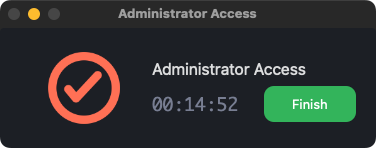
The user clicks Yes, which starts the session and displays a countdown timer:
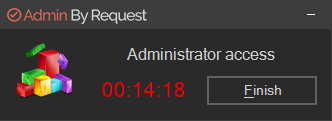
-
The duration of an admin session is set via the portal (15 minutes in this example) and the countdown timer ticks down to zero, at which time the session ends. The user can optionally end the session at any time once it has started by clicking Finish.
Admin By Request allows for quick pre-approval/blocking of trusted/untrusted applications from the Auditlog, based on the application vendor or checksum, visible when the Application Control screen is displayed (step 3 below).
Once an application has been installed on an endpoint with Admin By Request:
-
Log in to the portal and navigate to the application’s corresponding entry in the portal Auditlog.
-
Expand on the application entry, and select Pre-approve this file under Actions:
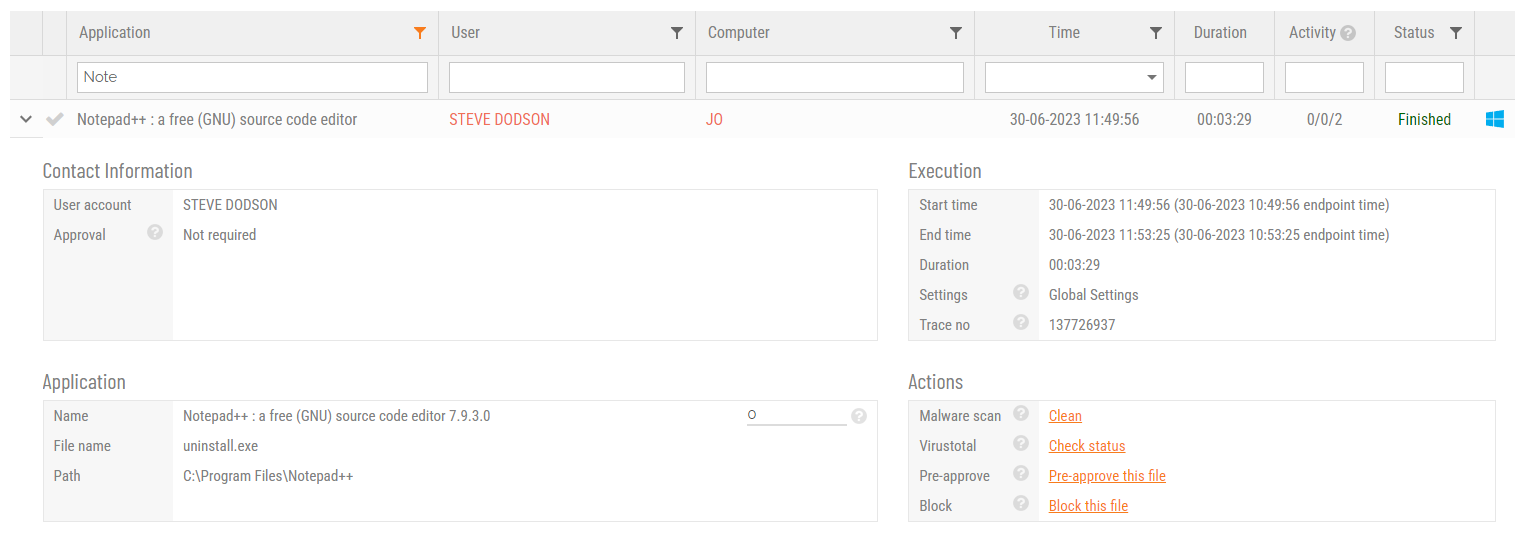
-
On the Application Control screen, modify any settings as required. For more information on pre-approval settings, refer to the Settings Table below.
-
Click Save verify that the app has been added to the list of pre-approved applications.
For example, the following applications are pre-approved:
During installation, if the computer is in a domain, Domain Users will be removed from the local administrator’s group right away. That is all that happens initially.
When a user then logs on, the user will be removed from the local administrator’s group unless:
-
You have unchecked “Revoke admins rights” in the portal settings
-
The user is in the list of excluded accounts in the portal settings
-
The user is member of a group that is the local administrator’s group (such as domain admins)
The reason all users are not just removed right away is to only remove accounts that are actually interactive user accounts and not accidentally remove any service accounts. Please refer to the Windows client technical details page for more information.
The users and groups administration will be removed entirely from Computer Management during an administrator session.
Even if the user still manages to tamper the local administrator’s group, the administrator’s group is snapshotted before the session starts and restored after the session ends. If the user tries to add other users or groups to the administrator’s group, these will simply be removed at the end of the session. If the user tries to uninstall Admin By Request during a session, Windows Installer will show an error message saying that Admin By Request cannot be uninstalled during an active session. If the user tries to tamper policy keys, these are also snapshotted and restored after sessions.
Please refer to the Windows client technical details page for more information.
You can keep some domain users as local administrators.
Domain groups (except Domain Users) are not removed from the local administrator’s group. This means that if a domain user logs on and is member of a domain group that is in the local administrator’s group (for example a Help Desk domain group) the user is always local administrator. In this case the tray icon is red and hovering it, you can see the tool tip saying “You are logged on as administrator”. You can also specify specific user accounts to exclude in the portal settings.
To change this setting in the portal, go to Endpoint Privilege Management > Settings > Windows Settings > Lockdown > ADMIN RIGHTS, or refer to Admin Rights tab for more information.
Visit web page Download the Free Plan and register for a free plan (up to 25 endpoint devices and 10 server licenses). We will email you login credentials, which you can use to access the Admin Portal using the Login button at the top.
Once logged-in, click Download on the portal top menu and download an .msi file (Windows) or a .pkg file (macOS/Linux) to install on your computer endpoints.
After login, you can adjust any settings as you wish to see how they affect the privileges granted to end users. You can also view an audit log and a full software and hardware inventory of your clients. Finally, there is a mobile app, which is also free.
For more information, please refer to Getting Started in our Documentation Center.
To download and install the Admin By Request Windows endpoint client:
-
If you haven't already, login to the Admin By Requestportal.
-
In the portal, click the Download menu link to download the Windows endpoint client and store the .msi file in a suitable location:

-
Double-click the .msi file to start the installation and click Install when prompted.
You might be prompted for administrator credentials, depending on the endpoint's UAC configuration.
-
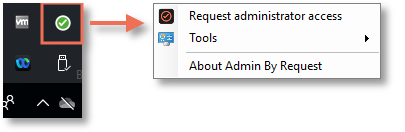
Click the icon to show details about the client or to start an Admin Session:
Depending on installation preferences, Admin By Request shortcut icons may also be placed on the desktop:
When the installation completes, the Admin By Request icon appears in the system tray in the bottom right corner of the screen. The icon is red if you are logged-on as an Administrator and green if you are logged-on as a Standard User. Refer to The Windows Client User Interface for a description of the differences.
Installation is now complete.
If your Macs are not auto-updating to the latest version of Admin By Request, check the currently installed version on your endpoints. There was an auto-update issue with macOS version 3.2.1 - any Macs running that version of ABR will need to be manually updated.
The problem has been fixed in later versions of Admin By Request for Mac.
Auto-Update deployment
Admin By Request software updates are deployed using our Auto-Update process. However, when we release a new version we do not deploy it right away to all customers via auto-update. This is simply to mitigate any unforeseen issues.
Admin By Request software updates to Linux endpoints are delivered via the distribution package update process. Please note that, when we release a new version, we do not make it immediately available to the update process. This is simply to mitigate any unforeseen issues.
Our rule-of-thumb for a new release is to
Contact us if you wish to receive the latest version right now. You can also raise a support ticket requesting the latest update.
Visit the Download Archive for previous versions of Admin By Request.
Admin By Request allows for quick pre-approval/blocking of trusted/untrusted applications from the Auditlog, based on the application vendor or checksum, visible when the Application Control screen is displayed (step 3 below).
Once an application has been installed on an endpoint with Admin By Request:
-
Log in to the portal and navigate to the application’s corresponding entry in the portal Auditlog.
-
Expand on the application entry, and select Pre-approve this file under Actions:

-
On the Application Control screen, modify any settings as required. For more information on pre-approval settings, refer to the Settings Table below.
-
Click Save verify that the app has been added to the list of pre-approved applications.
For example, the following applications are pre-approved:

Some Mac applications (e.g. Grammarly and Spotify) require wide-ranging permissions to install properly and can only be successfully installed via an Admin Session. Further, these applications almost always require the same wide-ranging permissions when they auto-upgrade, meaning that another Admin Session must be started before upgrading the app.
This is simply due to the nature of how processes work on the macOS operating system. When attempting to run an installation or upgrade via Run As Admin, a pop-up window prompting for admin credentials will be triggered by the OS whenever a separate executable that handles access to another area of the file system is invoked. At the time of writing, the only way around this is to carry out the installation or upgrade via an Admin Session.
You can find the error log under /var/log/adminbyrequest.log.
On a Mac, while logged-in as an Admin user, run the uninstall program /Library/adminbyrequest/uninstall.
The uninstall program requires admin privileges via sudo and cannot be run during a normal (i.e. Standard user) Admin By Request admin session.
Refer to Uninstalling Admin By Request for more information.
Visit web page Download the Free Plan and register for a free plan (up to 25 endpoint devices and 10 server licenses). We will email you login credentials, which you can use to access the Admin Portal using the Login button at the top.
Once logged-in, click Download on the portal top menu and download an .msi file (Windows) or a .pkg file (macOS/Linux) to install on your computer endpoints.
After login, you can adjust any settings as you wish to see how they affect the privileges granted to end users. You can also view an audit log and a full software and hardware inventory of your clients. Finally, there is a mobile app, which is also free.
For more information, please refer to Getting Started in our Documentation Center.
On a Mac, some packages (i.e. .app files) can be executed under Run As Admin by dragging them over the Admin By Request icon in the dock. However, Full Disk Access (FDA) must be enabled first.
To enable FDA, refer to Enable Full Disk Access (FDA).
For any .app file, initiate Run As Admin by dragging and dropping the application file over the Admin By Request Dock icon. At the account control pop-up, enter credentials and hit OK to run the installer as an administrator. Note that this works only for .app files; it does not work for .pkg files.
Immediately after installation of the ABR endpoint client, FDA must be checked to make sure that Admin By Request is enabled to fully protect Mac endpoints.
Admin By Request must be installed prior to enabling FDA, so that its apps and extensions appear in the list of apps available under Full Disk Access.
Refer to Enable Full Disk Access (FDA) for more information on enabling FDA.
If you log on to a Mac that is not joined to Active Directory and expect the user account to be downgraded from Admin to User, but it doesn’t happen and the icon appears red in the toolbar, you are most likely hitting the “Last Admin Check”.
You can confirm this by clicking the red icon. The intention of this check is to make sure you always have a service account. If you don’t have at least one admin account, you cannot change, modify or delete user accounts on the computer and you can never uninstall Admin By Request.
If you use the “Revoke admins rights” option in the portal to revoke user rights, all user accounts will be downgraded from Admin to User, when they log on. In the portal settings, you can specify user accounts that are excluded. These would typically be service accounts for a Help Desk or similar. If no excluded accounts are specified and the machine is not joined to Active Directory, the revoke will not be executed for the last administrator and it falls under the “Last Admin Check”.
Last Admin Check is no longer used - please refer to Portal Administration for Mac for more information.
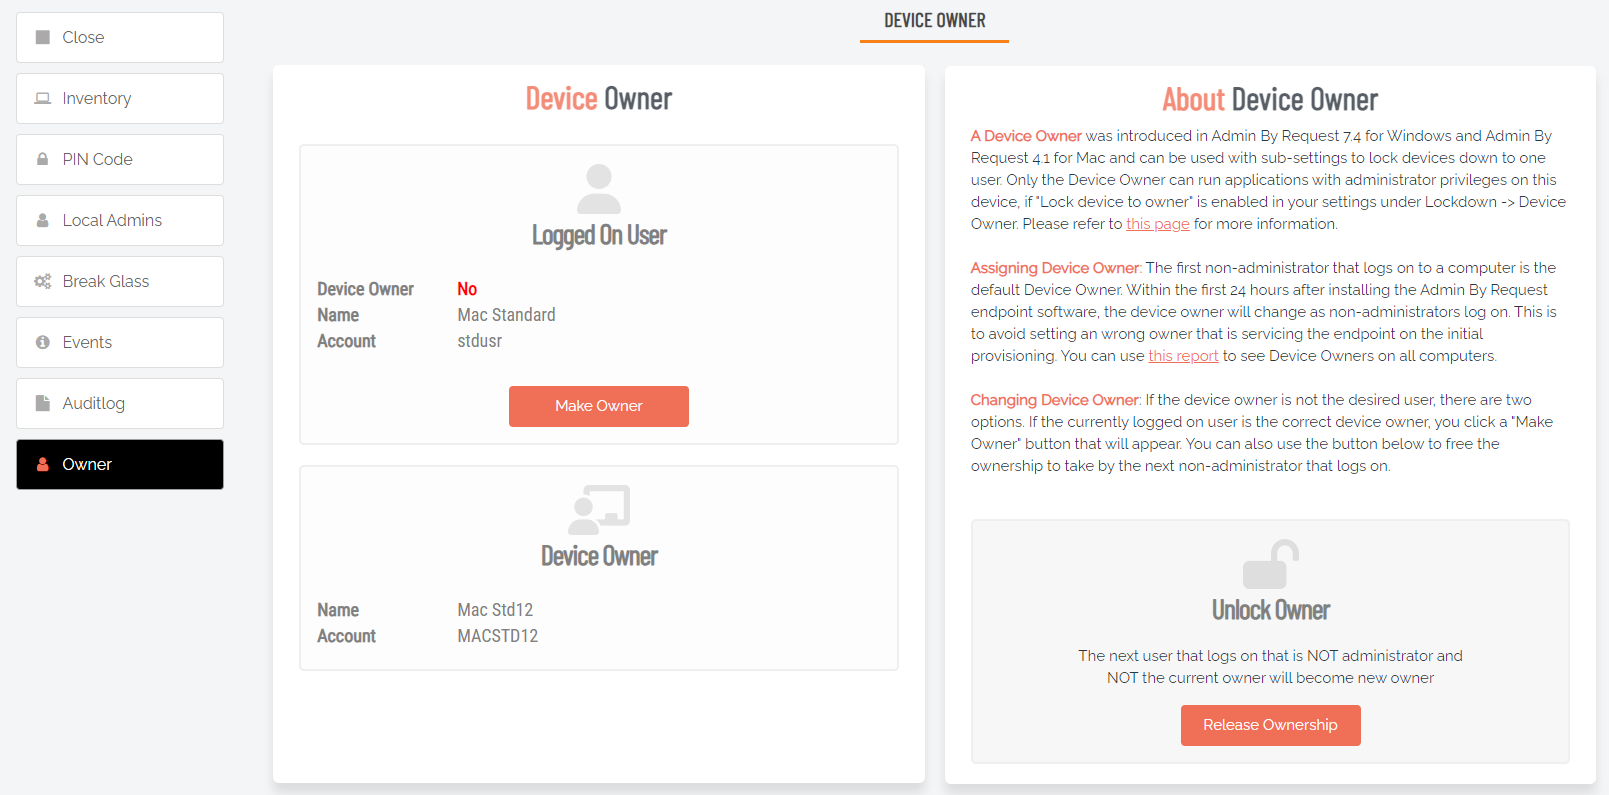
To make a Mac user the device owner:
-
In the portal, go to the Inventory top menu and locate the device.
-
Click either the computer name (in column Computer) or the Details link (in column Details) to show information for the device.
-
Select the left menu option Owner.
-
Click button Make Owner:
Following installation of the macOS 5.0 endpoint client, there are two apps that need full disk access:
-
adminbyrequest - The main app for enabling Admin By Request endpoint client features, including the ability to drag a file over the ABR icon in the dock to elevate privileges.
-
Admin By Request System Extension - The extension app enables a range of functionality, but the main feature for macOS 5.0 is the ability to install an app by dragging its icon over the Applications folder. This app requires macOS 11+.
Immediately after installation of the ABR endpoint client, FDA must be checked to make sure that Admin By Request is enabled to fully protect Mac endpoints.
Admin By Request must be installed prior to enabling FDA, so that its apps and extensions appear in the list of apps available under Full Disk Access.
The following procedures describe three ways to enable FDA:
These procedures are not sequential - pick one or a combination of all three, depending on your requirements.
-
 On the Mac - FDA
The procedure to enable FDA is slightly different for different macOS versions. The following steps describe how to enable FDA on endpoints running macOS 11 (Big Sur) and macOS 12 (Monterey), and then for endpoints running macOS 13 (Ventura) through macOS 26 (Tahoe).
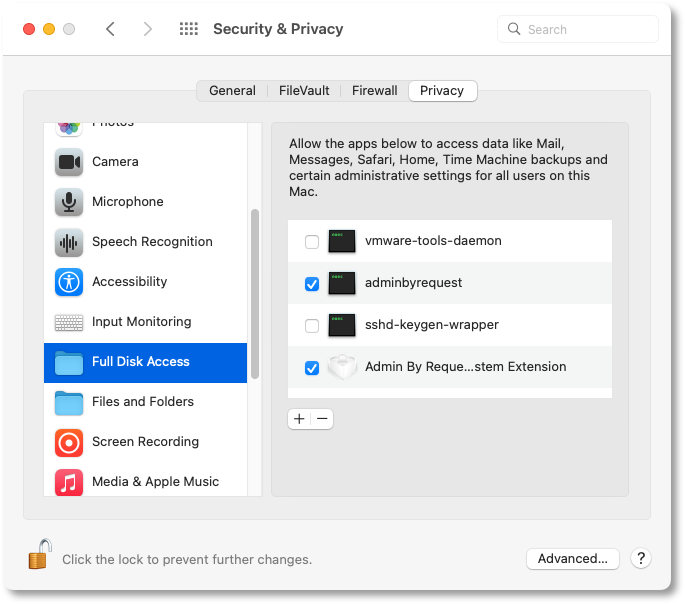
macOS 11 (Big Sur) and macOS 12 (Monterey)
-
On your Mac device, navigate to System Preferences > Security & Privacy > Privacy tab and select Full Disk Access from the list. You’ll need to supply your password to unlock and make changes.
-
Select both adminbyrequest and Admin By Request System Extension in the list of apps (i.e. ensure the boxes are checked):
-
Lock the tab to save changes and close the System Preferences window.
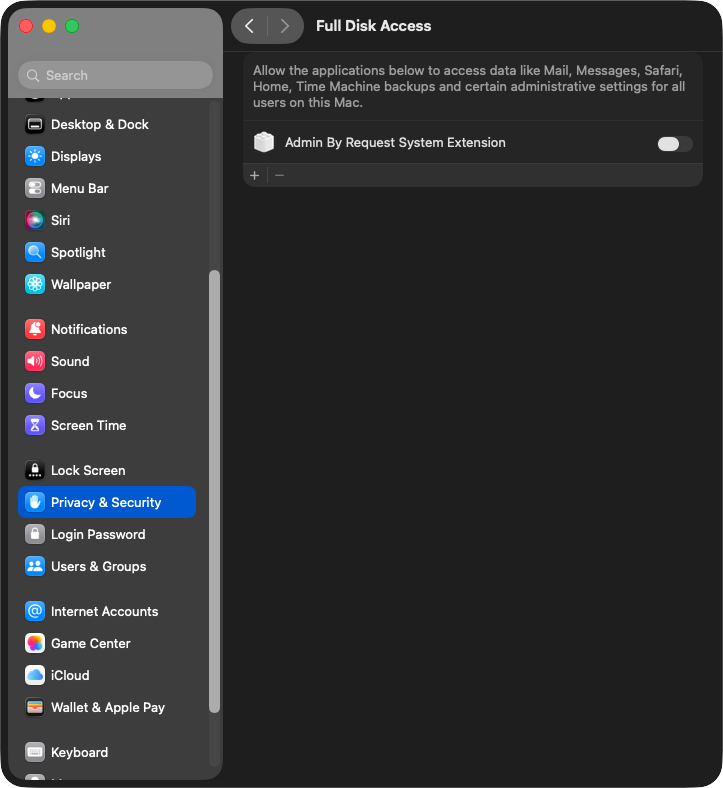
macOS 13 (Ventura) through macOS 26 (Tahoe)
-
On your Mac device, navigate to System Settings > Privacy & Security tab and select Full Disk Access from the list. You’ll need to supply your password to unlock and make changes.
-
Enable the Admin By Request System Extension:
-
Drag and drop the adminbyrequest executable from Finder into the Full Disk Access list in System Settings. Note that this step is not required in macOS 26.3 or above.
That completes the requirements for enabling both the Endpoint Privilege Management and Secure Remote Access components of Admin By Request.
-
-
Using Jamf - FDA
Admin By Request provides a set of configuration files to assist with configuration in Jamf. Download the set here and visit Creating and Uploading PLIST or .mobileconfig File for instructions on deployment.
Alternatively, follow the procedure below if you wish to build your own Jamf Configuration Profiles to manage Mac endpoints:
-
In Jamf, go to Computers > Configuration Profiles.
-
Create a new profile and configure it as follows:
-
Name: give the profile a name that helps explain what application it is giving rights to. In this example, we use ABR - PPPC.
-
Category, select Applications.
-
Distribution Method, select Install Automatically.
-
Level, select Computer Level.
-
-
Navigate from the General tab to the Privacy Preferences Policy Control tab:
-
Identifier, enter /Library/adminbyrequest/adminbyrequest.
-
Identifier Type, select Path.
-
For Code Requirement, enter the following line of code:
Copyidentifier "com.fasttracksoftware.adminbyrequest" and anchor apple generic and certificate 1[field.1.2.840.113635.100.6.2.6] /* exists */ and certificate leaf[field.1.2.840.113635.100.6.1.13] /* exists */ and certificate leaf[subject.OU] = AU2ALARPUPIMPORTANTThe code snippet is all one line. Use the Copy button in the top right corner of the code box to copy the code to the clipboard.
-
Under App or Service, select SystemPolicyAllFiles and under Access, select Allow:

Under App or Service, select Accessibility and under Access, select Allow.
-
Save the profile.
-
-
Deploy and use this profile to enable FDA for all your macOS endpoints.
-
-
Using Intune - FDA
Similar to Jamf, Intune uses Configuration Profiles to manage Mac endpoints:
-
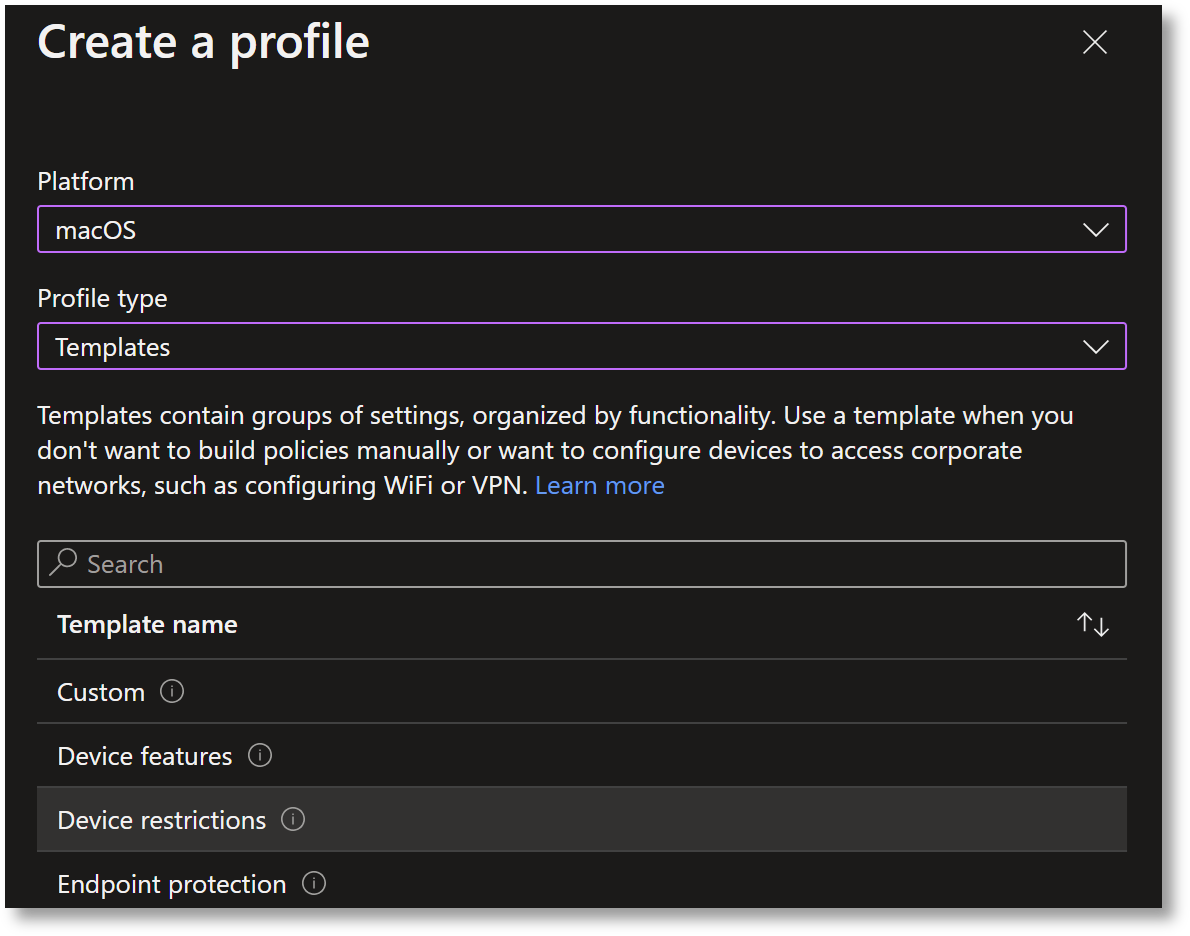
In Intune, under Configuration Profiles, select Create Profile.
-
Enter the following details into the Create a Profile form:
-
Platform: macOS
-
Profile type: Templates
-
Template name: ABR – FDA
-
-
Click Create.
-
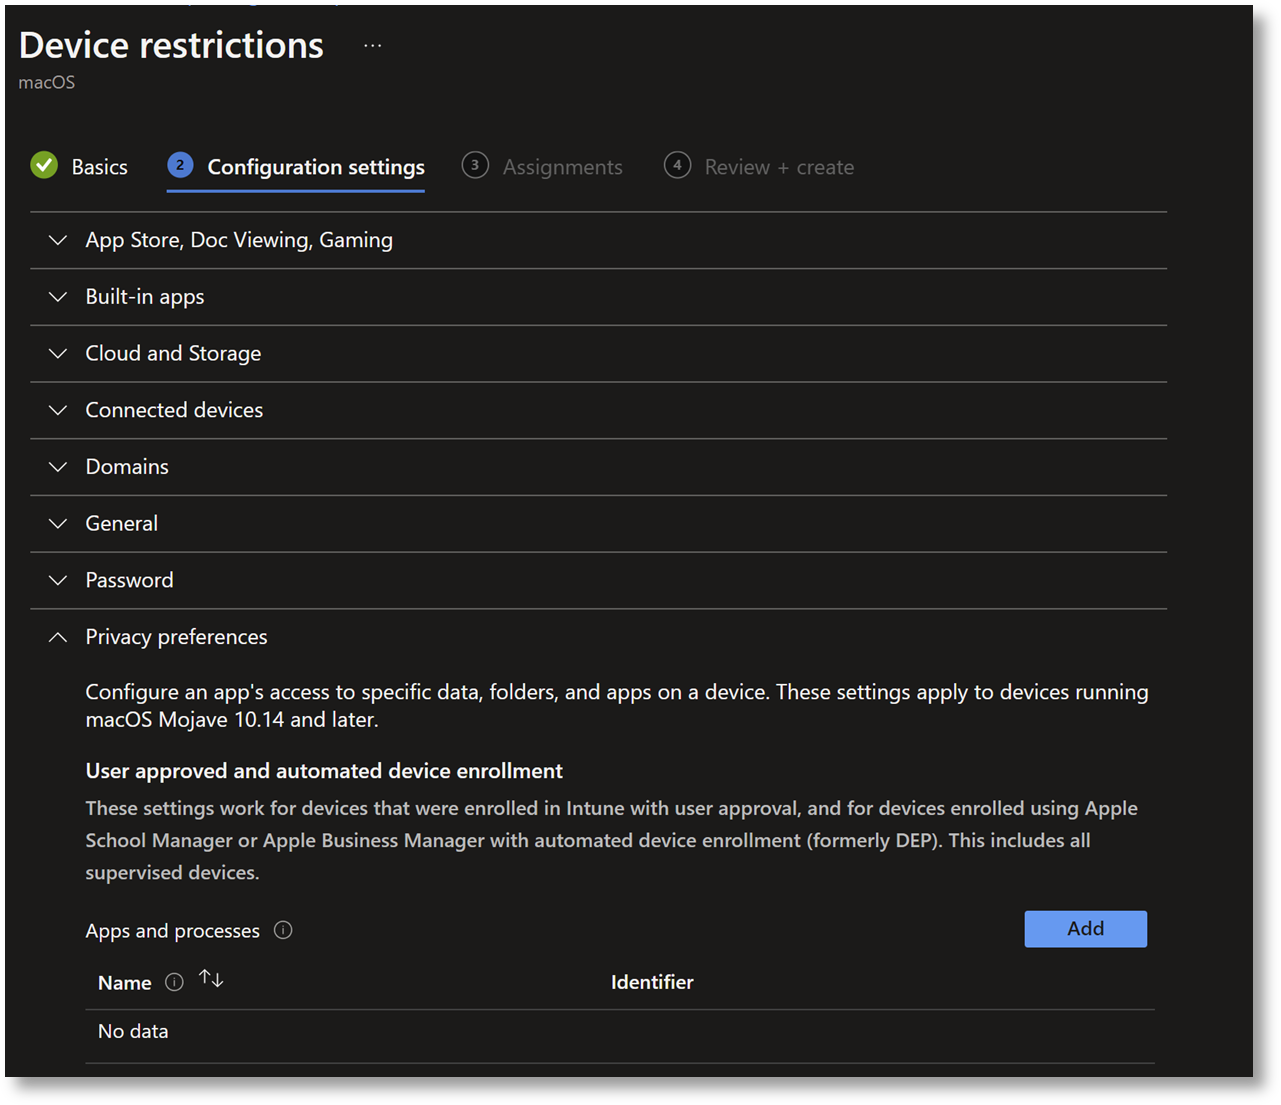
Under Device restrictions, go to Configuration settings.
-
Select Privacy preferences and click Add:
-
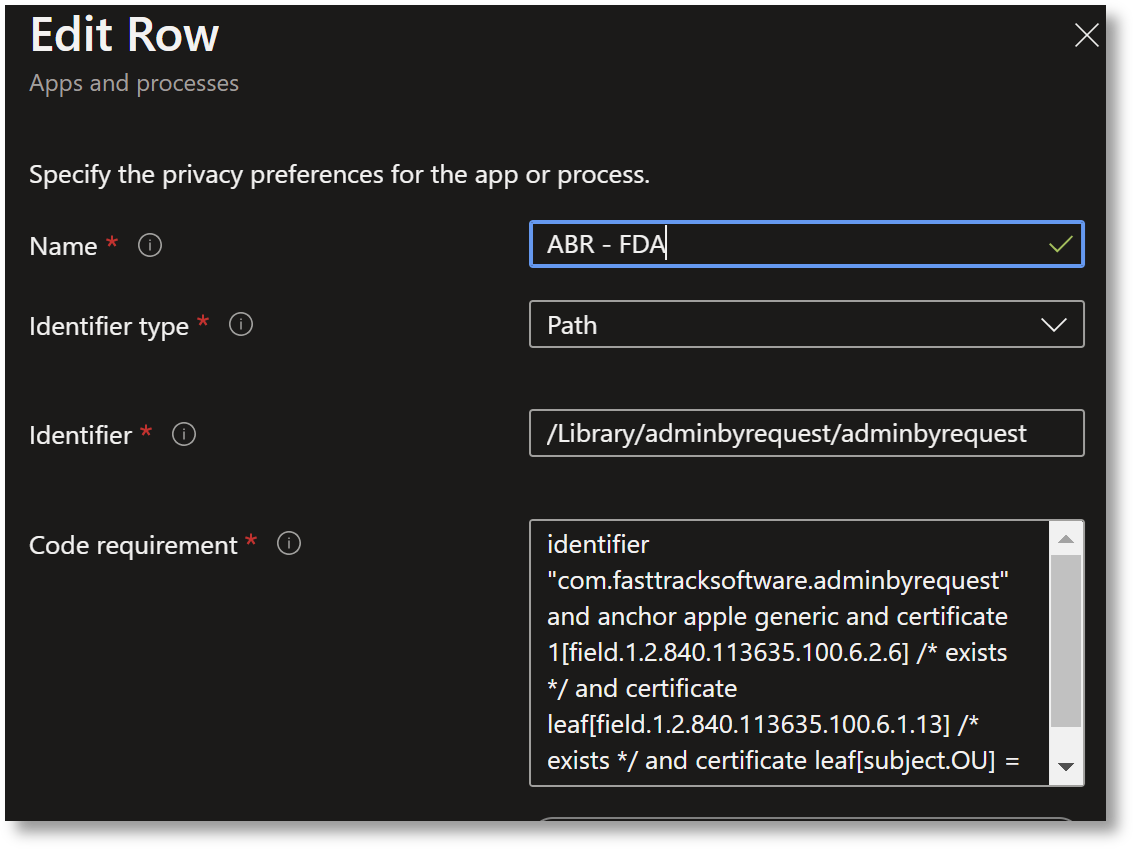
In the Edit Row form, enter the following:
-
Name: ABR – FDA
-
Identifier type: Path
-
Identifier: /Library/adminbyrequest/adminbyrequest
-
For Code Requirement, enter the following line of code:
Copyidentifier "com.fasttracksoftware.adminbyrequest" and anchor apple generic and certificate 1[field.1.2.840.113635.100.6.2.6] /* exists */ and certificate leaf[field.1.2.840.113635.100.6.1.13] /* exists */ and certificate leaf[subject.OU] = AU2ALARPUPIMPORTANTThe code snippet is all one line. Use the Copy button in the top right corner of the code box to copy the code to the clipboard.
-
-
Finally, select Allow in field Full disk access:

The completed form:
-
To download and install the Admin By Request macOS endpoint client:
-
If you haven't already, login to the Admin By Requestportal.
-
In the portal, click the Download menu link to download the Mac endpoint client and store the file in a suitable location:
-
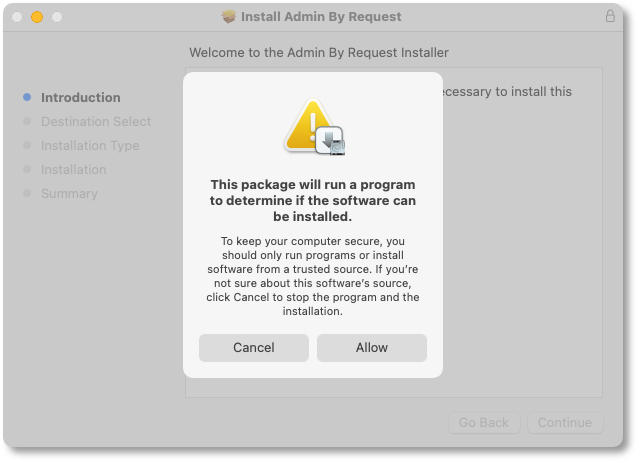
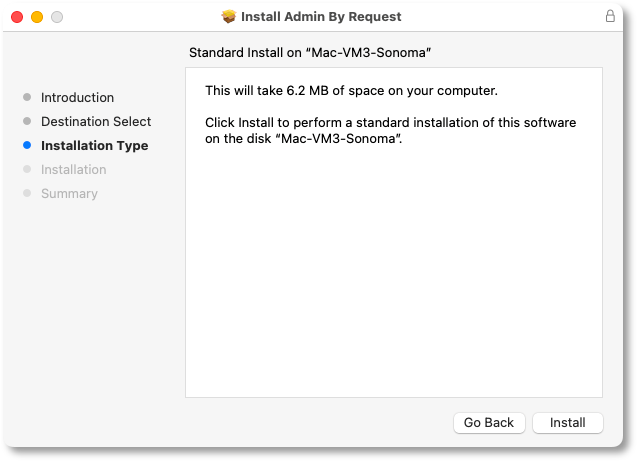
Click (or double-click) the downloaded package to begin the installation.
The package runs a check to determine if Admin By Request can be installed:
-
Allow and Continue with the installation, providing Administrator credentials if necessary:
-
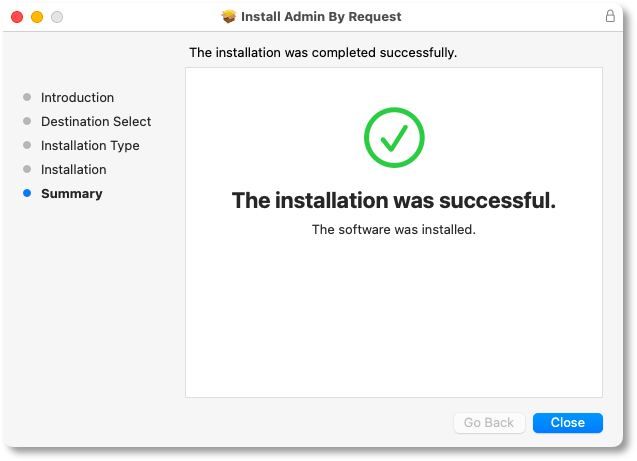
When done, close the installer and (optionally) move the installer package to the bin:
The user experience on first-time use
A number of things occur once Admin By Request is installed:
-
The Admin By Request icon will be red initially (indicating elevated rights), but it will then change color (to black or white) as admin rights are removed.
This occurs without needing a restart. An important consequence is that any operations requiring elevated privileges from now on need admin credentials, including responding to the Login Items & Extensions prompt coming up next (only a consideration for single endpoint installs - does not apply to MDM installations).
Also does not apply if local admin rights are not revoked or if the user installing is listed in the excluded accounts (see portal setting Endpoint Privilege Management > Settings > Mac Settings > Lockdown > ADMIN RIGHTS).
-
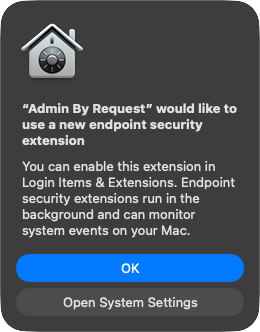
Several prompts appear, requesting authorization from the logged-in user.
The first of these is the endpoint security extension prompt. When this appears, click Open System Settings:
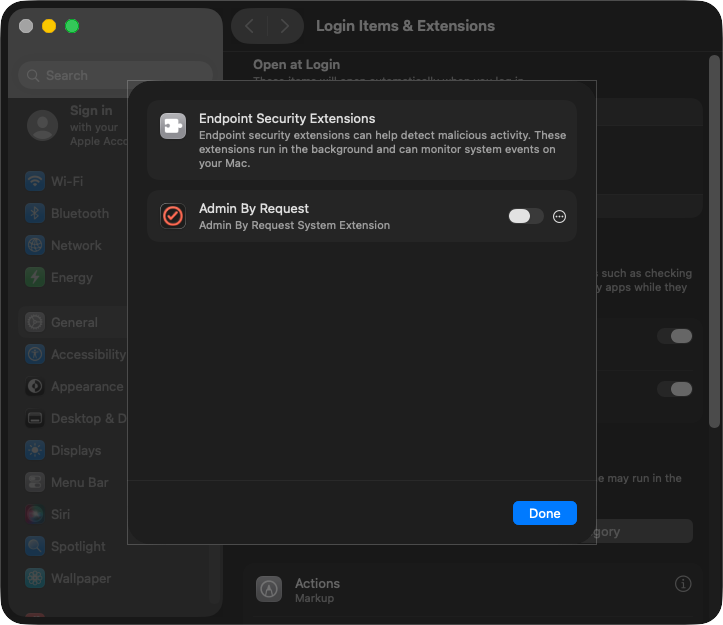
-
In Login Items & Extensions, enable the Admin By Request System Extension and click Done:
-
From Admin By Requestversion 5.2, if the endpoint is enrolled in Secure Remote Access (portal setting Settings > Product Enrollment > SECURE REMOTE ACCESS - see Product EnrollmentExample 2 for a scope example), an Accessibility Access prompt will appear:
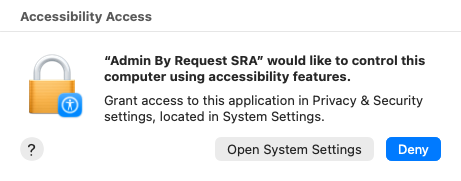
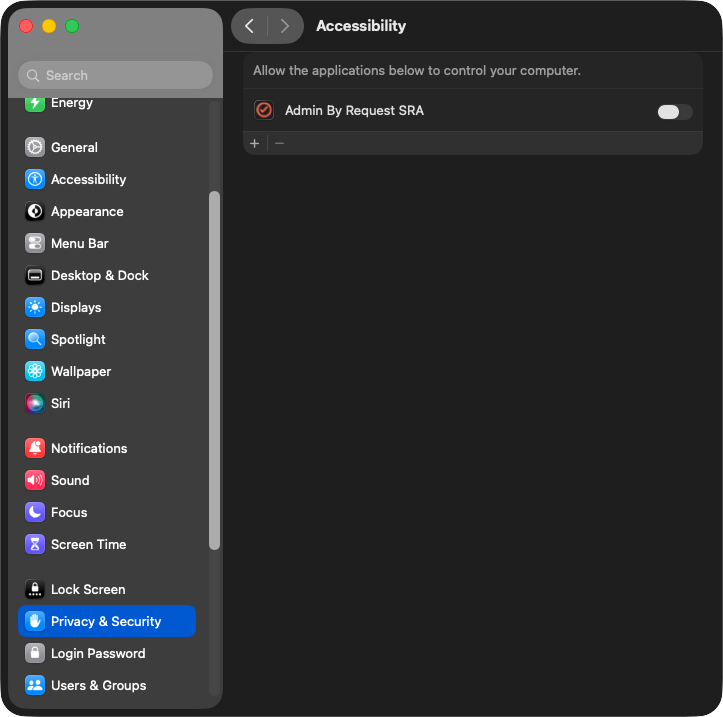
When this appears, click Open System Settings, go to Privacy & Security > Accessibility and enable Admin By Request SRA:
This is a first-use, one-time-only prompt raised by the macOS operating system that allows Admin By Request SRA to run on the endpoint.
NOTE
-
If installing Admin By Request via MDM and the endpoint is enrolled in Secure Remote Accessat the time of installation, this prompt will not appear.
-
If the endpoint is not enrolled in Secure Remote Access, this prompt will not appear. However, if the endpoint is enrolled at some point in the future, the prompt will appear the first time a user logs in after enrollment.
-
-
When the Screen Recording prompt appears, click Open System Settings:
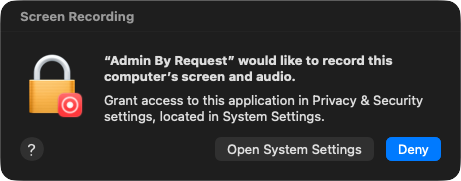
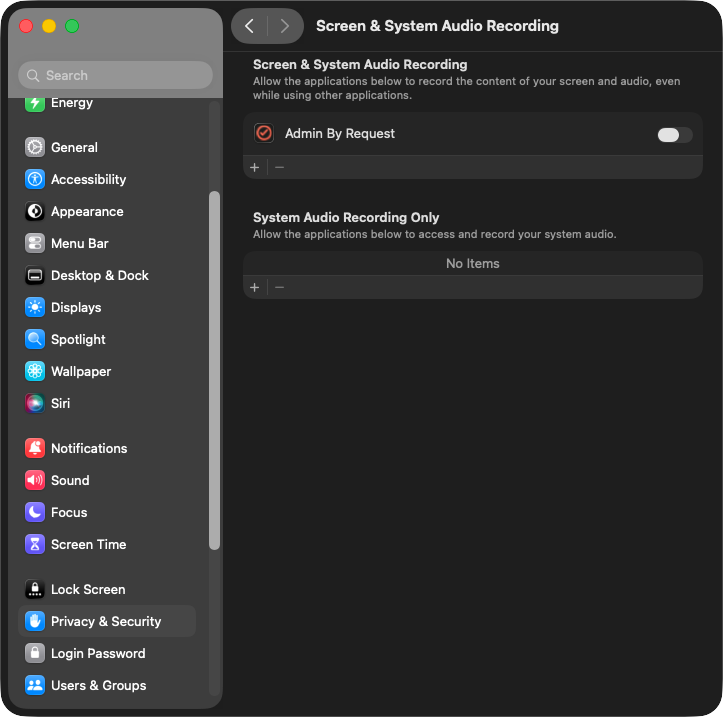
In Screen & System Audio Recording, enable Admin By Request:
-
Installation is now complete. Keep System Settings open and go to the next step, which is to ensure that Full Disk Access (FDA) is enabled for Admin By Request.
A standard user making this selection where approval is required initiates the following sequence of events.
-
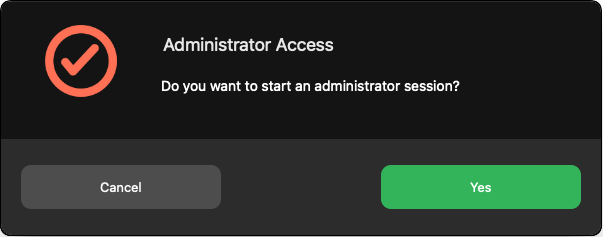
A prompt asks “Do you want to start an administrator session?”. The user clicks Yes to continue:
-
An empty Request Administrator Access form appears:
-
The user enters email, phone and reason information into the form and clicks OK.
NOTESettings in the portal control the full extent of what is displayed to the user:
-
If Code of Conduct is enabled, the user must acknowledge a Code of Conduct pop-up to continue (EPM > Settings > Windows Settings > Endpoint > INSTRUCTIONS).
-
If Require approval is OFF, the approval steps are skipped (EPM > Settings > Windows Settings > Authorization > AUTHORIZATION > Admin Session).
-
-
The request is submitted to the IT administration team and the user is advised accordingly:
-
The IT administration team is notified via the Admin By Request portal that a new request for administrator access has arrived.
The following example shows how two new requests might appear in the portal:
-
One of the team either approves or denies the request. If approved, the user is advised accordingly:
-
The user clicks Yes, which starts the session and displays a countdown timer:
-
The duration of an admin session is set via the portal (15 minutes in this example) and the countdown timer ticks down to zero, at which time the session ends. The user can optionally end the session at any time once it has started by clicking Finish.
On the Linux client, screen resolution scaling can make a difference to how fonts appear in the Admin By Request GUI. If the font appears distorted, large, compressed or with overlapping lines (or is simply unreadable), check the UI scaling percentage (Settings > Displays > Scale). If the value is greater than 100%, fonts in the GUI panels can appear distorted:

This will be fixed in a future release of the Linux client. Until then, the workaround is to reduce scaling to 100%. Note that functionality is unchanged - the client will still work as intended.
A standard user making this selection where approval is required initiates the following sequence of events.
-
An empty Request Administrator Access form appears:
-
The user enters email, phone and reason information into the form and clicks OK.
NOTESettings in the portal control the full extent of what is displayed to the user:
-
If Code of Conduct is enabled, the user must acknowledge a Code of Conduct pop-up to continue (EPM > Settings > Windows Settings > Endpoint > INSTRUCTIONS).
-
If Require approval is OFF, the approval steps are skipped (EPM > Settings > Windows Settings > Authorization > AUTHORIZATION > Admin Session).
-
-
The request is submitted to the IT administration team and the user is advised accordingly:
-
The IT administration team is notified via the Admin By Request portal that a new request for administrator access has arrived.
The following example shows how two new requests might appear in the portal:
-
One of the team either approves or denies the request. If approved, the user is advised accordingly:
-
The user clicks Yes, which starts the session and displays a countdown timer:

-
The duration of an admin session is set via the portal (5 minutes in this example) and the countdown timer ticks down to zero, at which time the session ends. The user can optionally end the session at any time once it has started by clicking Finish.
On Linux endpoints, clicking the countdown timer window enables an app menu with a single item:
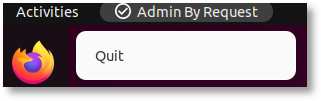
Selecting Quit does not end the admin session - it simply closes the countdown timer window. The admin session continues running (and counting down) in the background. If you click the ABR menu bar icon and select Request administrator access again, the countdown timer will reappear (unless it has expired, in which case you'll be prompted to start a new session).
Visit web page Download the Free Plan and register for a free plan (up to 25 endpoint devices and 10 server licenses). We will email you login credentials, which you can use to access the Admin Portal using the Login button at the top.
Once logged-in, click Download on the portal top menu and download an .msi file (Windows) or a .pkg file (macOS/Linux) to install on your computer endpoints.
After login, you can adjust any settings as you wish to see how they affect the privileges granted to end users. You can also view an audit log and a full software and hardware inventory of your clients. Finally, there is a mobile app, which is also free.
For more information, please refer to Getting Started in our Documentation Center.
The Linux command line interface requires the following:
-
The CLI commands are designed for the command line. If run inside a graphical interface's terminal window, certain commands will defer to the GUI version.
-
Using the CLI requires Admin By Request for Linux version 3.1.9 or greater.
Refer to Prerequisites for more information.
Use the following process to uninstall Linux from an endpoint. Note that you must know the root password for the endpoint:
-
Shutdown and reboot the computer.
-
Do one of the following:
-
If your computer boots using BIOS, press and hold down the Shift key while GRUB is loading.
-
If your computer boots using UEFI, press the Escape key (Esc) while GRUB is loading.
-
As you’re booting the computer, wait for the manufacturer logo to flash from the BIOS. If your computer boots too quickly, you’re going to need to do this immediately after powering it on. Quickly press the Escape key.
The timing has to be near perfect on some computers, so you may have to press the key repeatedly. If you miss the window, reboot and try again.
-
-
At the GRUB boot menu. you’ll see an entry for “Advanced Options ...”. Select it and press Enter.
-
Choose the most recent recovery mode option and press Enter.
-
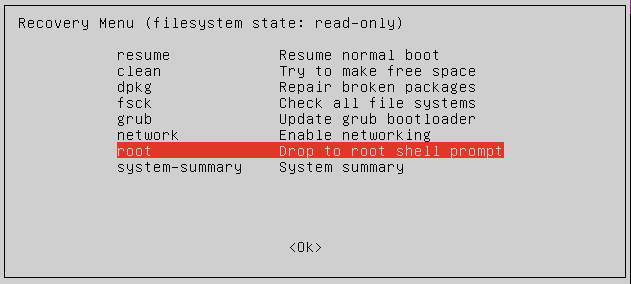
If a menu similar to that shown below appears, choose the option that gets you to a shell prompt:
-
At the Password: prompt, enter the root password..
-
Now you can uninstall Admin By Request for Linux by executing the following command:
The most likely reason the Linux client fails to install is because the system has broken dependencies from earlier failed installations.
The first thing the Admin By Request Linux installer script does is run update + upgrade, to make sure the system is fully (and successfully) up-to-date. If anything fails during that process, then ABR will not install correctly. Check the system logs and resolve any outstanding failed installations before continuing with ABR install.
sudo is supported on both Mac and Linux endpoints - this is controlled in the portal.
To enable sudo support for macOS, go to Endpoint Privilege Management > Settings > Mac Settings > Lockdown > ADMIN SESSION and make sure Allow sudo terminal commands is ON.
To enable sudo support for Linux, go to Endpoint Privilege Management > Settings > Linux Settings > Lockdown > SUDO and make sure Allow sudo terminal commands is ON. You can then further control non-sudoers and sudo interactive sessions.
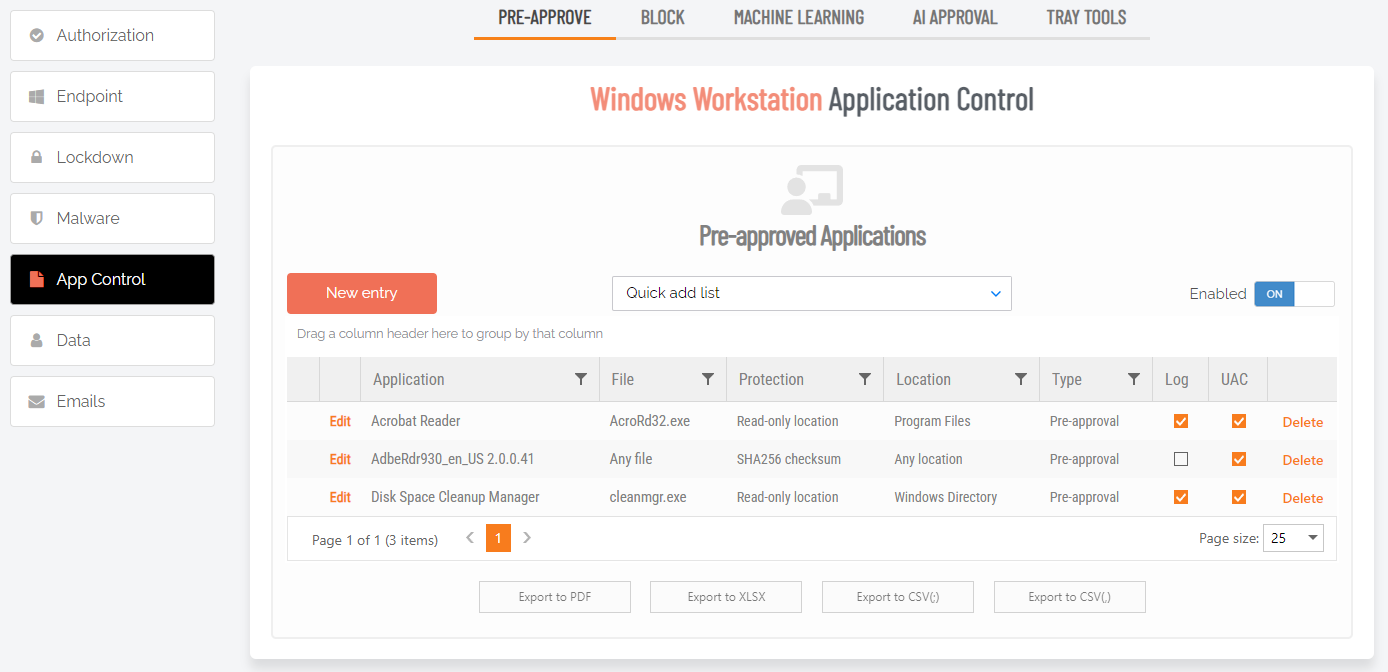
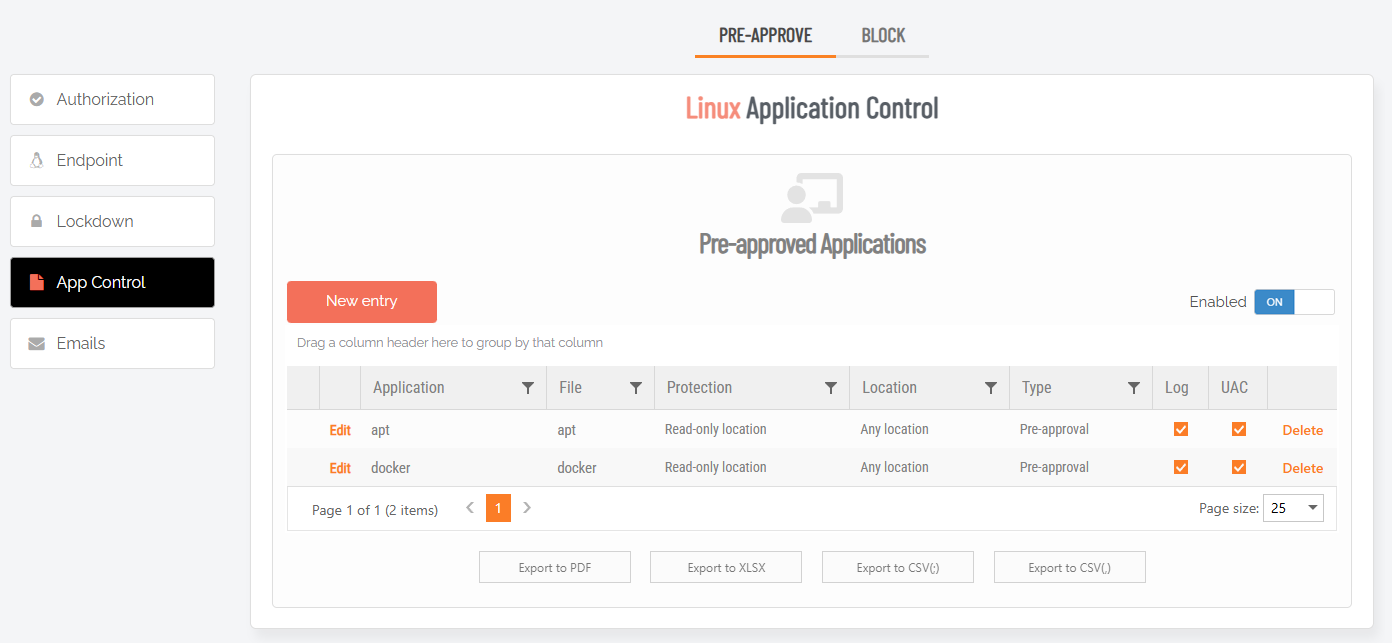
The portal is regularly updated as new features are introduced to Admin By Request. During one such update, what was Applications was renamed App Control and moved to Settings > Linux Settings > App Control, as indicated in the screenshot:
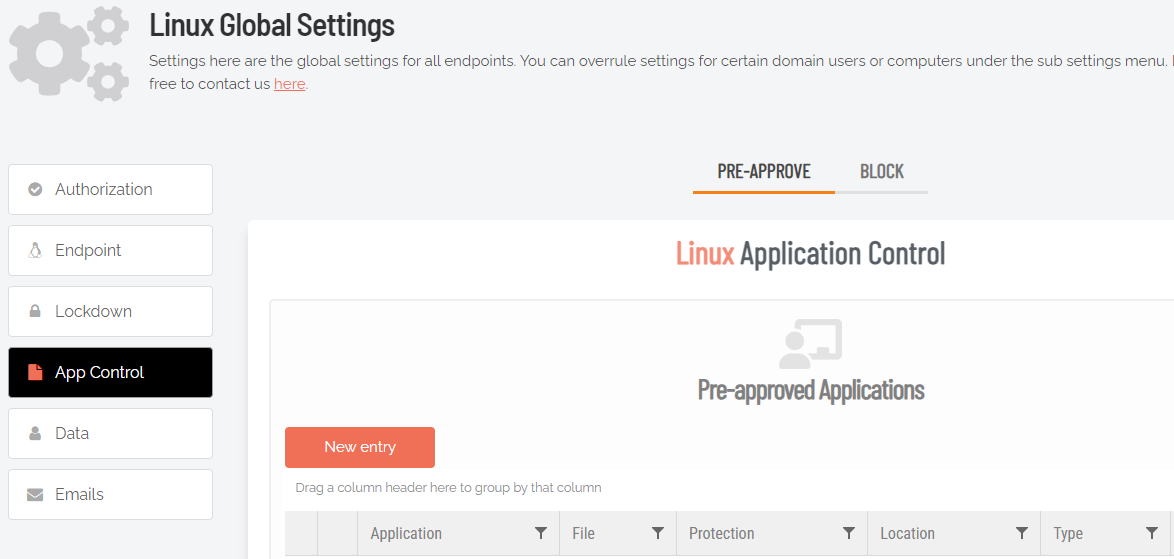
From here, you can PRE-APPROVE or BLOCK applications by clicking New entry and providing the relevant details.
The Linux installation file is a script made in Python. It's a text file - you can open it with Window's Notepad to see its content.
Due to the name of the file ending with ".0", Windows sees this file as a ".0" file type, contra a Linux file system, which simply sees it as a normal data file.
To download and install the Admin By Request Linux endpoint client:
-
If you haven't already, login to the Admin By Requestportal.
-
In the portal, click the Download menu link to download the Linux endpoint client and store the file in a suitable location:
-
Make a note of the installer file name - needed in the next steps.
-
If you haven’t already, start a terminal session and make sure the file is executable:
Copychmod +x abr-installer* -
Run the installation script:
Copysudo ./abr-installer\ 4.0.0 -
When the installation completes, the Admin By Request icon appears in the top right corner of the screen. Click the icon to show details about the client or start an Admin Session.
Portal
- Settings
- Remote Access
- Connectivity
There are buttons on several portal pages that allow you to export data in different formats from the Inventory. Refer to Exporting Portal Data for more information.
Unexpected computers can appear in the portal inventory for the following reasons:
-
Cause – security tool sandboxing: Endpoint protection products such as EDR/AV, VPN clients or next‑generation firewalls often download and “explode” (install) the ABR MSI in a virtual sandbox to analyze its behavior. Because the ABR installer embeds its licence, the security software completes the install and registers the sandbox in the portal without requiring manual license entry.
-
Common: This behavior is widespread among major security vendors; new sandboxes continue to emerge despite our ongoing efforts to detect and mitigate them.
-
Typical indicators: These phantom entries frequently report old operating systems (e.g., Windows 7/10), generic hostnames and minimal system activity.
-
Past vs present: In the past, the device’s IP address could be traced back to the security tool vendor, but many modern sandboxes route their traffic through Tor or other anonymizing networks, making the source IP less useful.
-
Remediation: If you see an unknown device with these traits, it’s usually safe to delete it from your inventory. Removing these entries does not impact your real endpoints.
Refer to Unexpected Inventory Computers for more information.
There are a number of ways to check if an unknown computer in the inventory is a sandboxed machine:
-
Check operating‑system details: Sandboxes often use outdated OS images like Windows 7 or early builds of Windows 10; they lack your organization’s naming standards or endpoint management tools.
-
Look for virtual‑machine artefacts: Virtualization platforms leave tell‑tale signs. Examples include:
-
MAC address prefixes – VMware adapters typically start with
00:1C:14,00:50:56,00:05:69or00:0C:29; VirtualBox uses08:00:27and Hyper‑V uses00:03:FF. Physical NICs from vendors like HP, Dell, Broadcom and Nvidia start with different prefixes.Refer to MAC Address Vendors - Data Feed to look-up detailed information on physical NICs used in your environment.
-
Virtualisation registry keys/processes – Windows VMs often contain registry keys or services named after VMware or VirtualBox (e.g.
VMTools,VBoxService,VBoxTray.exe). Their presence strongly suggests the machine is running in a virtual environment. -
Unusual CPU/memory profiles – Sandboxes may have very few CPU cores, small memory or tiny disk sizes. MITRE ATT&CK notes that adversaries use system‑information checks (via WMI/PowerShell) to look for VM artefacts such as network adapter addresses, CPU core count and available memory/drive size; you can use the same checks to identify sandboxes.
-
-
Hostnames and file locations: Temporary machines may have generic hostnames (e.g. WIN7X64, VMware) or save the installer in paths containing names like sample, malware or long hash strings.
-
Assess user activity: Real endpoints show file changes, backups and user logins; a sandbox often shows no user activity. Malware‑analysis sandboxes also avoid common user actions like scrolling or mouse clicks.
-
Observe network behavior: Sandboxes frequently communicate from data center IP ranges or Tor exit nodes. They may contact the portal once during installation and never check in again.
-
Hardware/BIOS identifiers: CPUs in virtual machines often identify themselves as “VMware...” or “Microsoft HV”. The CPUID instruction can reveal this: bit 31 of the ECX register is 1 on a VM and 0 on physical hardware.
Refer to Malware Evasion Techniques Part 2: Anti-VM for detailed information on certain malware evasion techniques.
-
Automated heuristics: Using the ABR API, consider building automation into portal lists to flag devices that match multiple sandbox characteristics (e.g. old OS, VM MAC prefixes, generic hostnames, no backups etc.).
Refer to Unexpected Inventory Computers for more information.
Admin By Request has an Auto Update feature that can be configured in the portal at Settings > Tenant Settings > Auto-Update > WINDOWS WORKSTATION (also available for Mac, Linux and Windows Server).
However, for large numbers of clients, there are times when it's better to use your organization’s enterprise management suite: SCCM, Intune, Jamf etc. Please refer to Updating Client Software for Large Enterprises for more information.
A user's Admin Session runs until it expires, or until the user ends it locally via the Finish button. Sessions cannot be ended remotely.
The 60-day device inactivity period cannot be modified, but, for licensed users, you can delete endpoints manually through the Inventory or with the Inventory API and this way make the period shorter.
Unlicensed (i.e. free plan) users must wait for 60 days before licenses are released.
If the device comes back online with ABR still installed, it will reappear in the inventory and the 60-day inactivity period will reset.
The inventory refreshes every four hours when the endpoint is online.
To find all occurrences of PIN code use, use the Reports menu:
-
In the portal, go to Reports > Endpoint Reports > Events.
-
Make sure you're on tab ALL EVENTS, then click the filter icon on column Event.
-
Expand the box width if necessary and scroll until you find PIN code entries.
PIN Code entries have event names such as:
-
Admin Session PIN 2 issued
-
Admin Session PIN code used
-
Application block PIN 2 issued
-
-
Select the required event - only matching events will now appear in the list.
Once the list is filtered, the browser window shrinks to show only the matching events. To view the full list of events again, click the filter icon once more and choose (All) at the very top of the filter list.
You can set the Auditlog retention policy in Settings > Tenant Settings > Data > RETENTION. The range is from three months to five years and the standard period (i.e. the default) is one year.
AI Approval allows our AI scoring system to auto-approve trivial Run As Admin requests for common applications.
At the time of writing, our app database comprises more than 12 million known applications. Each of these is scored by our AI engine in real-time based on popularity, reputation and trends. If, for example, the App score is enabled at 20, it means that any request is auto-approved if the App score is 20 or above.
Refer to AI Approval for more information.
Data Privacy Settings have moved to Tenant Settings (Settings > Tenant Settings > Data > PRIVACY).
Refer to Data Privacy for more information.
By design, SCIM-provisioned users cannot be edited once they have been created.
SCIM-provisioned users can only authenticate using Office 365 or OKTA, as these are the only two currently supported methods for SCIM. With that in mind, best practice is to decide which authentication method to use during SCIM setup as this cannot be changed later.
A later product version may allow additional authentication methods for SCIM-provisioned users (e.g. ADFS). At present, if portal users need to use ADFS, their accounts need to be created manually.
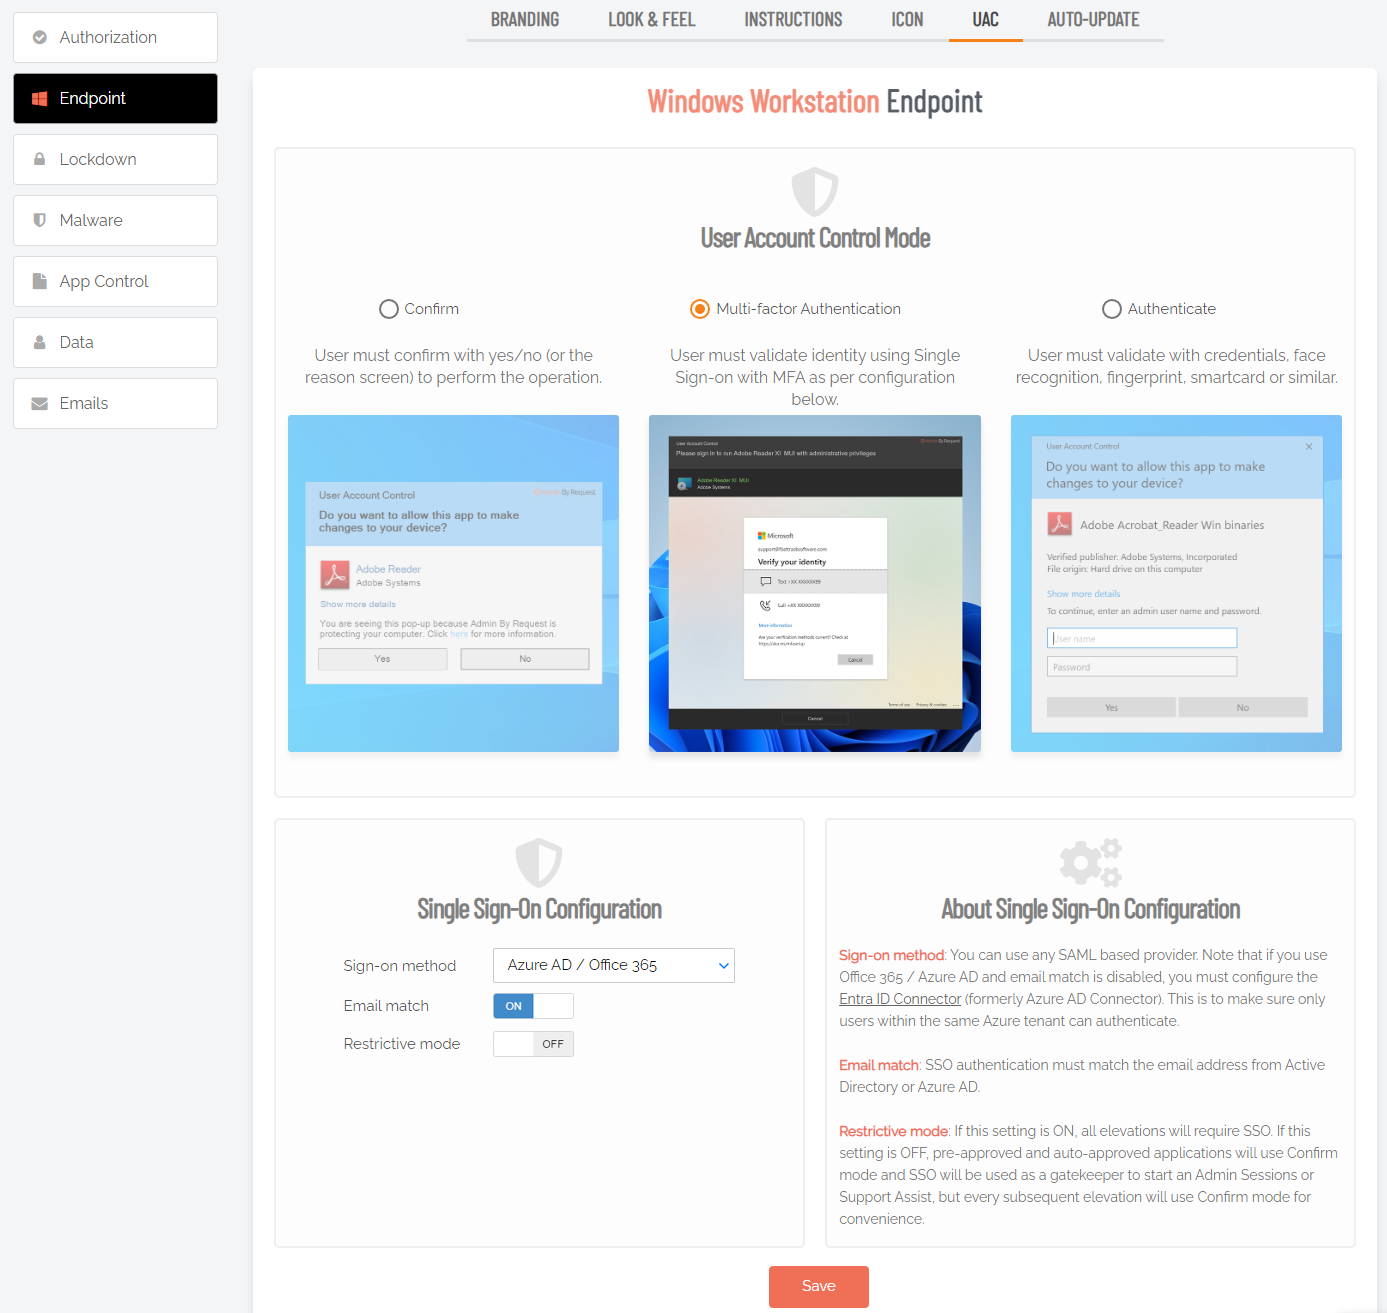
Users can have email addresses that are different from their user accounts. This is to prevent the error message that can occur when requests for elevation are approved: "Single Sign-on Error: Email addresses do not match".
To configure this in the portal:
-
Go to Settings > Workstation Settings > Windows Settings and select the Endpoint left menu.
-
Select the UAC tab and the Multi-factor Authentication option:
-
Set Email match to Off and click Save.
For best results, you should add the logo in the portal before turning on Use logo file and before downloading or otherwise deploying the msi installation file. Doing so makes sure your logo is included correctly.
Refer to Branding tab under Windows Settings for more information.
A "product view" is the information displayed in the portal for that product.
The portal customizes the information displayed depending on the product selected. The information available for display across all menus (Summary, Auditlog, Requests, Inventory etc.) is called the "view" for that product:
-
The menu selection Endpoint Privilege Management shows the product view for managing local admin rights on your endpoint clients.
-
The menu selection Secure Remote Access shows the product view for managing your endpoints that can be remotely accessed.
To change your password in the portal, click the User Account drop-down in the header on any page.
Refer to Header parts for more information.
By default, endpoint clients synchronize with the portal approximately every four hours. If an immediate sync is needed on a particular client, you can achieve this by opening Admin By Request from the tray tool (Windows) or menu bar (macOS and Linux) and selecting About Admin By Request.
At the same time, you should verify that connectivity is OK by clicking the Connectivity button.
Refer to Synchronizing Clients with the Portal for more information, or if you are having problems with synchronization.
Yes. You can set a scope for portal logins to only see and approve part of the data based on the end user or computers groups or Organizational Units.
For example, an administrator in a region could be set up to only see and approve requests and data from computers in his/her own scope, assuming for example that all computers are in a specific Organizational Unit.
Refer to Logins for more information.
Yes. In the portal, you can create additional logins for more people. You can also define which roles they have, such as read-only view, whether or not they can edit settings, access to the audit log and if the person is allowed to approve requests.
In the portal, go to Logins > User Logins > New user.
Refer to Logins for more information.
Admin By Request allows for quick pre-approval/blocking of trusted/untrusted applications from the Auditlog, based on the application vendor or checksum, visible when the Application Control screen is displayed (step 3 below).
At the time of writing, pre-approval/blocking from the Auditlog is not available for Linux clients.
Once an application has been installed on an endpoint with Admin By Request:
-
Log in to the portal and navigate to the application’s corresponding entry in the portal Auditlog.
-
Expand on the application entry, and select Pre-approve this file under Actions:
-
On the Application Control screen, modify any settings as required. For more information on pre-approval settings, refer to the Settings Table below.
-
Click Save verify that the app has been added to the list of pre-approved applications.
For example, the following applications are pre-approved:
Turning off everything effectively means giving users back their local admin rights. Think about this carefully before doing it.
To turn off everything except logging actions to the Auditlog, you need to:
-
Authorization: turn On Allow Run As Admin and turn Off all other toggles
-
Authorization: turn On Allow Admin Sessions and turn Off all other toggles.
-
Authorization: make the Access time (minutes) a large number that covers most of the day. For example, 480 minutes (8 hours).
-
Lockdown: turn Off Revoke admin rights.
For more information, refer to Authorization tab under Windows Settings.
You can also check out the WHIZ usage persona for a 10-minute video on how to accommodate developers or power users.
You do not need to approve each time a user wants admin access. You can use a setting after sign-in to allow elevation without approval. In this case, you still get the benefits of auditing; who elevated, when, and an auditlog of installed software and executed applications.
In auto-approval mode, you can (and should) require the user to document a reason for administrator elevation, which you can later use to cross-reference actual activity. You can (and should) also enable the Code of Conduct message/screen that will appear just before the session starts. The Code of Conduct is a screen/message that is used to inform the end user of company policy and penalties for abusing administrator elevation.
Change this setting in the portal at Settings > [OS] Settings > Authorization > AUTHORIZATION.
By default, endpoint clients synchronize with the portal approximately every four hours. If an immediate sync is needed on a particular client, you can achieve this by opening Admin By Request from the tray tool (Windows) or menu bar (macOS and Linux) and selecting About Admin By Request.
At the same time, you should verify that connectivity is OK by clicking the Connectivity button.
Refer to Synchronizing Clients with the Portal for more information, or if you are having problems with synchronization.
You can add your company logo to both the portal and the dialog boxes that users see on their endpoints. The setting is in the portal at Endpoint Privilege Management > Settings > Windows Settings > Endpoint > BRANDING.
Refer to Branding tab under Windows Settings for more information.
Yes.
The most typical pattern we see for new customers is that they start with approval required. Then after an initial period, when the psychological effects on end users are clear and there is reassurance end users do not violate rules, they shift to auto-approval mode combined with reason requirement and Code of Conduct screen.
This is the point where the whole administrator access issue is truly solved, because now the system and administrator access rests with end users without any administration work on the server side.
Code of Conduct screen
You do not need to approve each time a user wants admin access. You can use a setting after sign-in to allow elevation without approval. In this case, you still get the benefits of auditing; who elevated, when, and an auditlog of installed software and executed applications.
In auto-approval mode, you can (and should) require the user to document a reason for administrator elevation, which you can later use to cross-reference actual activity. You can (and should) also enable the Code of Conduct message/screen that will appear just before the session starts. The Code of Conduct is a screen/message that is used to inform the end user of company policy and penalties for abusing administrator elevation.
Change this setting in the portal at Settings > [OS] Settings > Authorization > AUTHORIZATION.
You can set a scope for portal logins to only see part of the data based on the end users or computers groups and/or Organizational Units.
For example, sales managers can be set up to only see users and computers in sales. They will then only get approval requests from their own staff. You can also set up a manager to not have approval ability, but only the ability to see the auditlog for his/her own staff.
You can create a portal user account that can see only the auditlog and, optionally, the inventory. No other data will be visible.
To give a user a limited view within the portal, you simply create a user account that cannot approve requests. This way, your customer can see the data you choose without the ability to approve requests.
If you have on-premise remote gateways configured, you can also remove access to the portal entirely by limiting user access to those computers accessible via the relevant gateway. This is controlled in the admin portal under setting Logins > User Logins, EDIT or New user, tab ACCOUNT, heading Rights, field Limit to access.work.
If you don't see field Limit to access.work, you have not yet configured an on-premise gateway.
Clicking the drill-down link opens an inventory-style list of all devices accessible via this gateway. Devices can be entered manually or they can be discovered.
Devices can be ACTIVE or INACTIVE and are displayed in the corresponding tab:
-
ACTIVE: able to be connected to via Unattended Access and consume a license.
-
INACTIVE: are not able to be connected via Unattended Access and do not consume a license.
Use the Disable/Enable links to make a device active/inactive respectively.
Use the Search button to search for devices in large lists and the Export buttons to export data in the format shown.
Refer to Devices (n) for more information.
Remote Support is part of the Secure Remote Access product by Admin By Request, that allows you to share screens and remotely control devices inside of your Admin By Request inventory, while using all of the well-known features of the Admin By Request ecosystem, such as: inventory, auditlog, settings and sub-settings, approval flows etc.
Remote Support allows either end users or IT admins to initiate a secure, just-in-time, remote support session – allowing them to share and control the end-user's device – and tear everything down once the session is done – eliminating any access points for bad actors.
This document covers getting started with Product Enrollment and Remote Support. It also describes key settings that can be administered from the portal.
Refer to Remote Support Overview for more information.
Remote Support is based on the same gateway concept as the Unattended Access gateway, which is also part of the Admin By RequestSecure Remote Access product. It allows a just-in-time setup between the gateway and the endpoint by establishing a secure Cloudflare tunnel.
Once the tunnel is established, a just-in-time server session is created on the endpoint – allowing for screen sharing and remote control via the browser.
Once the session is terminated or expires, the tunnel and the server session are terminated, leaving the endpoint in the same state as before the remote support session.
The setup is fully cloud-based and does not require any on-premise setup besides what’s mentioned in the prerequisites:

Refer to How does Remote Support work? for more information.
A self-hosted implementation means that you run Unattended Access on-premise inside your own infrastructure, including the ability to run Docker containers. To establish a secure tunnel, your infrastructure must also allow outbound connections to Cloudflare.
Refer to How do I setup a Self-hosted Implementation? for more information.
A managed service is a way of operating Unattended Access so that your infrastructure allows an outbound connection to establish a secure tunnel from your respective endpoints and that these have the Admin By Request endpoint client installed.
Refer to How do I setup a Managed Service? for more information.
Before trying to remotely access a device, make sure all setup has been done and the gateway to your device is "live". Refer to Getting Started with Unattended Access for more information on prerequisites and setting up gateways.
To remotely access a device:
In order to allow Admin By Request to connect to your endpoints, they need to allow traffic on the following ports:
-
RDP - 3389 (Windows only)
-
SSH - 22
-
VNC - 5900 and 5901
Connecting to a server
-
From the portal, head over to your Inventory and make sure you're in the Secure Remote Access view. Select an endpoint which is enrolled for Secure Remote Access:
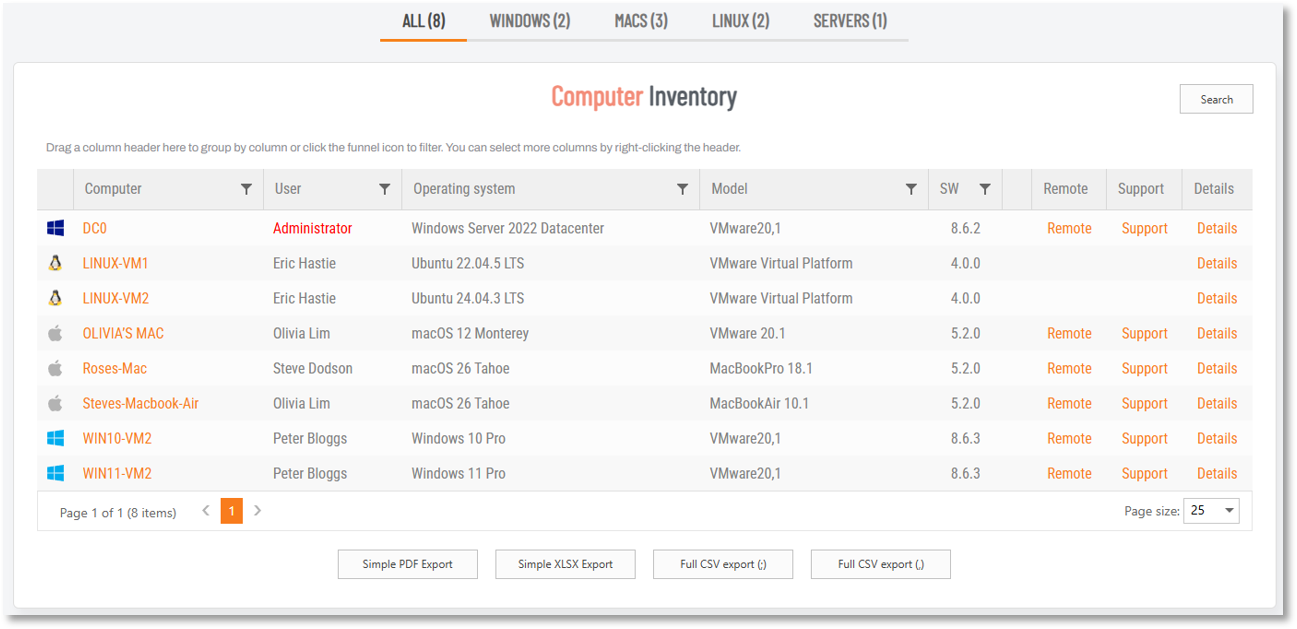
-
Click the Remote link for this endpoint, enter User name and Password and click Connect:
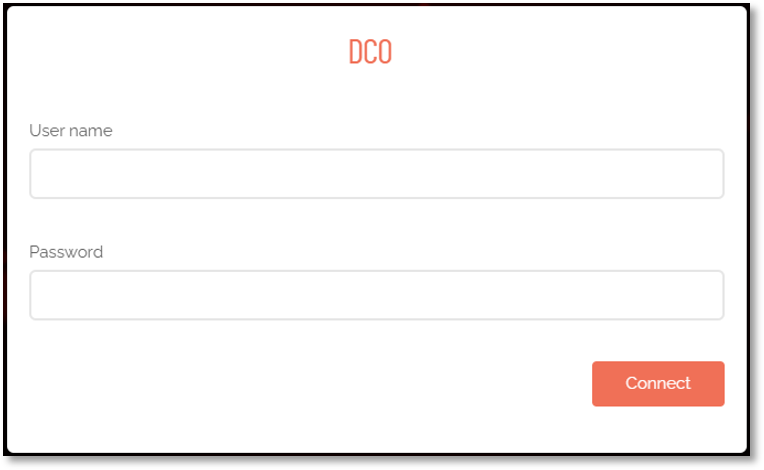
After a few seconds, the connection appears directly in your browser.
The CLOUD tab becomes visible only when an on-premise gateway is created. If no on-premise gateway has been created, the CLOUD tab is not available and Unattended Access uses the managed service option, which is enabled by default and requires no configuration.
Creating an on-premise gateway means the cloud gateway must be disabled (see How do I setup a Self-hosted Implementation?), which is why the CLOUD tab becomes visible when a gateway is created.
Vendor Access, also known as access.work (https://access.work), is a feature of Secure Remote Access that allows users to connect to devices through their browsers without needing access to the Admin By Request Portal.
Refer to Using Vendor Access for more information.
Via the portal:
-
To enable Unattended Access, log in to the Admin By Request portal and head over to Secure Remote Access > Settings > Unattended Access Settings.
-
Select Authorization in the left menu and, from the AUTHORIZATION tab, ensure that Allow Unattended Access is turned On:
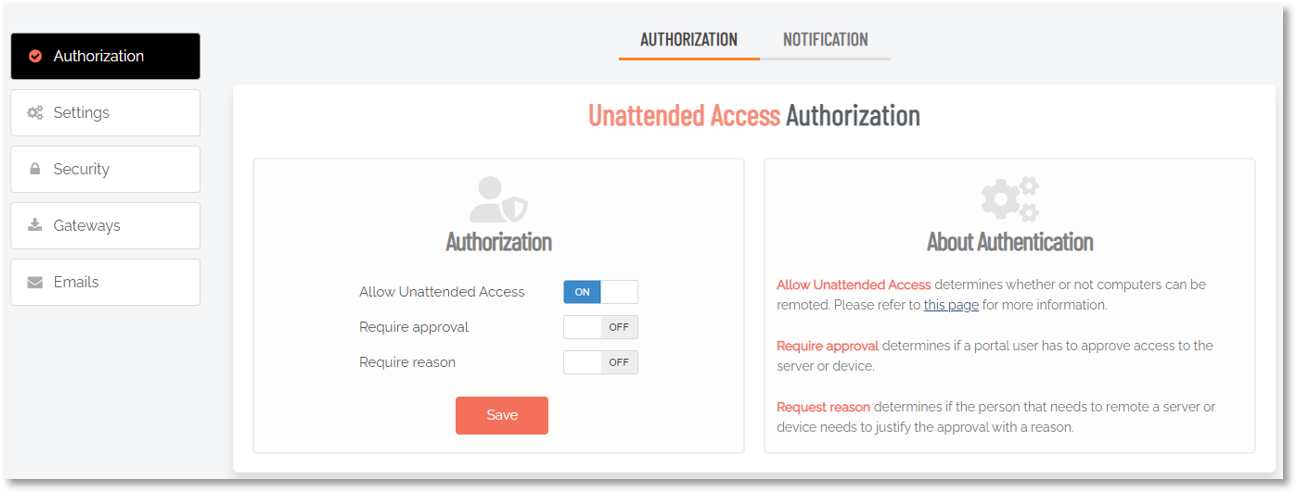
Refer to Getting Started with Unattended Access for more information.
Getting started with Unattended Access is simply a matter of enabling it in the portal:
-
To enable Unattended Access, log in to the Admin By Request portal and head over to Secure Remote Access > Settings > Unattended Access Settings.
-
Select Authorization in the left menu and, from the AUTHORIZATION tab, ensure that Allow Unattended Access is turned On:
For more information, refer to Getting Started with Unattended Access.
Unattended Access is a feature of Secure Remote Access that allows you to connect remotely to your servers and network endpoints directly from your browser, using a lot of the well-known Admin By Request features like: inventory, auditlog, settings and sub-settings, approval flows, integrations etc.
The implementation of Unattended Access can use either a "Cloud" or an "On-premise" gateway, eliminating the need for VPN and jump servers, while still maintaining a secure and segregated setup.
Refer to Unattended Access Overview for more information.
Product enrollment is the mechanism of determining which Admin By Request licenses – and hence product capabilities – should be available to specific endpoints.
Refer to Product Enrollment for more information.
The Test Drive mode allows a portal user to cherry pick which devices are enrolled with the selected product. This can either be done by specifying a computer group scope or by manually picking devices.
Refer to Product Enrollment (Test Drive) for more information.
In July 2025, Admin By Request added several new data centers. They are:
-
London, UK
-
Frankfurt, Germany
-
Singapore
In January 2026, US West was added in California.
Data Center location
Your data is stored in a data center that is located in one of the geographic locations listed below. These are in Europe, the USA, the UK and Asia.
To determine your data location, go to page Tenant Settings > Data in the portal and click the RETENTION tab.
Note the geographic location shown in field Data Location - it will be one of the following:
-
EU West, Netherlands (Europe)
-
US East, Virginia (USA)
-
US West, California (USA)
-
London, United Kingdom (UK)
-
EU Central, Germany (Europe)
-
Singapore (Asia)
Data Center URL
To determine the API prefix for your data center, go to page Settings > Tenant Settings > Data > API KEYS in the portal and check which API prefix is shown under About API Keys. The data center API URL (also known as the API prefix) will be one of the following:
-
https://dc1api.adminbyrequest.com (Europe - Netherlands)
-
https://dc2api.adminbyrequest.com (US East)
-
https://dc3api.adminbyrequest.com (UK)
-
https://dc4api.adminbyrequest.com (Europe - Germany)
-
https://dc5api.adminbyrequest.com (US West)
-
https://dc6api.adminbyrequest.com (Asia)
Make a note of your prefix - among other things, this is the domain used when an API Key is created.
You can also see your API prefix on the API web pages (e.g. Public API > Auditlog API). However, a small script runs in the background that determines to which data center you are attached, so JavaScript must be enabled in your browser for this to work.
Data Center location
Your data is stored in a data center that is located in one of the geographic locations listed below. These are in Europe, the USA, the UK and Asia.
To determine your data location, go to page Tenant Settings > Data in the portal and click the RETENTION tab.
Note the geographic location shown in field Data Location - it will be one of the following:
-
EU West, Netherlands (Europe)
-
US East, Virginia (USA)
-
US West, California (USA)
-
London, United Kingdom (UK)
-
EU Central, Germany (Europe)
-
Singapore (Asia)
Data Center URL
To determine the API prefix for your data center, go to page Settings > Tenant Settings > Data > API KEYS in the portal and check which API prefix is shown under About API Keys. The data center API URL (also known as the API prefix) will be one of the following:
-
https://dc1api.adminbyrequest.com (Europe - Netherlands)
-
https://dc2api.adminbyrequest.com (US East)
-
https://dc3api.adminbyrequest.com (UK)
-
https://dc4api.adminbyrequest.com (Europe - Germany)
-
https://dc5api.adminbyrequest.com (US West)
-
https://dc6api.adminbyrequest.com (Asia)
Make a note of your prefix - among other things, this is the domain used when an API Key is created.
Cloud Gateways
If you are using Secure Remote Access, you need to allow your browsers access to the following cloud gateways:
-
cloudgatewayeu1.accessbyrequest.com (Europe - Netherlands)
-
cloudgatewayus1.accessbyrequest.com (US East)
-
cloudgatewayuk1.accessbyrequest.com (UK)
-
cloudgatewaygermany1.accessbyrequest.com (Europe - Germany)
-
cloudgatewayuswest1.accessbyrequest.com (US West)
-
cloudgatewaysingapore1.accessbyrequest.com (Asia)
They are called over WSS (Websockets Secure) on port 443 from the browser.
Further, if you wish to remotely access endpoints using Unattended Access and Remote Support:
-
Outbound MQTT broker connectivity via Websockets - port 443 - for the following:
-
If your data is located in Europe (Netherlands):
Ten nodes (FastTrackHubEU1.azure-devices.net to FastTrackHubEU10.azure-devices.net) -
If your data is located in the USA (East):
Ten nodes (FastTrackHubUS1.azure-devices.net to FastTrackHubUS10.azure-devices.net) -
If your data is located in the UK:
Ten nodes (FastTrackHubUK1.azure-devices.net to FastTrackHubUK10.azure-devices.net) -
If your data is located in Europe (Germany):
Ten nodes (FastTrackHubGermany1.azure-devices.net to FastTrackHubGermany10.azure-devices.net) -
If your data is located in the USA (West):
Ten nodes (FastTrackHubUSWest1.azure-devices.net to FastTrackHubUSWest10.azure-devices.net) -
If your data is located in Asia:
Ten nodes (FastTrackHubSingapore1.azure-devices.net to FastTrackHubSingapore10.azure-devices.net)
-
-
For Unattended Access, RDP needs to be enabled on port 3389 on the device.
IP addresses and API URLs
Admin By Request uses port 443 and the IP addresses and API URLs that need access through firewalls are as follows.
If your data is located in Europe (Netherlands):
-
IP: 104.45.17.196
-
DNS: api1.adminbyrequest.com
-
DNS: macapi1.adminbyrequest.com
-
DNS: linuxapi1.adminbyrequest.com
If your data is located in the USA (East):
-
IP: 137.117.73.20
-
DNS: api2.adminbyrequest.com
-
DNS: macapi2.adminbyrequest.com
-
DNS: linuxapi2.adminbyrequest.com
If your data is located in the UK:
-
IP: 85.210.211.164
-
DNS: api3.adminbyrequest.com
-
DNS: macapi3.adminbyrequest.com
-
DNS: linuxapi3.adminbyrequest.com
If your data is located in Europe (Germany):
-
IP: 9.141.94.162
-
DNS: api4.adminbyrequest.com
-
DNS: macapi4.adminbyrequest.com
-
DNS: linuxapi4.adminbyrequest.com
If your data is located in the USA (West):
-
IP: 172.184.188.29
-
DNS: api5.adminbyrequest.com
-
DNS: macapi5.adminbyrequest.com
-
DNS: linuxapi5.adminbyrequest.com
If your data is located in Asia (Singapore):
-
IP: 52.230.54.129
-
DNS: api6.adminbyrequest.com
-
DNS: macapi6.adminbyrequest.com
-
DNS: linuxapi6.adminbyrequest.com
Wherever you are, you can also use api.adminbyrequest.com, but the regional URLs will likely be more responsive.
Cloud Gateways
If you are using Secure Remote Access, you need to allow your browsers access to the following cloud gateways:
-
cloudgatewayeu1.accessbyrequest.com (Europe - Netherlands)
-
cloudgatewayus1.accessbyrequest.com (US East)
-
cloudgatewayuk1.accessbyrequest.com (UK)
-
cloudgatewaygermany1.accessbyrequest.com (Europe - Germany)
-
cloudgatewayuswest1.accessbyrequest.com (US West)
-
cloudgatewaysingapore1.accessbyrequest.com (Asia)
They are called over WSS (Websockets Secure) on port 443 from the browser.
Further, if you wish to remotely access endpoints using Unattended Access and Remote Support:
-
Outbound MQTT broker connectivity via Websockets - port 443 - for the following:
-
If your data is located in Europe (Netherlands):
Ten nodes (FastTrackHubEU1.azure-devices.net to FastTrackHubEU10.azure-devices.net) -
If your data is located in the USA (East):
Ten nodes (FastTrackHubUS1.azure-devices.net to FastTrackHubUS10.azure-devices.net) -
If your data is located in the UK:
Ten nodes (FastTrackHubUK1.azure-devices.net to FastTrackHubUK10.azure-devices.net) -
If your data is located in Europe (Germany):
Ten nodes (FastTrackHubGermany1.azure-devices.net to FastTrackHubGermany10.azure-devices.net) -
If your data is located in the USA (West):
Ten nodes (FastTrackHubUSWest1.azure-devices.net to FastTrackHubUSWest10.azure-devices.net) -
If your data is located in Asia:
Ten nodes (FastTrackHubSingapore1.azure-devices.net to FastTrackHubSingapore10.azure-devices.net)
-
-
For Unattended Access, RDP needs to be enabled on port 3389 on the device.
Admin By Request supports ServiceNow up to and including Yokohama (Q2 2025).
-
Failure to Establish API Connection:
The following steps can sometimes fix an API problem even if the key appears fine:
-
Regenerate the API Key in your Admin By Request portal and ensure you have clicked the Save button (the green tick icon appears upon successful save).
-
Replace the API Key in the ServiceNow Properties page and click Save. Ensure the “Properties Saved” message appears at the top of the page.
-
-
No Auditlog or Request Data coming through:
-
Ensure the Flow has been configured correctly (task C in the ServiceNow Integration). In ServiceNow, go to the Flow Designer, locate the Admin By Request Flow, and ensure all three are Active. Check that the Trigger is set to a reasonably short interval (e.g., two hours).
-
Ensure there is data in your Admin By Request portal to be pulled through to ServiceNow. If no data exists in Admin By Request, create some test data by making and consuming a request on the endpoint.
-
-
Unable to Access ServiceNow Features:
Ensure the account you are signed-in to ServiceNow has the appropriate administrative permissions enabled to access the features required for this integration. (Admin access is required for tasks A through D. in the ServiceNow Integration).
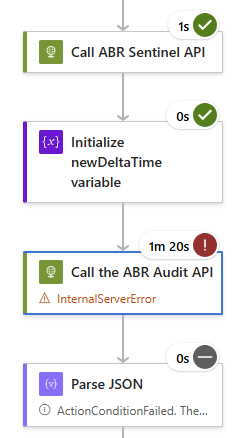
In Microsoft Sentinel, "InternalServerError" can be caused by trying to refer to the wrong data center when using an API key:
To determine the API prefix for your data center, go to page Settings > Tenant Settings > Data > API KEYS in the portal and check which API prefix is shown under About API Keys. The data center API URL (also known as the API prefix) will be one of the following:
-
https://dc1api.adminbyrequest.com (Europe - Netherlands)
-
https://dc2api.adminbyrequest.com (US East)
-
https://dc3api.adminbyrequest.com (UK)
-
https://dc4api.adminbyrequest.com (Europe - Germany)
-
https://dc5api.adminbyrequest.com (US West)
-
https://dc6api.adminbyrequest.com (Asia)
Make a note of your prefix - among other things, this is the domain used when an API Key is created.
When setting-up MS Sentinel configuration, if a different domain is used in the JSON code, it can result in an "InternalServerError" error when the API key is used.
To modify the JSON code, refer to .
Yes. Refer to ServiceNow Troubleshooting for detailed steps.
-
The integration is not asking for an API key:
If you are not asked for an API Key during setup of the Teams integration, it could be due to lack of permissions.
Use the Teams Admin Center to manage permissions and make sure that third-party apps are allowed:

-
Check that the Teams webhook is working normally:
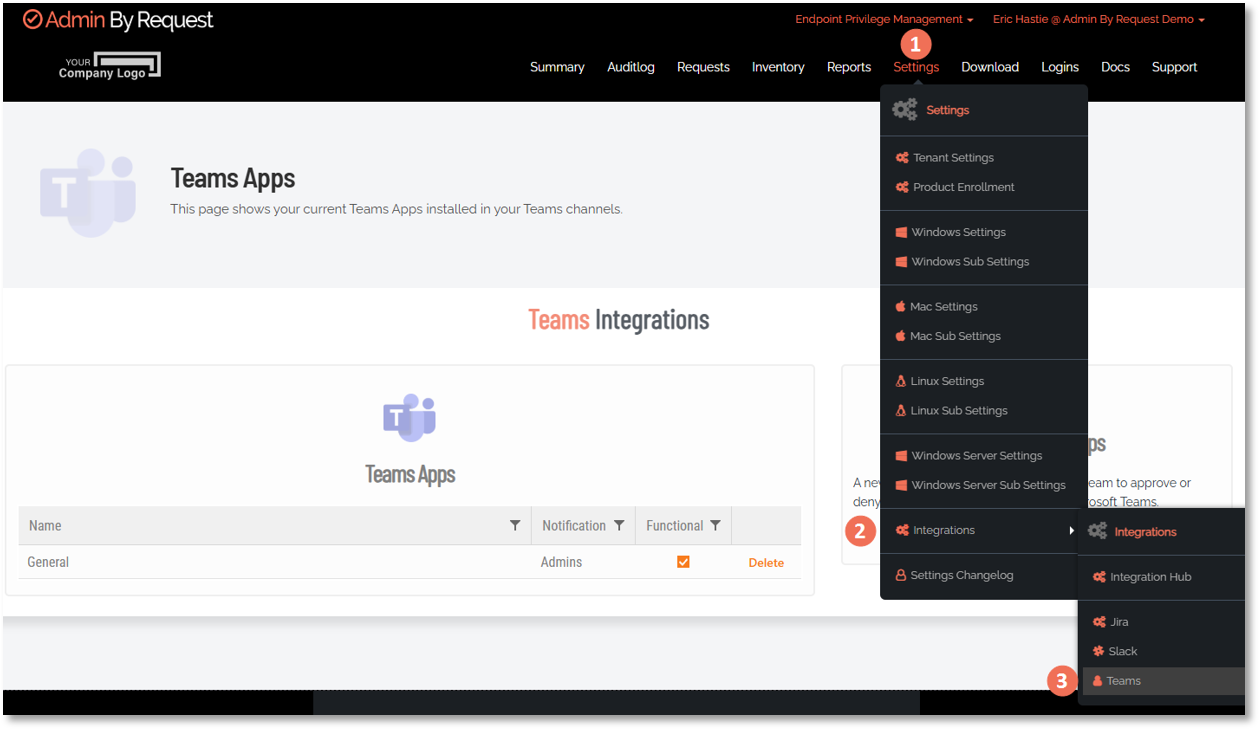
In the portal, go to Endpoint Privilege Management >Settings > Integrations > Teams and make sure the entry under Teams Apps is Functional:
There are two "sets" of JSON code for integrating Admin By Request with Microsoft Sentinel:
If this error occurs when configuring an Entra ID Connector for a tenant, it is most likely because the Secret ID has been input rather than the Value:
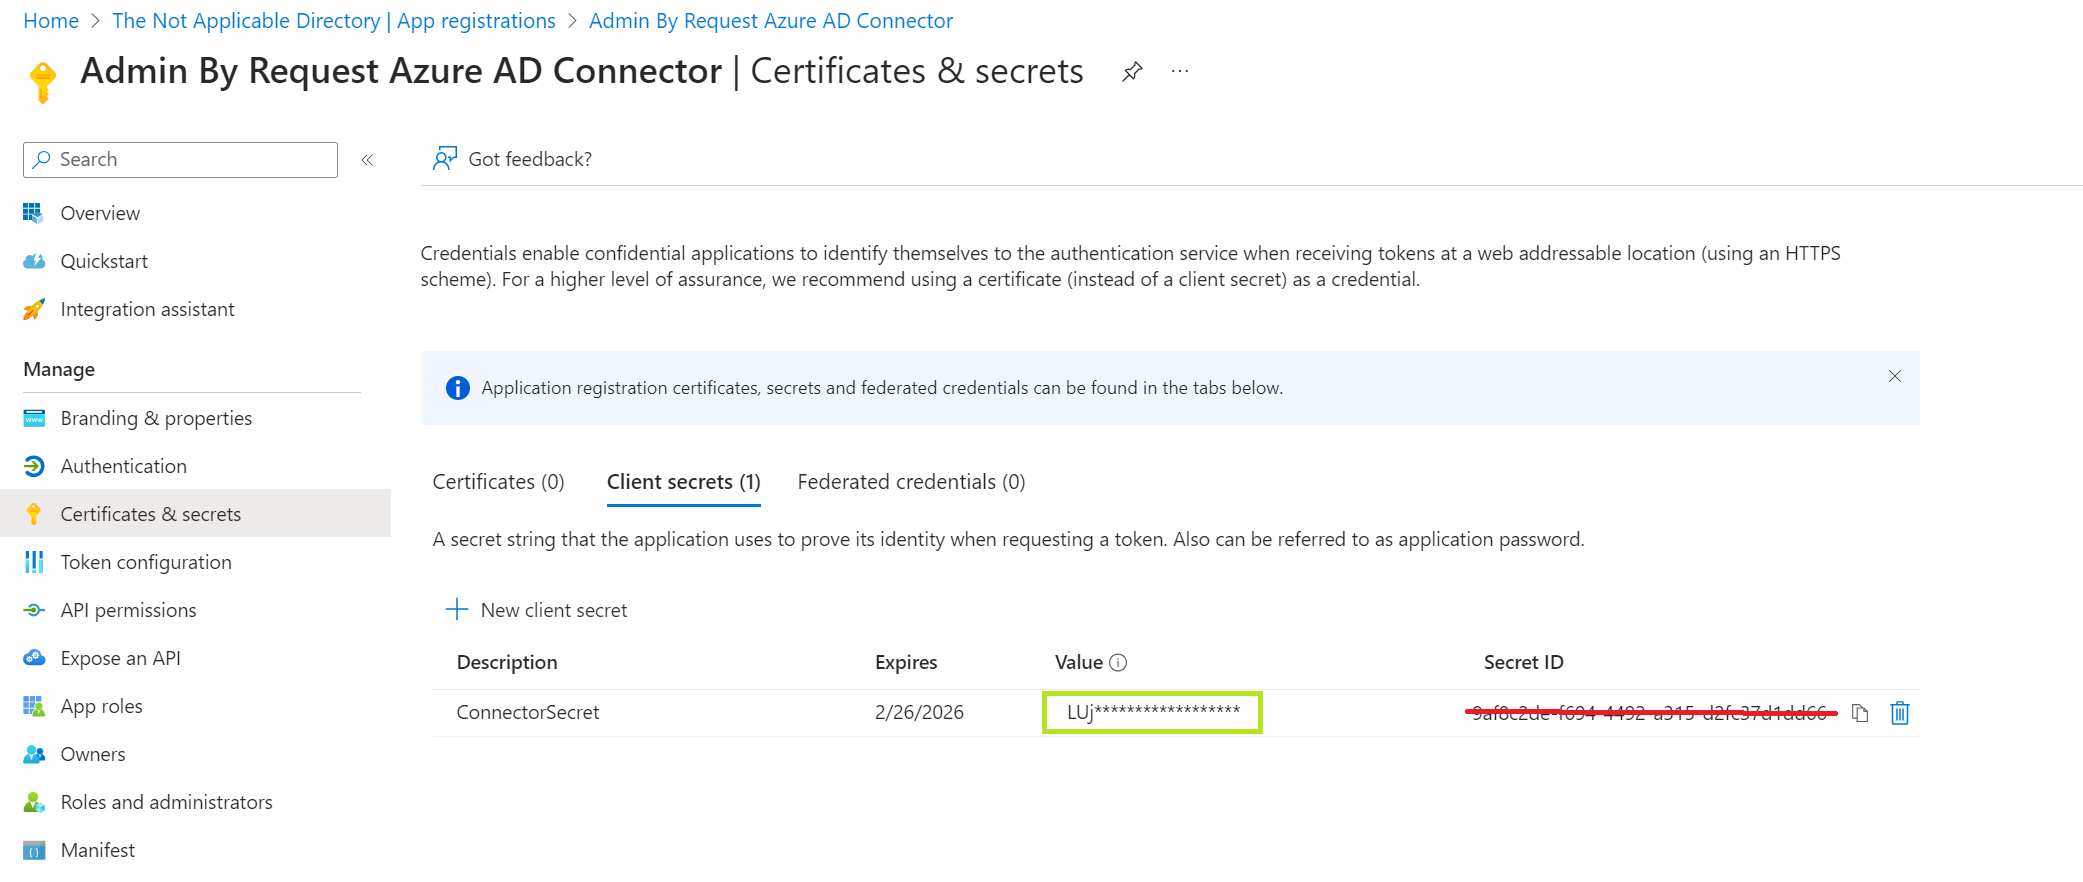
The Value is able to be read immediately after creation, after which it is hidden and would need to be created anew to copy. Make sure you enter the data in the Value field and not the Secret ID.
Admin By Request software updates are deployed using our Auto-Update process. However, when we release a new version we do not deploy it right away to all customers via auto-update. This is simply to mitigate any unforeseen issues.
Admin By Request software updates to Linux endpoints are delivered via the distribution package update process. Please note that, when we release a new version, we do not make it immediately available to the update process. This is simply to mitigate any unforeseen issues.
Our rule-of-thumb for a new release is to
Contact us if you wish to receive the latest version right now. You can also raise a support ticket requesting the latest update.
Visit the Download Archive for previous versions of Admin By Request.
Yes - please refer to the Jira Integration guide. This document includes all the online material in PDF form.
If your Jira integration is not working, check the following:
-
Custom fields are created (see 1. Creating custom fields in Jira) and a custom Request Type is created (see 3. Creating a custom Request Type). In particular, make sure the Request form tab is selected when adding your custom fields and the Description field is also added.
-
The integration with ABR completes successfully (see 4. Integrating Jira with Admin By Request). Make sure you use the correct email address as your Jira username and you have at least one service desk instance available.
-
If you plan to extend the integration with Jira automation rules, don't forget the Jira audit log that is available with each rule (see Creating Jira automation rules).
Refer to the following for more information on Intune deployment:
If your users are receiving messages like "request denied due to company policy", check the following:
-
Device Owner - in the portal, check Settings > [OS] Settings > Lockdown > OWNER. Only the owner of the endpoint is able to use Run As Administrator or start an Administrator Session.
The device owner is first non-administrator that logs on to the endpoint. You can change the owner in the inventory.
-
macOS version - make sure your Mac endpoints are running the latest version of Admin By Request. There was a problem identified in versions prior to 4.2.1 where certain scenarios caused "request denied" messages to users.
-
Admin rights - in the portal, check the following under Settings > [OS] Settings > Lockdown:
-
ADMIN RIGHTS - If On, make sure accounts to be excluded are entered.
-
RUN AS ADMIN - Deny elevating system files prevents the user from starting any file from the System32 directory with administrative privileges, such as cmd.exe or regedit.exe. You can define exceptions under Settings > [OS] Settings > > App Control -> PRE-APPROVE.
-
ADMIN SESSION - The same as for RUN AS ADMIN.
-
This may be surprising, but no. The client is only required to have an occasional internet connection (like a guest WIFI anywhere). The reason is, clients will ask the cloud service roughly once a day for current settings. The client then knows your current rules in case the user needs to elevate offline. If you then have auto-approval on, the client will allow the user to become administrator temporarily and will queue the data locally and log what has been done, including date & time, installed applications, exe files run as administrator and so on.
Once the client has an internet connection again, it will flush the queue to the cloud service and all data is uploaded. This means that the client works exactly the same whether online or offline. The only difference is the time the reporting data becomes available in the cloud service.
Yes.
Refer to Entra ID tab for details on how to setup the Entra ID Connector and Integrations > Single Sign-On (SSO) for details on setting up SSO.
The most likely cause is an incorrect email address, either from misspelling or inadvertent entry of extra characters that are not visible. This is particularly true if notifications have been configured for the ABR mobile app and they are being sent correctly, but notifications via email are not.
Remove the email address and re-enter it, then try the operation again.
Yes
When data is sent to the server, the sender IP address is cross-referenced to internet service provider (ISP) registration data. The expected accuracy is at a city level.
Do not be concerned about Internet bandwidth consumption. This has always been a primary focus on the development side, because metered connections still exist in some places in the world and, if the connection is bad, we don’t want to consume bandwidth.
Inventory data is collected intelligently, so only delta data is collected. If nothing changes from day to day and the user does not request admin elevation, no traffic happens. The actual data transferred from the client to the cloud service is minimal. If you take a random client and divide the traffic from typical use for a month, divide by days, we are talking about 5K of data per day. Or said in another way, you can expect a thousand machines to consume only about 150 megabytes of bandwidth per month.
In this case, the client cannot allow the elevation and you cannot see an approval request. The client will intelligently determine it is indeed offline (i.e. has no Internet access) and, on the approval screen, a note will automatically appear telling the user that elevation can happen only if the user either seeks an internet connection or, if not possible, contact IT and get a daily PIN code. The PIN code is a code the client and server know without having communication. The PIN code will appear in the left menu on computer details in the inventory if you enable approval mode.
General
- Licensing
- Security
Typically, when an Admin By Request tenant no longer has any paid licenses, it will fall back to become a Free Plan tenant. This means only 25 workstation licenses, along with 10 server licenses, will become available for use.
The implications of this are:
-
Only 25 endpoints will be visible under Endpoint Privilege Management
-
Only 10 servers will be visible under Endpoint Privilege Management
-
Only 25 endpoints will be available for remote access under Secure Remote Access
-
You will not be able to manually delete registered devices from your inventory list.
-
Access to Technical Support is removed (you no longer have the option of submitting a Support ticket from the portal)
Note that you can still contact Sales personnel via the chat function of the adminbyrequest.com website
-
The priority of the auto-update feature is lowered for your tenant
For the 25 available licenses on the devices where the ABR client is installed, both end users and portal administrators would be able to continue as normal; request an elevation, approve requests and so on.
There is no catch with the free plan. You can freely use the full EPM product in your production environment on up to 25 workstations and 10 servers in your organization. Further, you can remotely access up to 25 workstations using the Secure Remote Access product.
You can have a Free Plan and/or a Paid Plan, but not a combination of both. This means that, if you want 35 licenses, you don't get the first 25 licenses for free and only pay for the remaining 10 - if you have a Paid Plan, you must pay for all licenses under that plan. However, you can have a Free Plan as well as a Paid Plan. This can be useful for testing purposes and is a common setup for customers.
For more information, refer to Licensing.
Licenses are automatically removed after 60 days for inactive endpoints. If you don't want to wait that long, there are several other ways:
-
You can uninstall ABR from an endpoint - the license is instantly recovered.
-
You can find the endpoint in the Inventory and use either the Delete menu (at left) or the DELETE tab to remove the computer.
-
There is a bulk delete capability available using API calls, described here: https://www.adminbyrequest.com/en/docs/inventory-api. A video is available showing how bulk delete can be done in Postman: https://www.dropbox.com/s/nsoyi0crma63y4i/Multi-Inventory-ID-Delete.m4v?dl=0.
For more information, refer to Licensing.
For Frequently Asked Questions about licensing, refer to All FAQ (Licensing).
Visit web page Download the Free Plan and register for a free plan (up to 25 endpoint devices and 10 server licenses). We will email you login credentials, which you can use to access the Admin Portal using the Login button at the top.
Once logged-in, click Download on the portal top menu and download an .msi file (Windows) or a .pkg file (macOS/Linux) to install on your computer endpoints.
After login, you can adjust any settings as you wish to see how they affect the privileges granted to end users. You can also view an audit log and a full software and hardware inventory of your clients. Finally, there is a mobile app, which is also free.
For more information, please refer to Getting Started in our Documentation Center.
From the Admin By Request home page, click Download the Free Plan to start on a free plan. You can use the free plan for proof of concept without using trial-ware. If you need more licenses for proof of concept, please contact us.
Under the Free Plan, 25 workstation and 10 remote access clients are always free - you can start with those right now. For a Paid Plan, it depends how many clients you need and which types they are (i.e. server or workstation). Please use the quote form here and we will return a quote today.
For more information, refer to Licensing.
Please use the quote form here and we will return a quote today. If you purchase a paid plan, we will upgrade your free plan to a paid one on-the-fly without you having to do anything.
Under the Free Plan, 25 workstation and 10 remote access clients are always free - you can start with those right now. For a Paid Plan, it depends how many clients you need and which types they are (i.e. server or workstation). Please use the quote form here and we will return a quote today.
You can have a Free Plan and/or a Paid Plan, but not a combination of both. This means that, if you want 35 licenses, you don't get the first 25 licenses for free and only pay for the remaining 10 - if you have a Paid Plan, you must pay for all licenses under that plan. However, you can have a Free Plan as well as a Paid Plan. This can be useful for testing purposes and is a common setup for customers.
For more information, refer to Licensing.
The number of licenses you need depends on how many endpoints you wish to manage at your organization. Please use the quote form here and we will return a quote today.
No.
You buy a number of Workstation licenses and these can freely be mixed between Windows, Mac and Linux. In other words, you need one license for each installed endpoint.
For more information, refer to Licensing.
The mobile app is free - find it in the Apple App or Google Play stores.
The iPhone app works on iOS 10.0+. Android version works on version 4.4+ (KitKat).
Visit web page Book a Demo, fill out and submit the form, and we will get back to you asap. We can usually schedule a demo next business day.
When you request a free plan, you will get an email from us that you can respond to, asking any questions you might have.
If you did not receive an email, please use our contact details page (Contact Sales) to send us a message, and we will contact you.
This is fully explained in How We Handle Your Data. Please also refer to our SLA in the Trust Center.
For more information on how Admin By Request meets its compliance obligations and helps your organization do the same, refer to Compliance Mapping.
The only people who can see devices in your tenant are the primary login that was first used to register with Admin By Request and the users listed in the portal under Logins > User Logins.
The installer file downloaded from the portal is unique to your tenant. Depending on the target operating system, it can be an executable file, a package or a script and it is signed with a license that applies only to installers downloaded from the tenant in which you are currently logged-in. The same license file is applied to each of the operating system client installers: Windows, macOS, Linux and Server.
This is true for free plans as well as paid plans.
When installed on an endpoint, once the endpoint connects successfully, you will see in real time the status of the endpoint in your Inventory, which is also unique to your tenant. You will not see any endpoints installed with files downloaded from other tenants - this is simply not possible.
Admin By Request uses port 443 and the IP addresses and API URLs that need access through firewalls are as follows.
If your data is located in Europe (Netherlands):
-
IP: 104.45.17.196
-
DNS: api1.adminbyrequest.com
-
DNS: macapi1.adminbyrequest.com
-
DNS: linuxapi1.adminbyrequest.com
If your data is located in the USA (East):
-
IP: 137.117.73.20
-
DNS: api2.adminbyrequest.com
-
DNS: macapi2.adminbyrequest.com
-
DNS: linuxapi2.adminbyrequest.com
If your data is located in the UK:
-
IP: 85.210.211.164
-
DNS: api3.adminbyrequest.com
-
DNS: macapi3.adminbyrequest.com
-
DNS: linuxapi3.adminbyrequest.com
If your data is located in Europe (Germany):
-
IP: 9.141.94.162
-
DNS: api4.adminbyrequest.com
-
DNS: macapi4.adminbyrequest.com
-
DNS: linuxapi4.adminbyrequest.com
If your data is located in the USA (West):
-
IP: 172.184.188.29
-
DNS: api5.adminbyrequest.com
-
DNS: macapi5.adminbyrequest.com
-
DNS: linuxapi5.adminbyrequest.com
If your data is located in Asia (Singapore):
-
IP: 52.230.54.129
-
DNS: api6.adminbyrequest.com
-
DNS: macapi6.adminbyrequest.com
-
DNS: linuxapi6.adminbyrequest.com
Wherever you are, you can also use api.adminbyrequest.com, but the regional URLs will likely be more responsive.
Allowing your users to retain full access rights is equivalent to turning off all Admin By Request's protections.
Turning off everything effectively means giving users back their local admin rights. Think about this carefully before doing it.
To turn off everything except logging actions to the Auditlog, you need to:
-
Authorization: turn On Allow Run As Admin and turn Off all other toggles
-
Authorization: turn On Allow Admin Sessions and turn Off all other toggles.
-
Authorization: make the Access time (minutes) a large number that covers most of the day. For example, 480 minutes (8 hours).
-
Lockdown: turn Off Revoke admin rights.
For more information, refer to Authorization tab under Windows Settings.
You can also check out the WHIZ usage persona for a 10-minute video on how to accommodate developers or power users.
This is fully explained in How We Handle Your Data. Please also refer to our SLA in the Trust Center.
For more information on how Admin By Request meets its compliance obligations and helps your organization do the same, refer to Compliance Mapping.
This is fully explained in How We Handle Your Data. Please also refer to our SLA in the Trust Center.
For more information on how Admin By Request meets its compliance obligations and helps your organization do the same, refer to Compliance Mapping.
Admin By Request can help you comply with a number of regulatory frameworks, including GDPR, ISO 27001, NIST SP 800-53, DORA and NIS2. We continually assess frameworks for compatibility and use their requirements as one of the inputs to our development process.
Refer to Compliance Mapping for more information.
Yes. For more information on how Admin By Request meets its compliance obligations and helps your organization do the same, refer to Compliance Mapping.
The following IP addresses are used to send webhooks:
-
If your data is located in Europe (Netherlands): 104.40.134.41
-
If your data is located in the USA (USA East): 52.168.52.158
-
If your data is located in the USA (USA West): 20.66.43.213
-
If your data is located in the UK: 131.145.14.218
-
If your data is located in Europe (Germany): 9.141.94.163
-
If your data is located in Asia (Singapore): 135.171.17.26
All emails are sent from noreply@fasttracksoftware.com. We use Twilio SendGrid to send emails and the dedicated IP address is: 149.72.185.15.
Yes.
Once a stolen machine is booted and communicates with the Inventory, the public IP address of the thief’s router becomes available. The endpoint client does not require anyone to log on to a computer to upload data, so when the thief simply turns on the computer, inventory data is sent transparently. You can now see the public IP address and upload time in your client view and give this to the police. The police can then get the name and address of the IP address owner from the thief’s internet service provider (ISP).
Yes, we have published two CVEs in 2019. These were found by Improsec in September 2019 in the production version 6.1. We notified our customers and released version 6.2 on October 11th 2019 with fixes for these two vulnerabilities.
For more information, refer to CVE-2019-17201 and CVE-2019-17202.
We generally have two separate companies run penetration tests before every major release. We also get copies on a monthly basis of clean reports executed secretly by customers.
Please use our contact details page Get in Touch > Something Else to report your findings.
The scope of a vulnerability has to be escalation of privileges from a non-administrator user to obtain admin rights.
All collected data associated with the computer is deleted.
When a computer is deleted from the Inventory, make sure that its endpoint client software is removed .If the computer is subsequently powered on with a network connection, and the endpoint client is still installed, the computer will show up again and re-upload inventory data.