Getting More Out of Admin By Request: Tips and Tricks for SMBs
Introduction
You've deployed Admin By Request EPM, revoked local admin rights across your endpoints, and your users are elevating applications instead of running as permanent admins. That's a great start, and a significant security win on its own.
But there's a lot more under the hood.
Whether you're managing 25 endpoints or a few hundred, the tips in this document will help you tighten up your setup, save your team time, and get a clearer picture of what's actually happening on your devices. No deep expertise required, just a willingness to poke around the portal a little more than you have been.
This technical note is available in PDF format:
Tip 1: Get Familiar With the Inventory
The Inventory page is one of those features that's easy to overlook once your elevations are running smoothly, but it's worth spending some time with.
At a glance, you can see every enrolled endpoint: what OS it's running, which user is assigned to it, the current agent version, and whether anyone has administrator-level access (those show up in red). For a small IT team, that alone is a useful snapshot of your environment without having to dig through individual machines or rely on separate asset tracking tools.
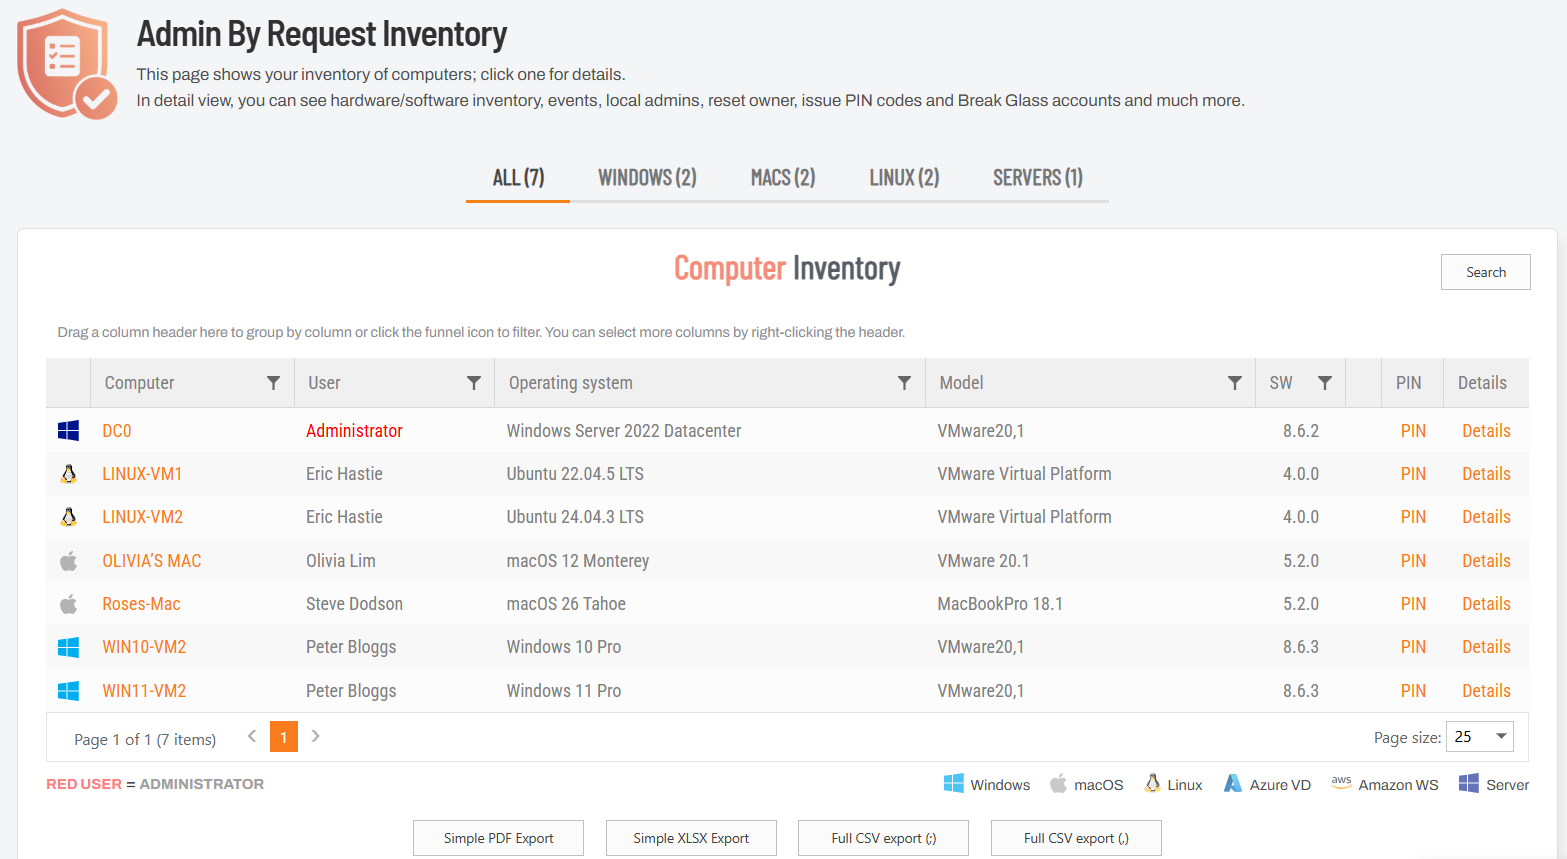
That said, the portal view is really just the highlights reel. If you want the full picture, hit the Full CSV Export button at the bottom of the page. The exported file includes a much deeper set of data per device: things like public and private IP addresses, service tags, OS install dates, major and minor OS version, specific build numbers, Bitlocker status, TPM version, Intune compliance status, whether the device is Azure or domain joined, and more. It's the kind of data that's genuinely handy for audits, compliance checks, or just getting a clear picture of where your endpoints stand.
If your endpoints are spread across different OS versions or you're not sure how up-to-date your fleet is, the CSV export is a quick way to find out without touching a single machine.
Tip 2: Check Your Security Score
On the Summary page of the portal, you'll find the Security Advisor widget showing your current Security Score out of 1000. It's worth paying attention to.
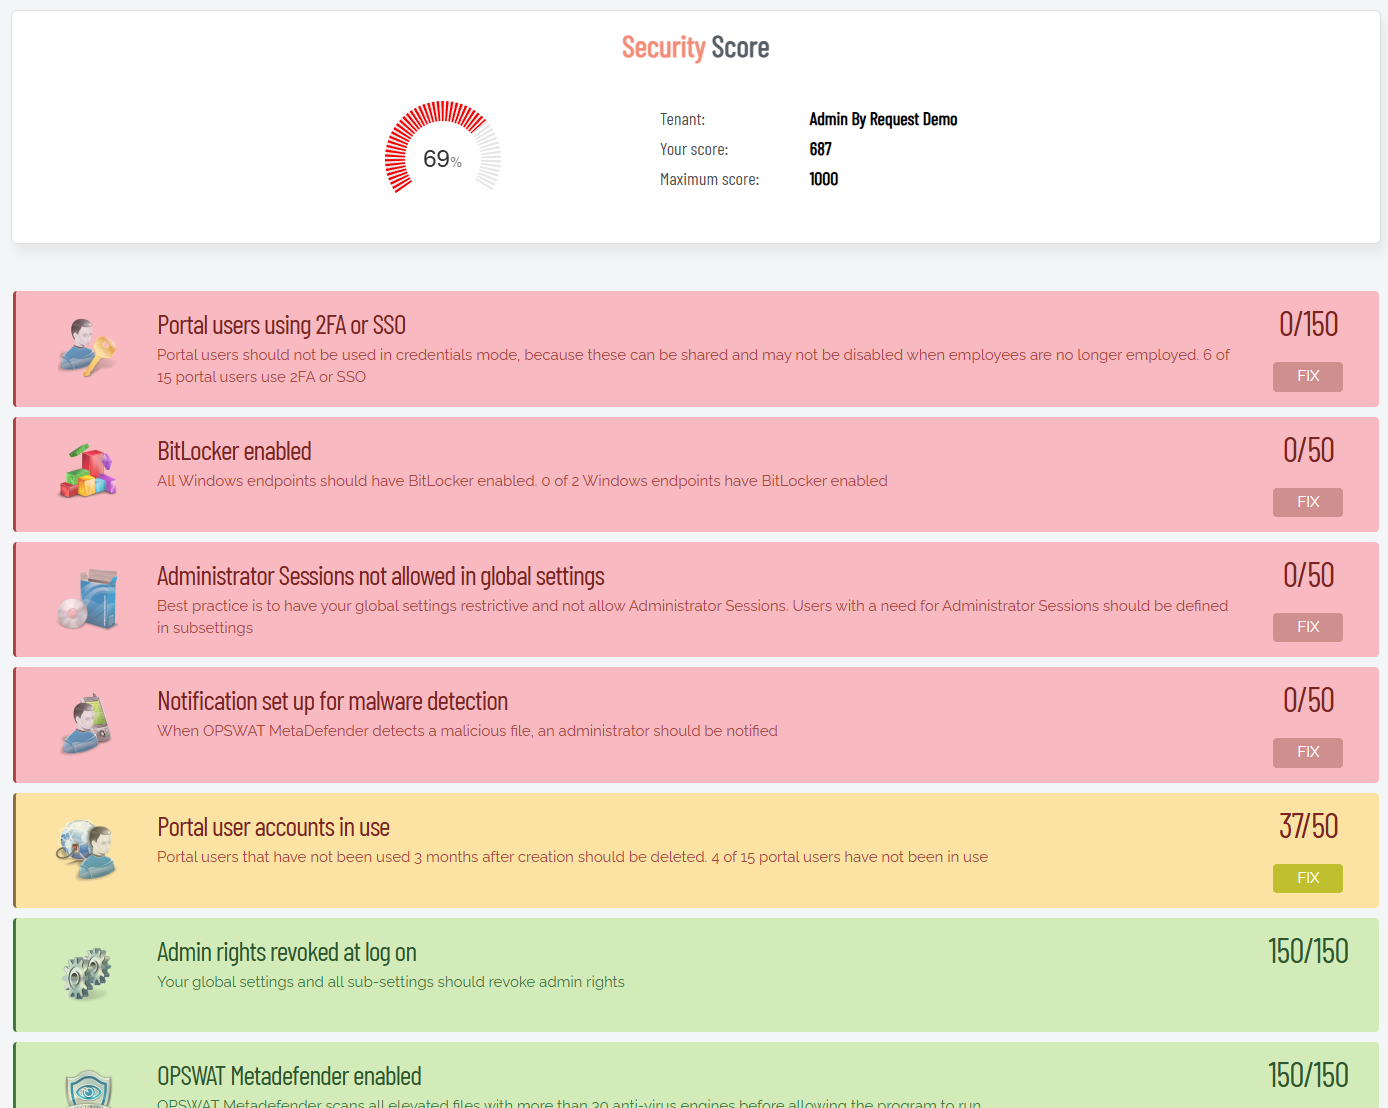
The Security Advisor breaks your score down into individual checks, each color-coded by status: green means you're good, yellow means there's room for improvement, and red means something needs your attention. The checks cover a solid range of security hygiene items: whether portal users are authenticating with 2FA or SSO, whether BitLocker is enabled across your Windows endpoints, whether Admin Sessions are restricted in your global settings, whether OPSWAT MetaDefender is enabled, whether stale portal accounts have been cleaned up, and more. Each flagged item includes a brief explanation of why it matters and a Fix button that takes you straight to the relevant setting.
It's a practical way to spot configuration gaps you might not have thought to look for, especially if you set things up quickly and moved on.
There's also a PDF export at the bottom of the page, which is worth knowing about if you're working toward ISO certification or any other compliance framework. Exporting the report on a regular cadence (quarterly works well for most teams) gives you a timestamped record of your security posture at any given point, handy when an auditor comes knocking.
Tip 3: Use the Local Admins Report During Rollout
The Local Admins report is one of the more immediately useful reports when you're in the early stages of deployment, particularly if your users have historically had permanent admin rights (which, in most SMB environments, is more common than anyone likes to admit).
As you roll out the EPM client across your endpoints, the report will automatically populate with every admin account it discovers in your environment. You don't have to do anything manually. As users log in, the client removes their admin privileges on the fly and the report updates itself accordingly.
To run the Local Admins report:
-
In the portal, select Reports > User Reports > Local Admins:
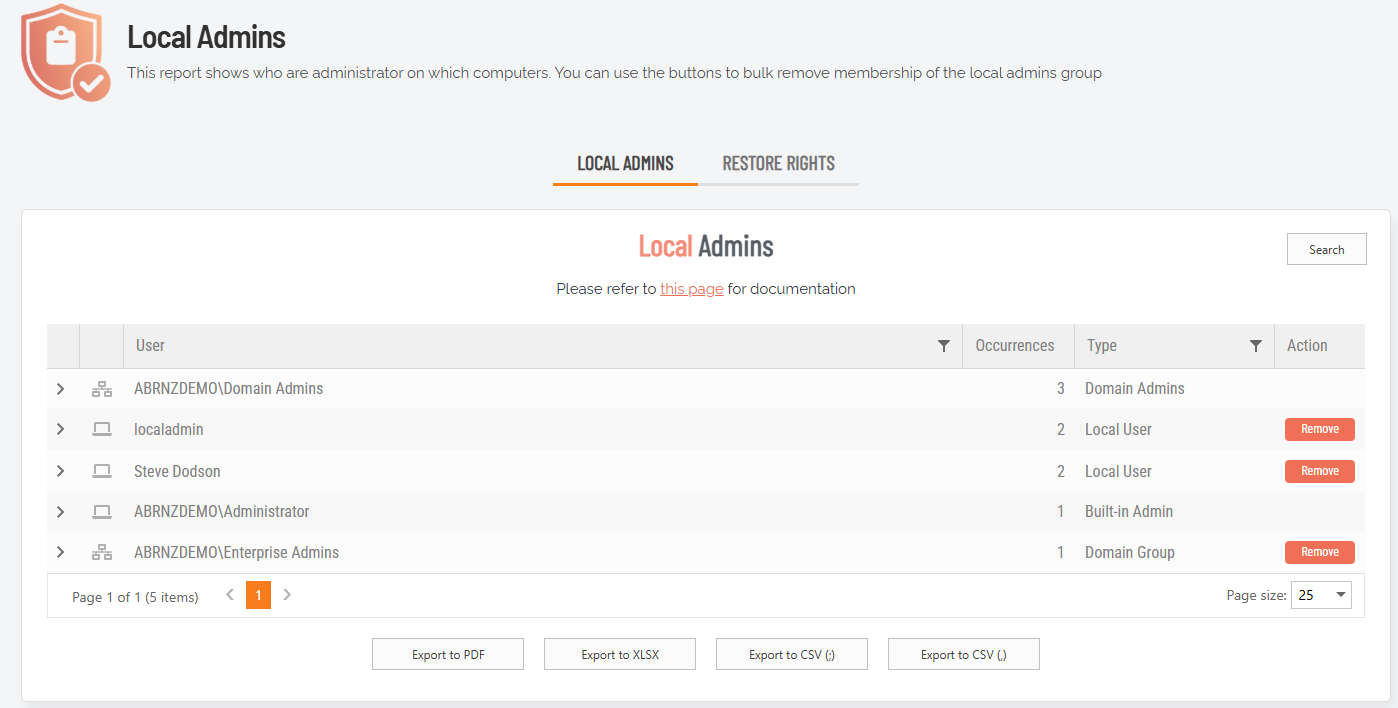
-
Under tab LOCAL ADMINS, expand an entry (e.g. localadmin) to view the local administrators on different computers:

-
If necessary, use the Remove button to remove local admin rights for a user on a computer.
It also works the other way: if you manually remove an account's privileges and need to reverse that, you can restore them directly from the same report.
For teams where a large number of users currently have admin access, this report is a great place to start. It gives you a clear, real-time picture of who still has elevated rights, so you can work through the cleanup in a controlled way rather than flying blind.
Tip 4: Use the Elevated Apps Report Before Revoking Rights
Like the previous tip, this one is particularly useful if a good portion of your users still have admin privileges and you haven't fully committed to revoking them yet. The Elevated Applications report is one of the best tools for taking the guesswork out of that transition.
By deploying the EPM client in learning mode first, the report builds up a picture of what applications your users are actually elevating, without changing anything about their experience. You can set a date range to get a realistic sample (the last year or two works well) and see exactly how many elevation requests you'd be dealing with once admin rights are removed. That data makes it a lot easier to plan your configuration before you flip the switch, rather than finding out what your users need after the fact.
The other thing worth knowing: you can create pre-approvals directly from this report. Rather than manually configuring each one in your settings, clicking the application's hyperlink in the report will pre-populate all the file information, and saving it adds it straight to your pre-approval list.
It's a much faster way to build out your pre-approvals, especially if you're working through a long list of applications:
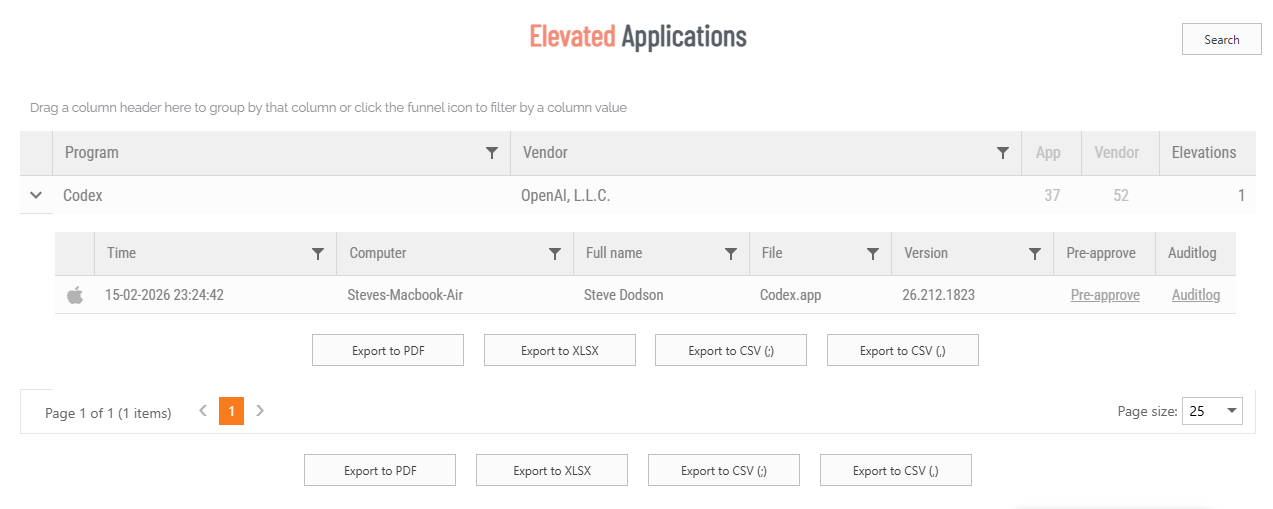
The Elevated Applications report is found in the portal at Reports > User Reports > Elevated Applications.
Tip 5: Lock Down Elevation With Intune Compliance
If your organization uses Microsoft Intune, this one's worth knowing about. In your Global Settings under Lockdown, you'll find the Intune Compliance toggle. When enabled, a device must be Intune compliant before any user can run an elevation through Run As Admin or start an Admin Session.

In practice, this means a device that's fallen out of compliance (missing updates, failed security checks, unenrolled, etc.) gets blocked from elevation entirely until it's back in good standing. It's a straightforward way to tie your privilege management directly to your existing device compliance policies rather than treating them as separate concerns.
You'll need the Entra ID Connector configured for this to work, but if you're already using Intune heavily, it's a natural addition to your setup.
Tip 6: Let Machine Learning Handle Repeat Approvals
Found under Global Settings in App Control, the Machine Learning Auto-Approval feature is one of the better ways to reduce approval overhead over time without having to build out a full pre-approvals list from scratch.
The idea is simple: set a threshold for how many times an application needs to be manually approved before the system starts approving it automatically for all future requests. If your threshold is set to 3, the fourth elevation request for that application gets approved without anyone having to touch it:
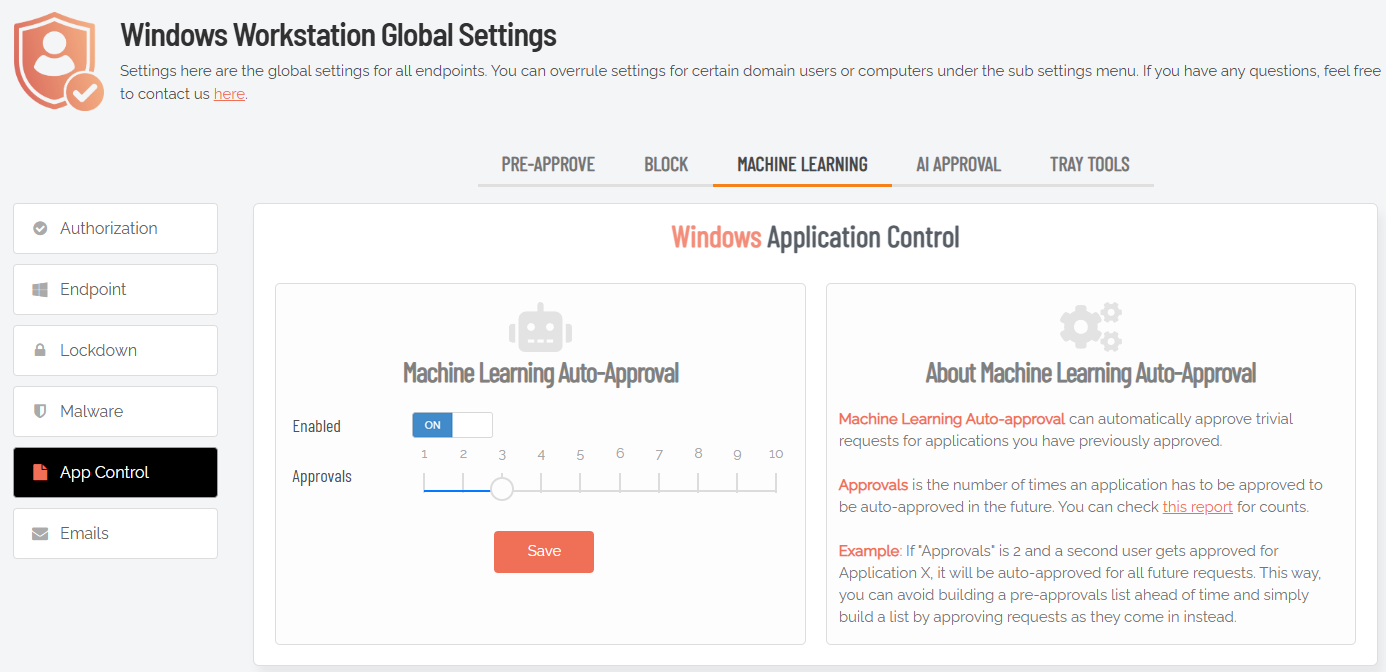
If you're new to this, it's worth starting with a higher threshold (somewhere around 10) while you're still getting a feel for what your users are running. That gives you enough manual oversight to catch anything unexpected before it gets learned in. As you build more confidence in your environment, you can dial the threshold down and let the automation do more of the heavy lifting.
It's a good middle ground for teams that want tighter control than blanket pre-approvals, but don't want to be manually approving the same applications week after week.
Tip 7: Consider Break Glass as a Replacement for LAPS
If you're currently using Microsoft LAPS to manage local administrator access, it's worth taking a look at the Break Glass feature and how it compares.
To create a Break Glass account, go to your Inventory in the portal and drill-down into an endpoint. In the left-hand menu for the endpoint, select Break Glass and then click Generate Account:
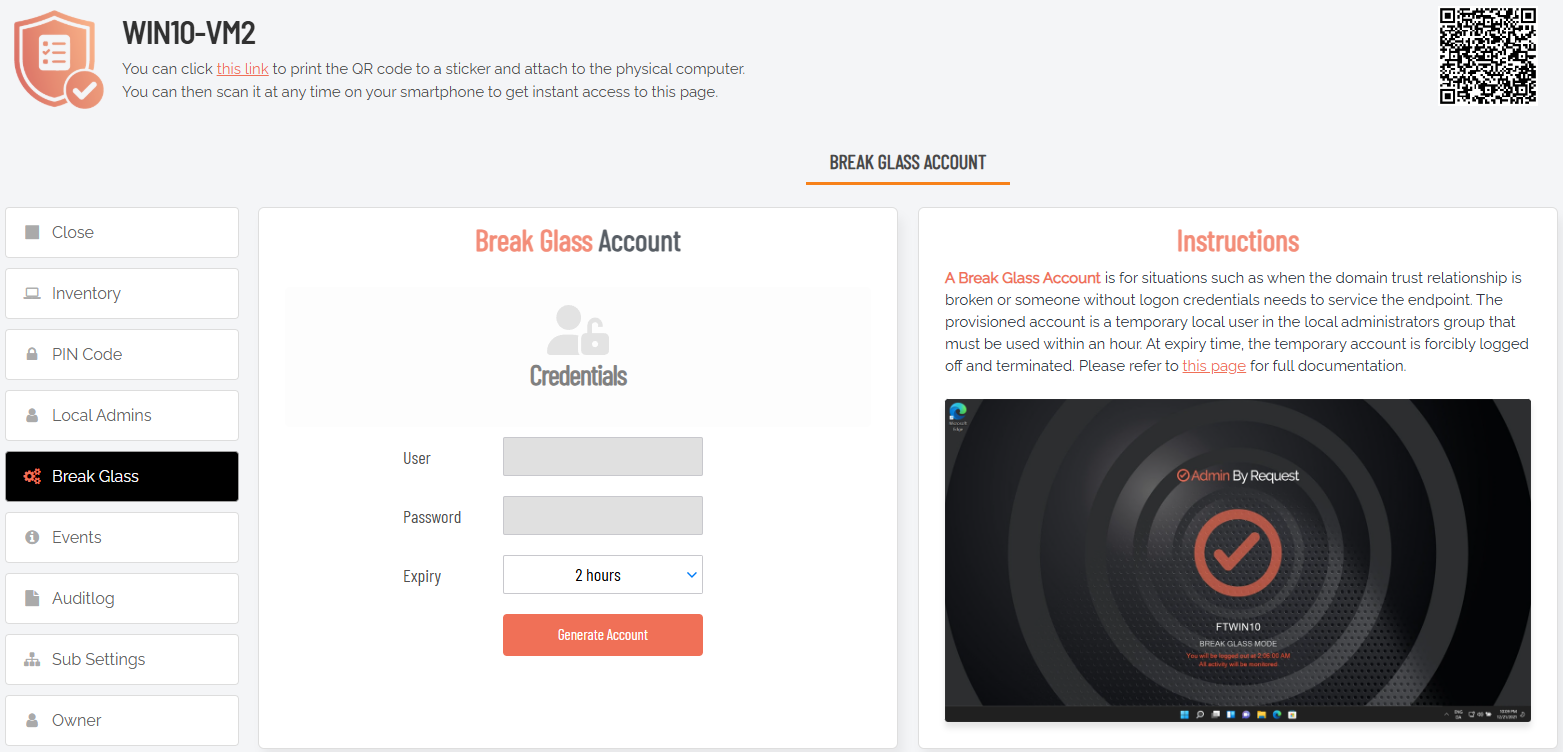
Break Glass generates a one-time, time-limited local admin account on any endpoint with a single click. Once the session is done, that's it. No standing credentials, no password to look up, no risk of an account being left active longer than it should be.
The common feedback from teams that switch from LAPS is that the auditing piece is what wins them over. With LAPS, there's no real trail of what someone actually did with that admin account once they had it. Break Glass logs everything, so if you hand a helpdesk team member access to an endpoint, you have a full record of every action taken under that account. That's a meaningful difference when something goes wrong and you need to piece together what happened.
The other LAPS pain point it sidesteps: password rotation. LAPS rotation can behave unpredictably when devices are offline or off a domain, which tends to cause headaches at the worst possible times. Break Glass doesn't have that problem since there's no persistent password to rotate in the first place.