The Mac Client User Interface
Introduction
The user interface is graphical and is accessed via the icon menu in the menu bar (top right) of the screen.
The color of the icon depends on the currently logged-in user: if the user is an administrator, the icon is red, whereas if the user is a standard user, the icon is black:
![]()
Click the icon to display the menu and select About Admin By Request for further information (Administrator and Standard User) or Request Administrator Access to carry out an admin task (Standard User only):
![]()
In this topic
Requesting Assistance (Support Assist)
Requesting Administrator Access
Setting-up a Break Glass Account
About Admin By Request
Once installed, Admin By Request is running in the background for as long as the endpoint is powered-on. Selecting the app from the menu bar or the dock launches the user interface, which comprises a simple window with four buttons down the left-hand side:
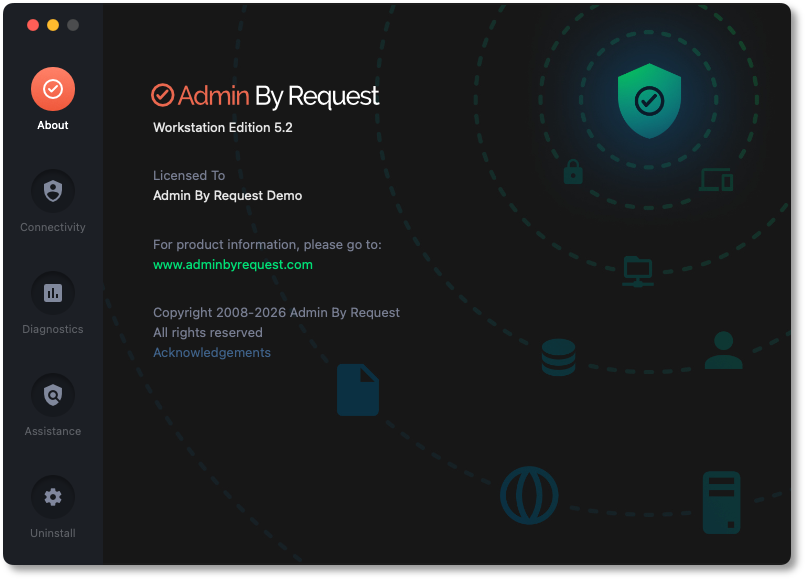
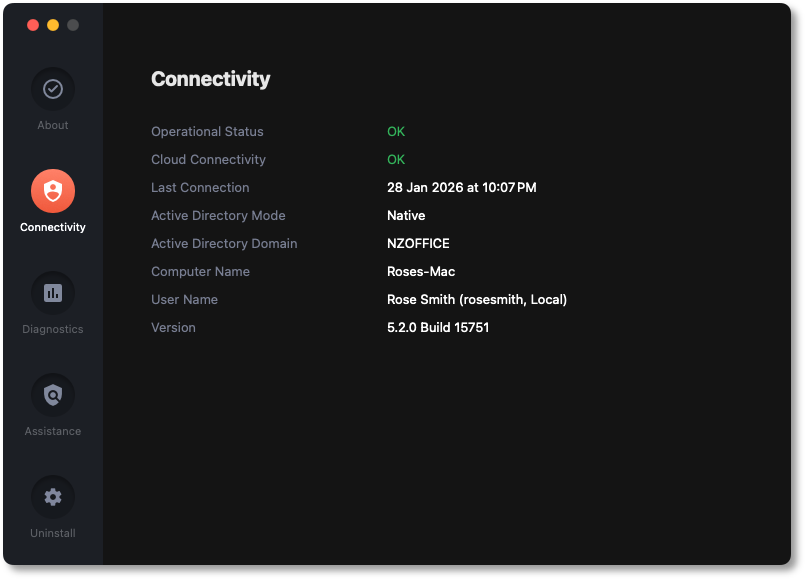
The default panel is About Admin By Request, which is accessed via the top button. It shows the following information:
-
Current workstation edition
-
License details - this information matches the organization details in the portal
-
Website link
-
Copyright information
Other panels presented in the user interface are accessed via buttons at the left. Clicking a button opens its corresponding panel and clicking the About button gets back to the default panel if viewing one of the others.
-
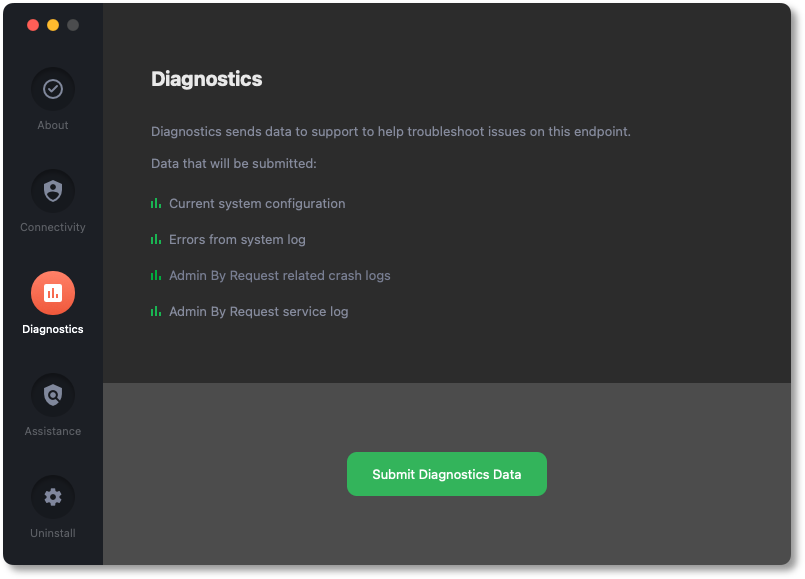
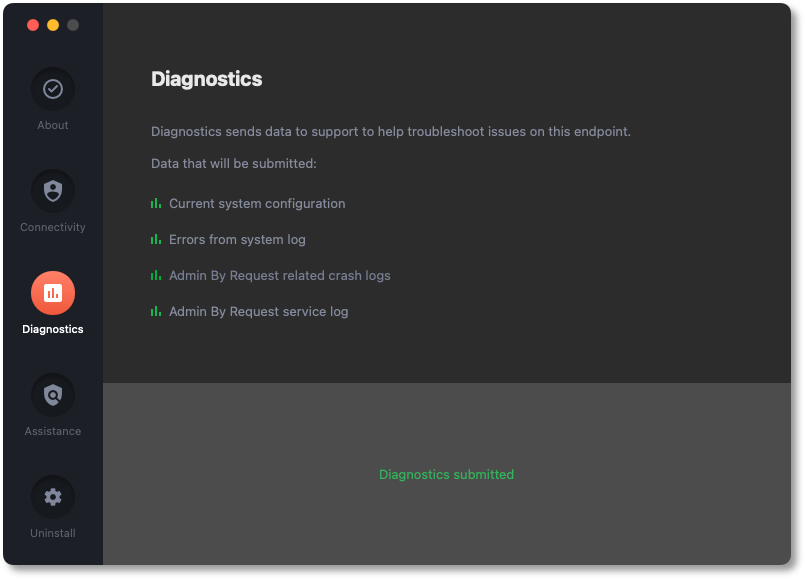
Diagnostics – provides a way to send useful diagnostic data on this workstation to the ABR support team (see Submitting Diagnostics for more information):
-
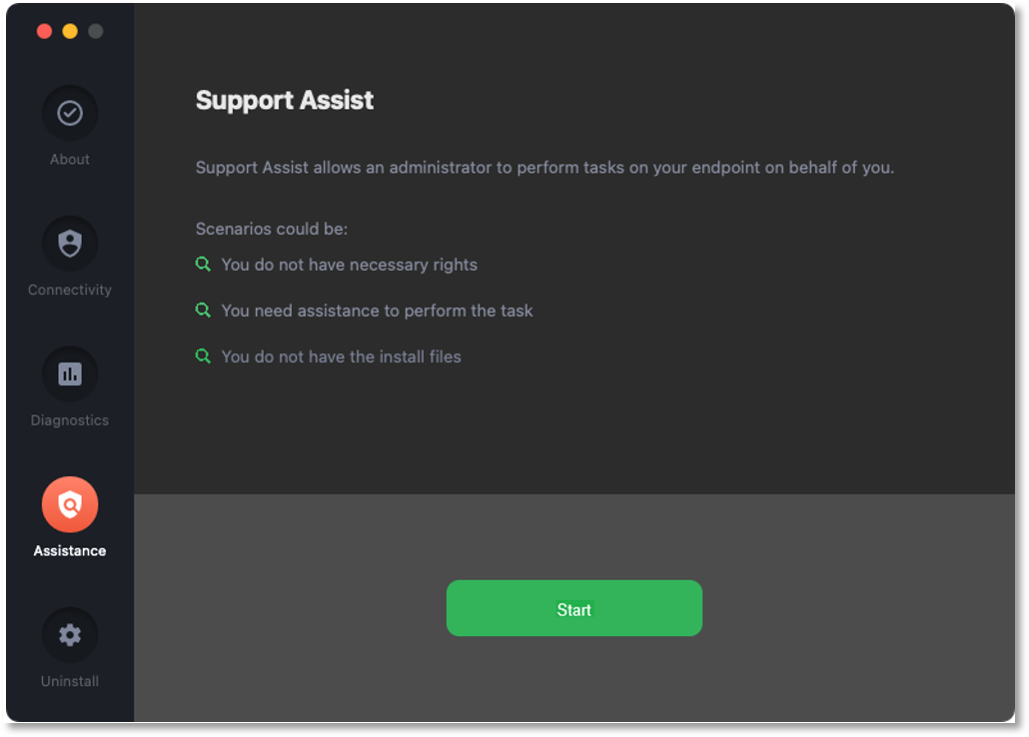
Assistance - (Standard User only) allows users to ask a knowledgeable support person to access the endpoint remotely and carry out tasks on the user's behalf (see Requesting Assistance (Support Assist) for more information):
-
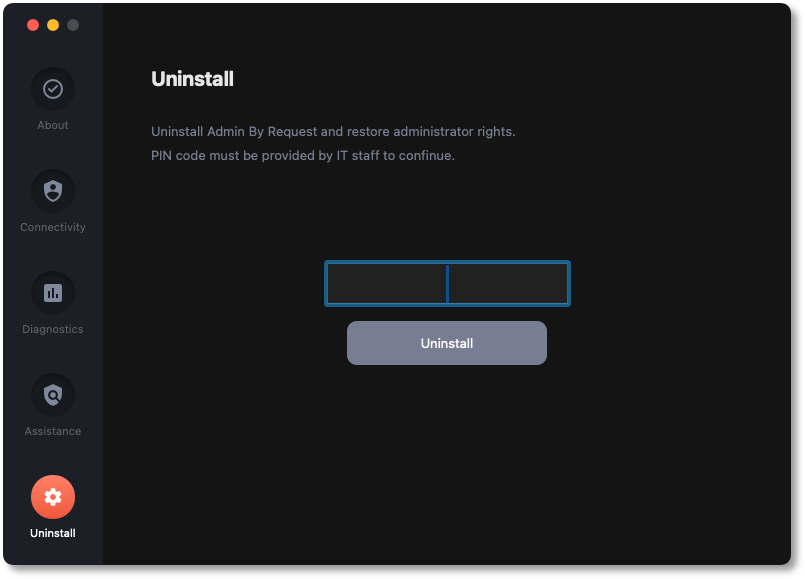
Uninstall – enables administrators to uninstall Admin By Request from this workstation. See Uninstalling via PIN Code for more information:
Submitting Diagnostics
Diagnostic information is available on each endpoint that has Admin By Request installed. The details recorded help IT administrators and the Admin By Request support team to troubleshoot issues that might be occurring.
The following data is recorded and submitted:
-
Current system configuration
-
Errors from the system log
-
Admin By Request-related crash logs
-
Admin By Request service log
To send diagnostic information about how Admin By Request is running on this workstation, select the Diagnostics button on the About Admin By Request panel and click Submit Diagnostics Data.
The button changes to text Diagnostics submitted, indicating that diagnostics have been sent for analysis:
It's a good idea to submit diagnostics when raising a support ticket for a new issue. The Admin By Request support team will frequently ask for diagnostics when responding to tickets if the information is not already available.
Requesting Assistance (Support Assist)
Support Assist is a feature that allows users to ask for help from someone who can connect remotely to the user's computer and provide technical assistance with tasks that the logged-in user would not normally be able to complete. The feature is accessible via the Assistance button in the user interface.
Support Assist has been designed to be used with non-admin users, so that customers can apply the best practice "principle of least privilege" to help desk staff as well as end users. The assisting user (non-admin) helps the requesting user (also non-admin) to carry out a task with less restrictive settings than the requesting user during a remote control session.
From ABR Mac 5.2, Unattended Access and Remote Support are available for IT admins to connect directly to Mac endpoints from the Admin By Request portal.
The following scenarios are examples of when this might be useful:
-
End users who are not allowed to install software at all (i.e. neither Run As Admin nor Admin Sessions are enabled).
-
End users who don’t know where to get the software they need to use.
-
End users who are not IT savvy enough to self-service.
-
End users who refuse to take on the responsibility of installing software on their work computers, knowing they will be audited.
Refer to Support Assist portal settings for details on how to configure Support Assist.
 Assistance example scenario
An example of the first scenario could be in Customer Relations, where users do not need to install software by default. When the time inevitably arrives that new or upgraded software is required, they have to call your help desk. If the request is accepted, a help desk staff member can assist by connecting remotely and using screen sharing with the end user.
Let’s take this scenario and say Customer Relations employee,
There are several (problematic) ways this could be solved without the Support Assist feature, with or without Admin By Request:
-
Steve could have a local administrator account to all computers. However, this is an absolute security no-no and there is no auditing.
-
You could have Microsoft’s Local Administrator Password System (LAPS) in place, but this also lacks proper auditing and doesn’t work without a LAN or VPN connection.
-
-
Steve could log on and use Run As Admin, but then Steve gets audited for
Ideally, Steve should execute the request with
If you have a change management or ticketing system, you would also want a reference to document this change. This is exactly what the Support Assist feature does.
Multi-Factor Authentication (MFA)
If MFA is enabled (Endpoint Privilege Management > Settings > Mac Settings > Endpoint > AUTHENTICATION), the support person (i.e. Steve) must authenticate using MFA.
Refer to Mac Settings (Authentication tab) for more information about MFA.
Assistance sequence
-
-
Steve is assigned the task and connects remotely to
-
Steve starts Admin By Request, selects Assistance from the About panel and clicks Start:
-
At the
-
The session starts, indicated by a progress timer, which displays for the duration of the session
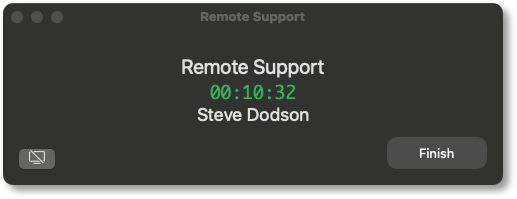
-
When the assist task is complete, Steve clicks Done. If he forgets,
Security checks
Is it risky if a user finds and clicks the Start button from the Assistance panel? No - the
For Help Desk employee Steve, it is essentially the same as logging in to
Think of Support Assist as a shortcut to logging in to
Uninstalling via PIN Code
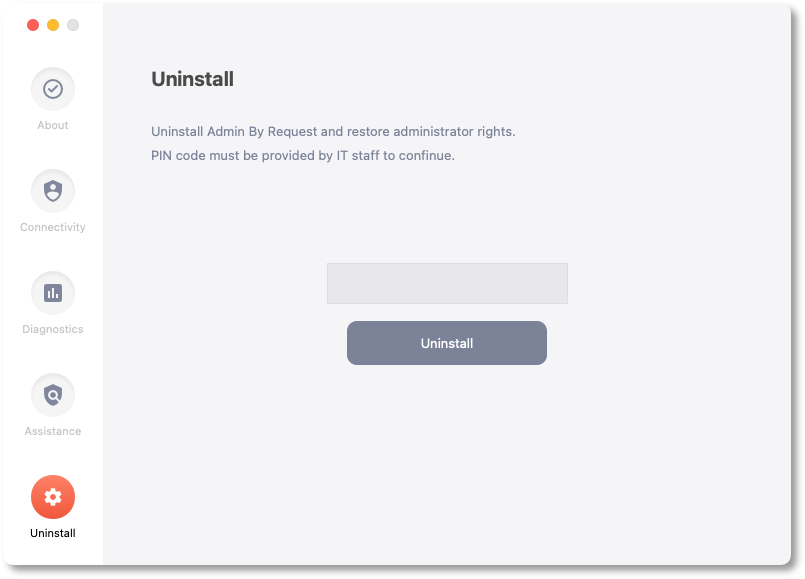
Offline users can obtain a challenge/response PIN, which allows the user to perform tasks requiring elevated privileges. A PIN Code can also be used to uninstall Admin By Request when online and this is the purpose of the Uninstall panel in the About Admin By Request window.
The first few steps in this procedure require access to the portal.
-
In the Admin By Request portal, navigate to the Inventory page and identify the device on which to perform the uninstall.
-
Locate the device in the inventory list - in the PIN column, click PIN for that device (columns can be switched around - the PIN column in your portal might not be the right-most column):

-
Click tab UNINSTALL PIN and then click button Generate PIN:

Note that clicking UNINSTALL PIN also displays a list of previous uninstall events on this computer (below the Uninstall Pin Code window):

-
Copy the PIN.
-
Back on the device on which you want to uninstall Admin By Request, go to the About panel (i.e. select the Admin By Request icon from the
-
In the Uninstall window, select Uninstall from the left button group, enter the PIN copied from the Portal, and click Uninstall:
Using Run As Admin
Example 1 - Install app VLC
A standard user, requiring elevated privileges to execute the VLC installation program, initiates the following sequence of events:
-
Download the package or application file for installation.
-
Start the installation by opening the Downloads folder and dragging the VLC icon to the Applications folder. If the download is a .dmg file, double-click it first to mount it:
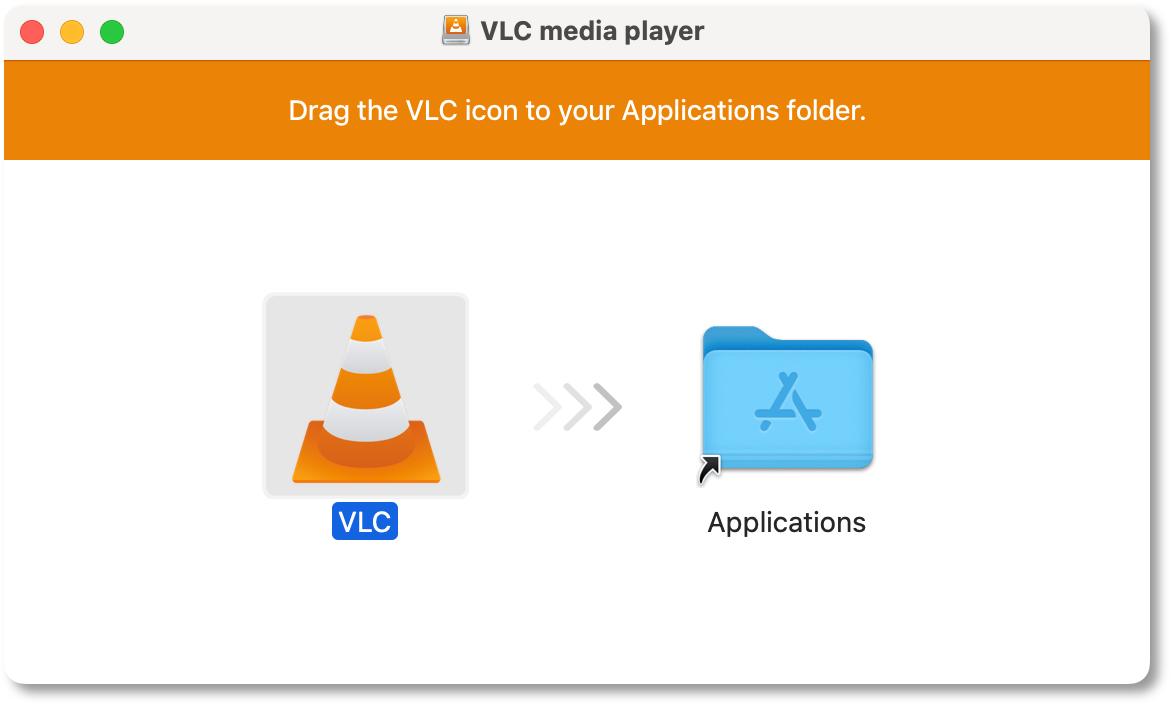
If a warning about VLC being downloaded from the Internet pops-up, click Open to continue.
-
Admin By Request suspends installation and checks the organization's portal settings.
-
Endpoint Privilege Management > Settings > Mac Settings > Authorization > AUTHORIZATION:
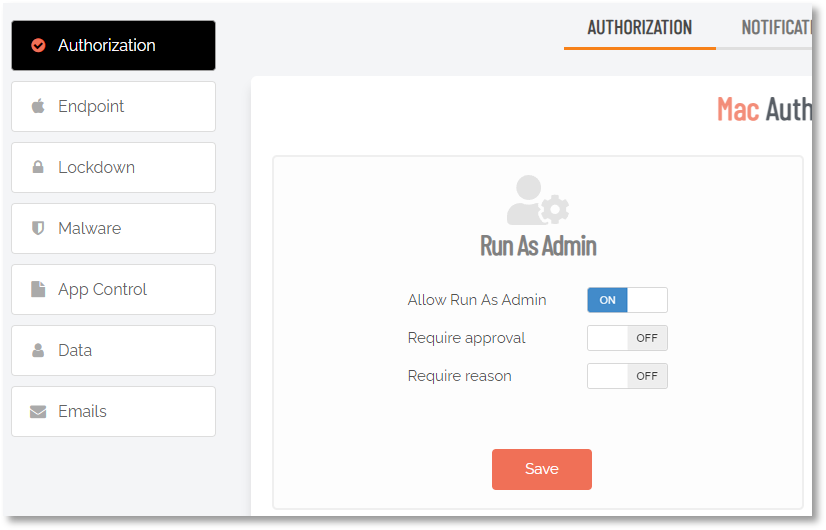
Authorization (i.e. approval) is not required, so installation can proceed. This is also the case when approval is required, but the app is pre-approved.
-
Endpoint Privilege Management > Settings > Mac Settings > Endpoint > AUTHENTICATION:
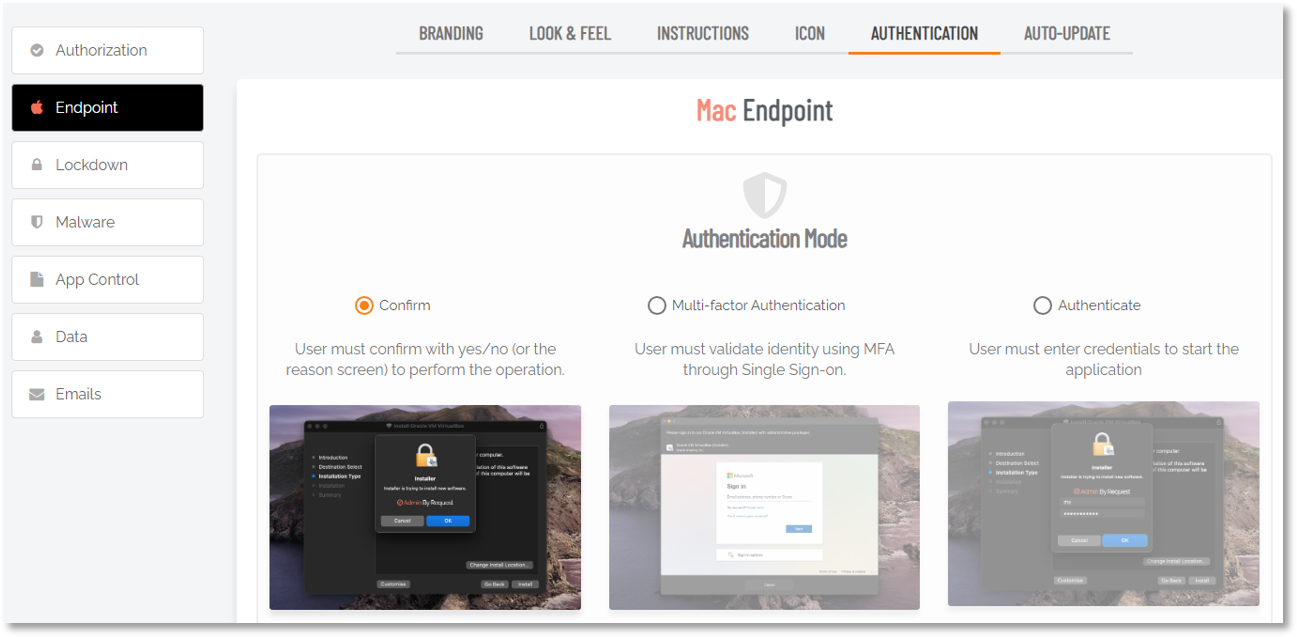
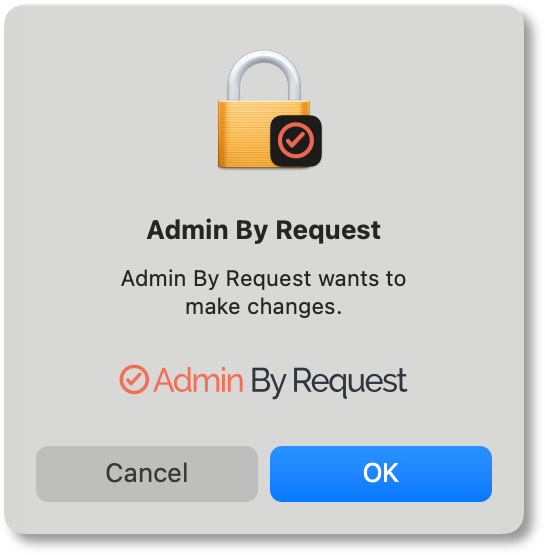
Authentication is always required and the mode in this case is Confirm. so the following prompt is displayed and the user simply has to click OK to continue:
-
-
Once authenticated, installation proceeds to completion and Admin By Request displays a note from the application installer saying that installation has completed successfully.
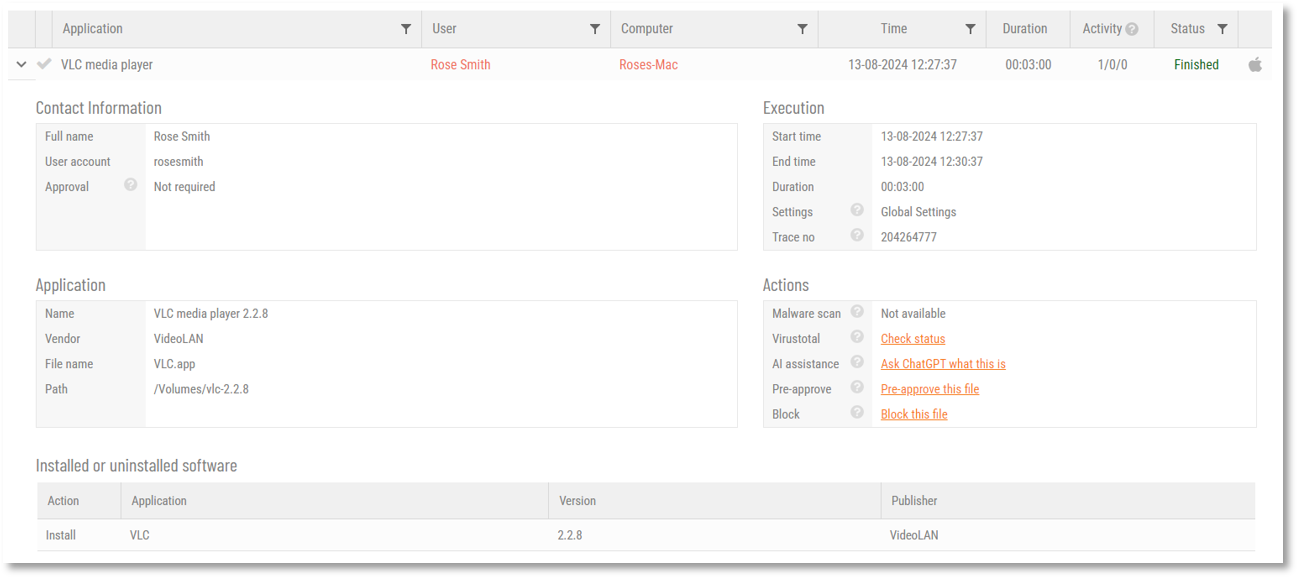
After installation, portal administrators can check the audit log in the portal for details on the user, the endpoint, the application and execution history:
Example 2 - Install app Foxit PDF Reader
A standard user, requiring elevated privileges to execute the Foxit PDF Reader installation program, initiates the following sequence of events:
-
Download the package or application file for installation.
-
Start the installation by opening the Downloads folder and double-clicking the .pkg file:
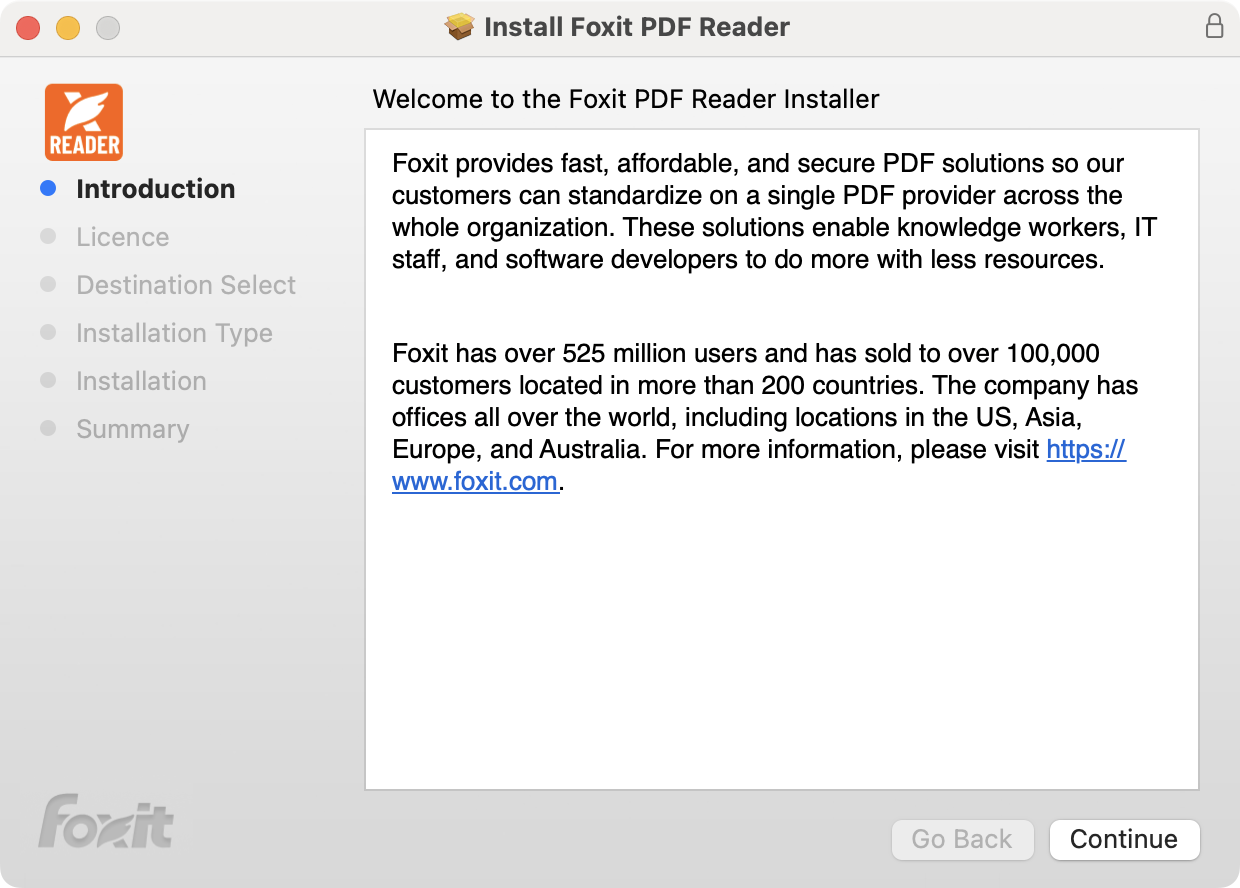
If a warning about the file being downloaded from the Internet pops-up, click Open to continue.
-
Admin By Request suspends installation and checks the organization's portal settings.
-
Endpoint Privilege Management > Settings > Mac Settings > Authorization > AUTHORIZATION:

Authorization (i.e. approval) is required, so Admin By Request prompts for phone, email address and reason. This information is submitted for approval and the user is advised they will be notified via email when approved:
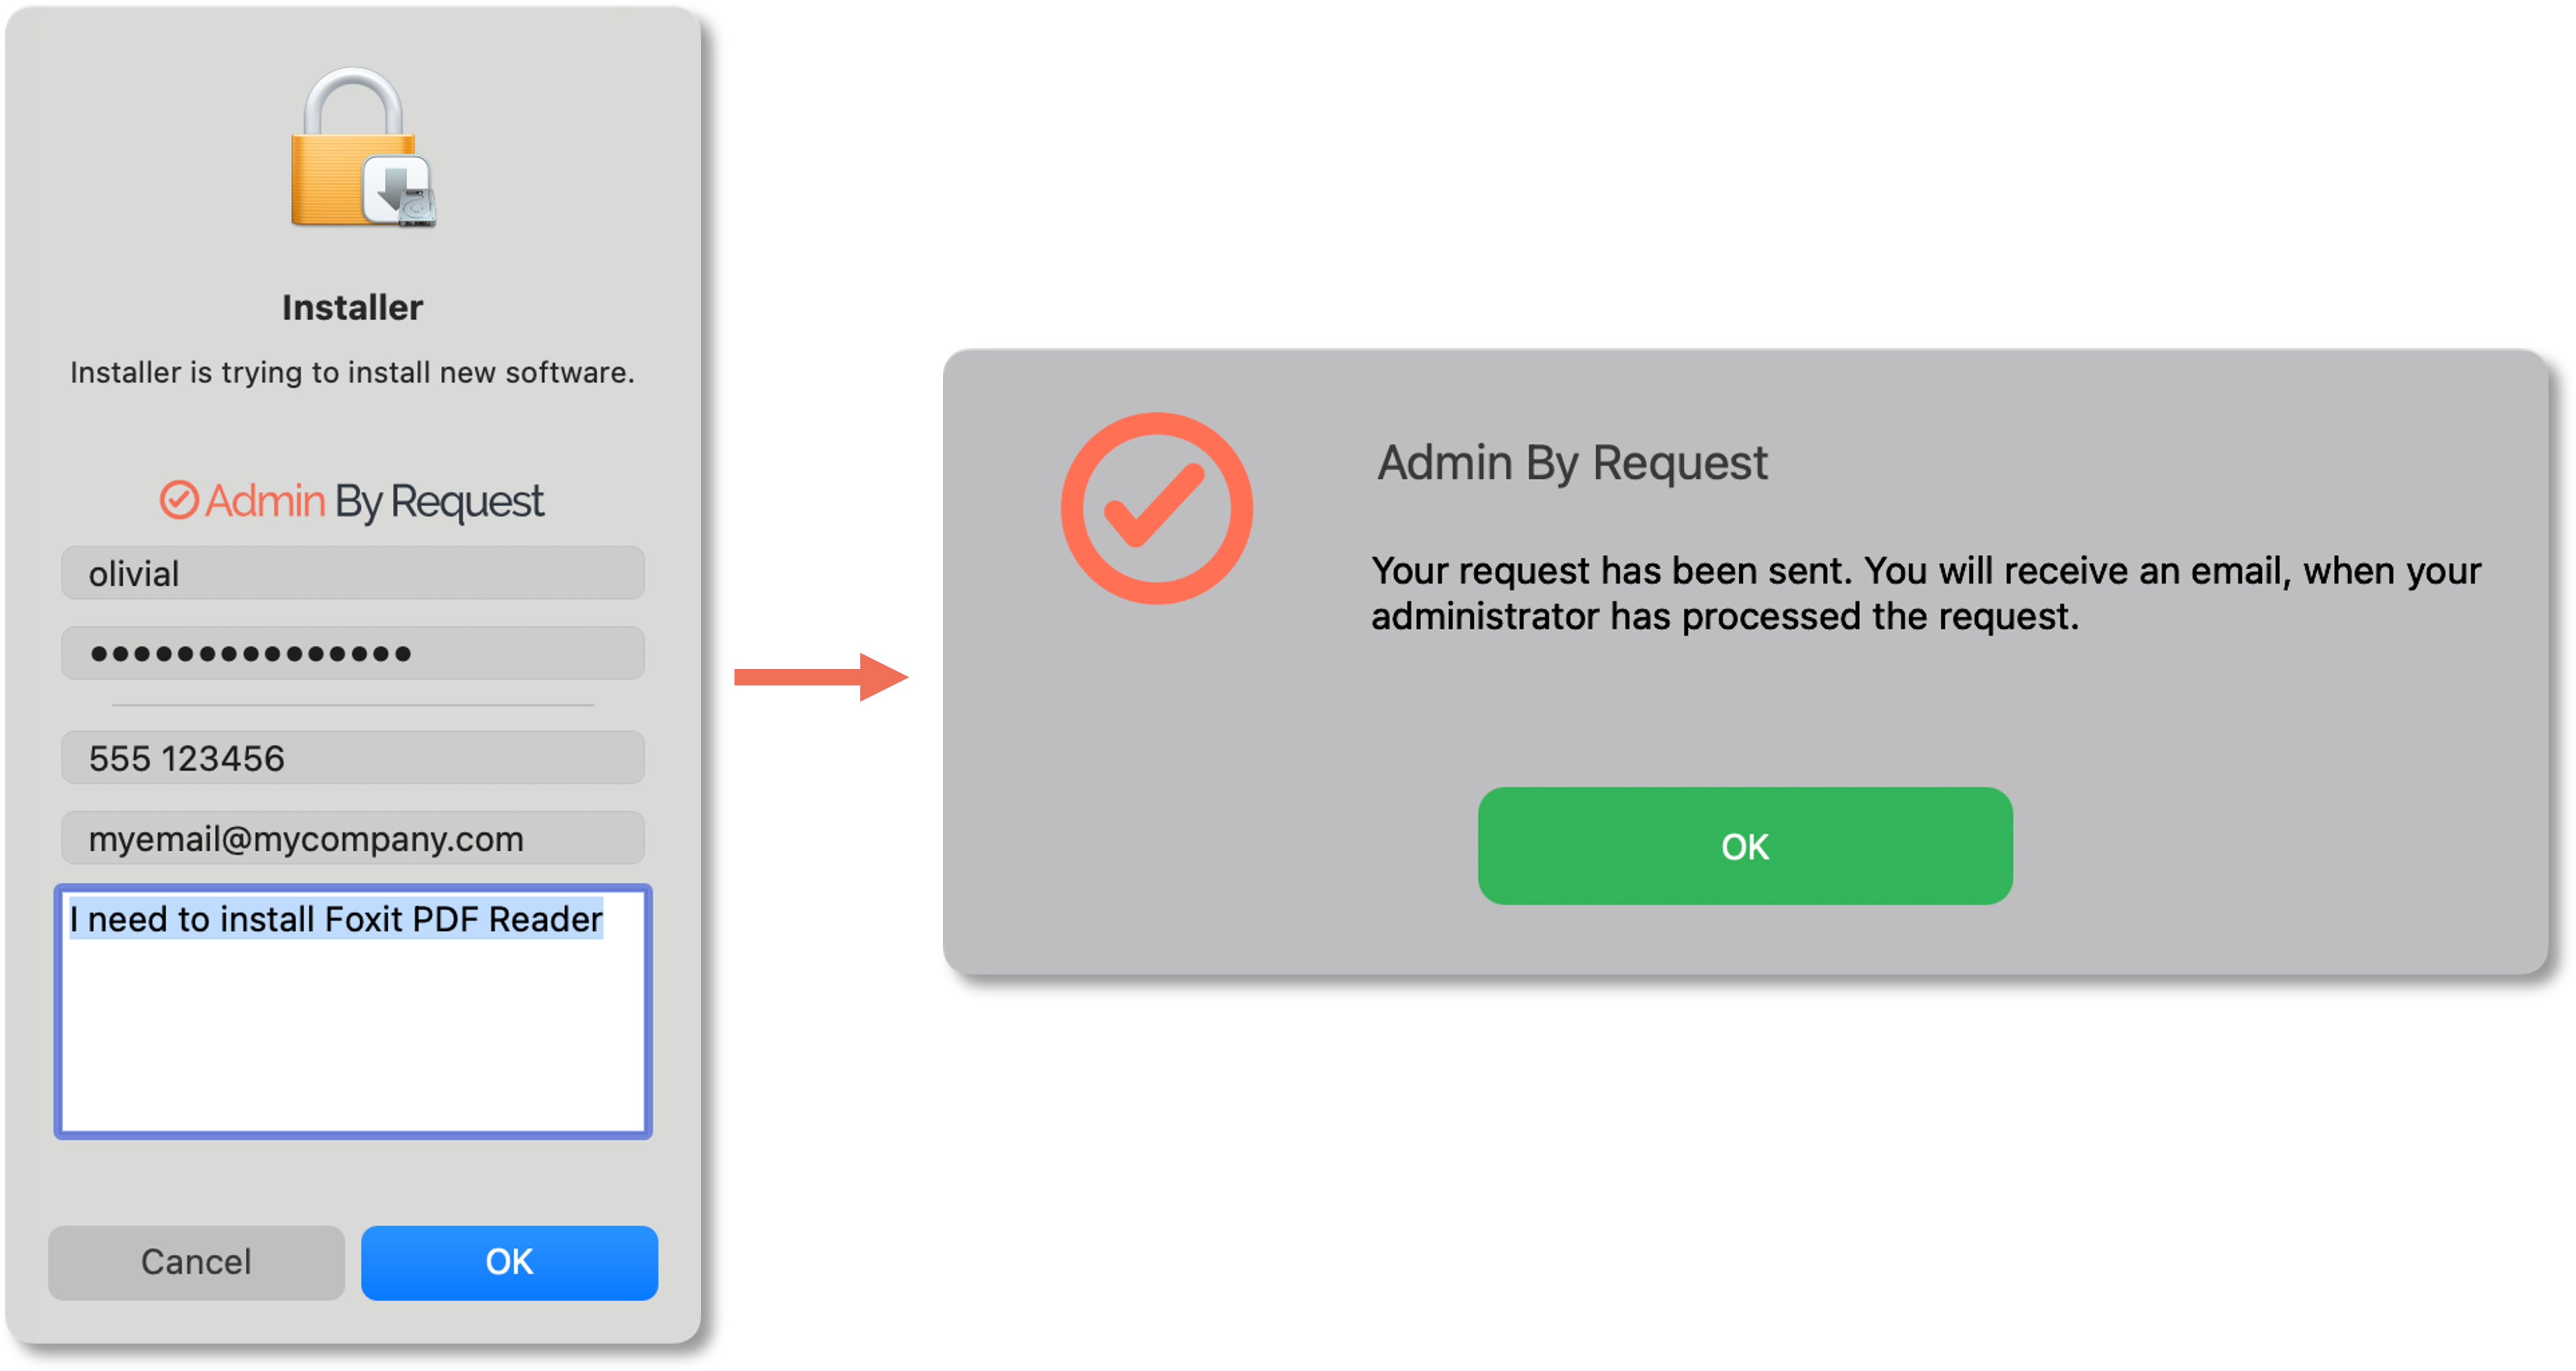
A portal administrator receives the request and approves it:

When approval arrives via email, the user can continue the installation with authentication (step 3.b below).
-
Endpoint Privilege Management > Settings > Mac Settings > Endpoint > AUTHENTICATION:
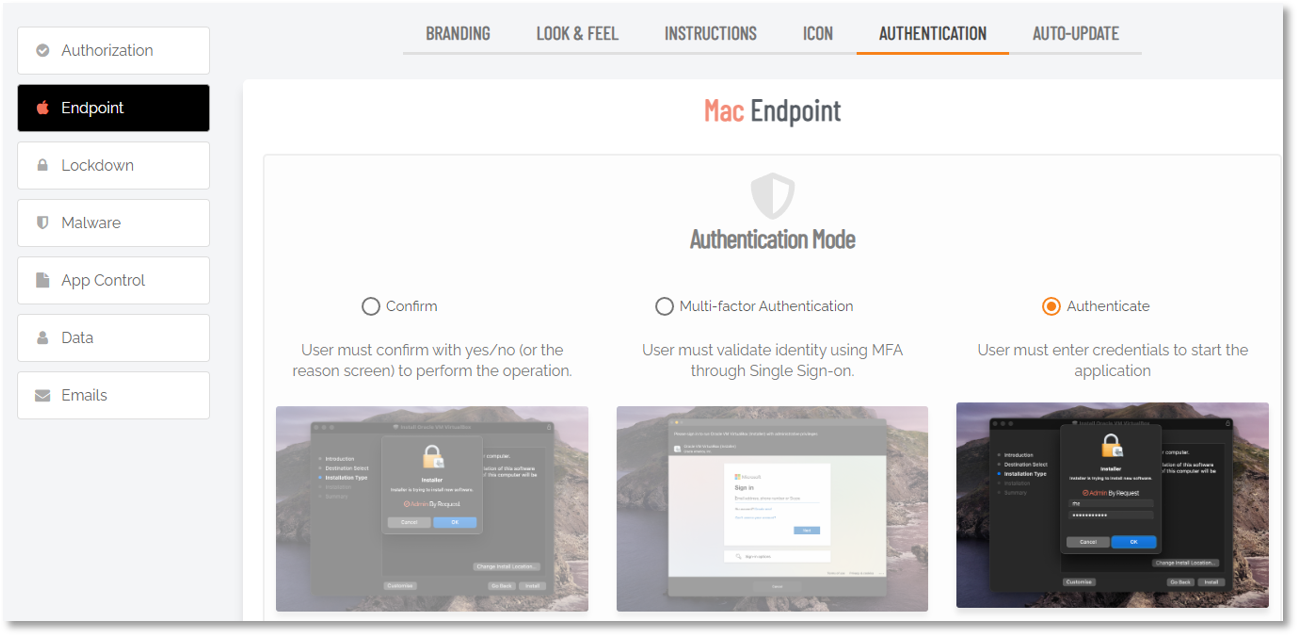
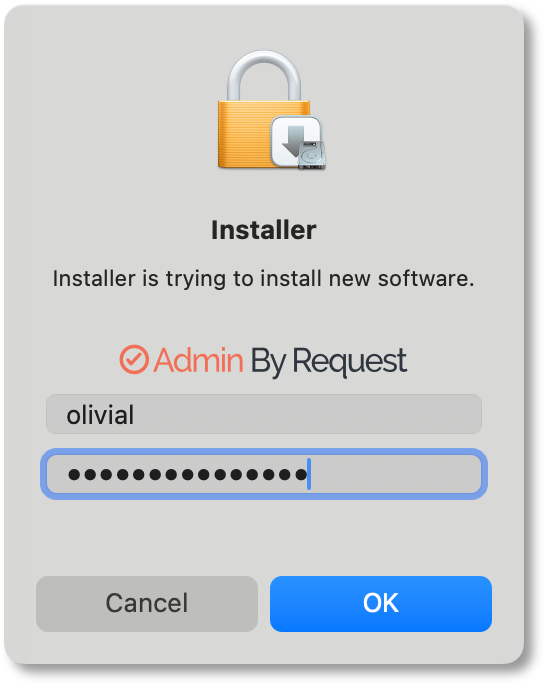
Authentication is always required and the mode in this case is Authenticate. so the following prompt is displayed and the user must supply credentials to continue:
-
-
Once authentication is provided, installation proceeds to completion and Admin By Request displays a note from the application installer saying that installation has completed successfully.
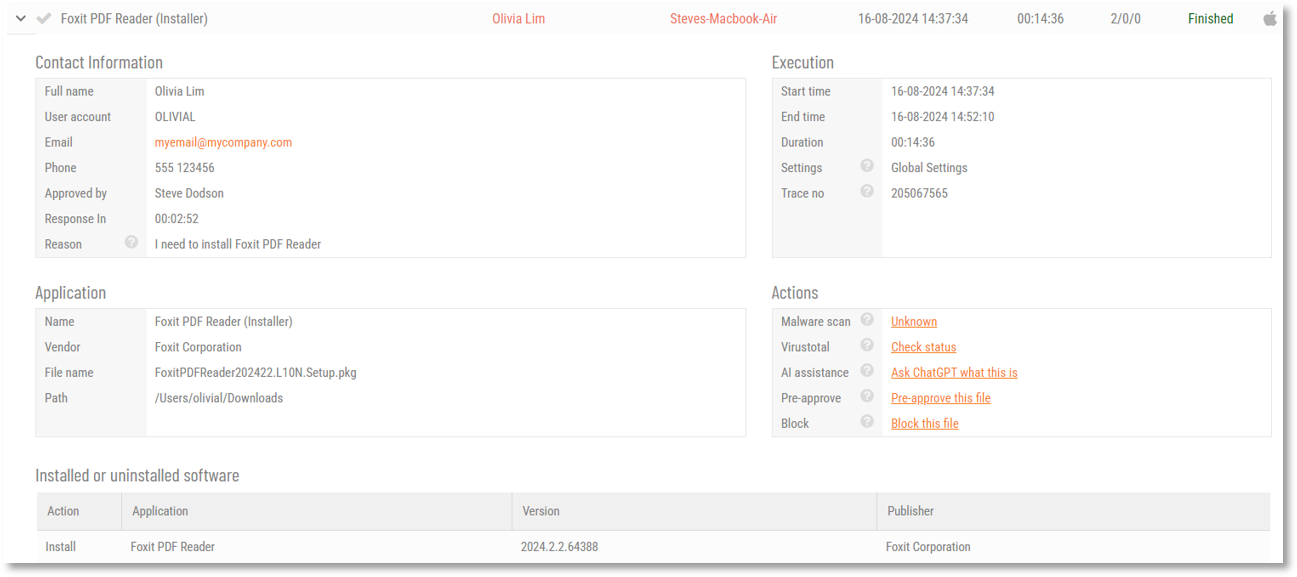
Check the audit log in the portal for details on the user, the endpoint, the application run and execution history.
Elevated privileges last only for the duration of the install and apply only to the particular application or package authorized.
Removing an app from a Mac
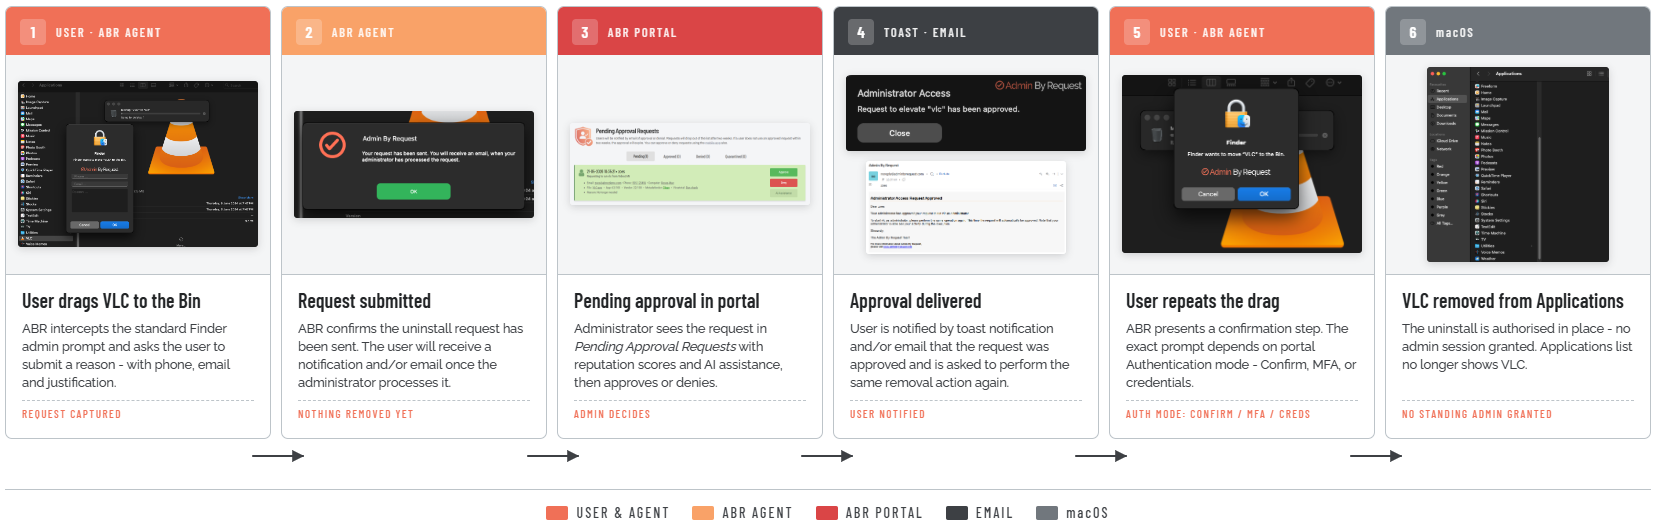
Standard users can uninstall eligible apps from /Applications through ABR authentication. As in Example 1 above with drag-to-Applications folder to install, the drag-to-bin action to remove is familiar - ABR intercepts the macOS admin prompt and routes the request through approval before authorising the uninstall in place.
The following example illustrates the process for a standard user to remove VLC - six steps, no admin session and eligible apps only - protected, restricted and managed apps still require full admin credentials:
MFA with Run As Admin
MFA is available as an option for authenticating users prior to granting Run As Admin privileges. The three options in the portal for authenticating users are:
-
Confirm - User must confirm with Yes or No to elevate via Run As Admin.
-
Multi-factor Authentication - User must validate identity using MFA through SSO.
-
Authenticate - User must validate with credentials, face recognition, fingerprint, smartcard or similar.
Refer to Mac Settings (Authentication tab) for more information.
Intuitive app updates
Prior to Mac 5.0, updating already-installed applications required an Admin Session. Now, pre-approved apps can be updated when the apps themselves prompt for it on manufacturer release. Alternatively, IT departments can control app updating by withholding pre-approval for the next release of an app until full testing has been completed.
As with the initial installation, portal settings determine if users must request approval to update (authorization) and, once approved, they are asked to confirm an update via Confirm, MFA or Authenticate with credentials (authentication).
Requesting Administrator Access
Requesting administrator access is also known as requesting an Admin Session, which is a time-bound period during which a standard user has elevated privileges and can carry out administrator-level tasks..
As with About Admin By Request,
![]()
A standard user making this selection where approval is required initiates the following sequence of events.
-
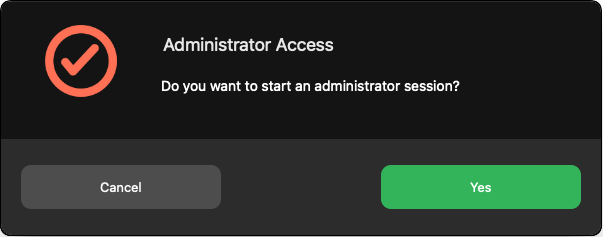
A prompt asks “Do you want to start an administrator session?”. The user clicks Yes to continue:
-
An empty Request Administrator Access form appears:
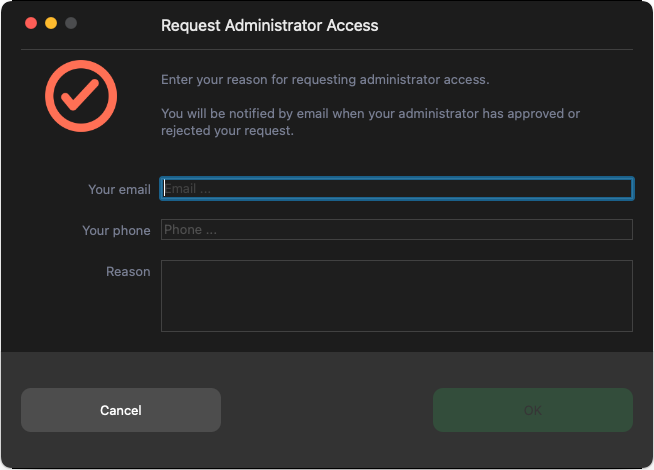
-
The user enters email, phone and reason information into the form and clicks OK.
NOTESettings in the portal control the full extent of what is displayed to the user:
-
If Code of Conduct is enabled, the user must acknowledge a Code of Conduct pop-up to continue (EPM > Settings > macOS Settings > Endpoint > INSTRUCTIONS).
-
If Require approval is OFF, the approval steps are skipped (EPM > Settings > macOS Settings > Authorization > AUTHORIZATION > Admin Session).
-
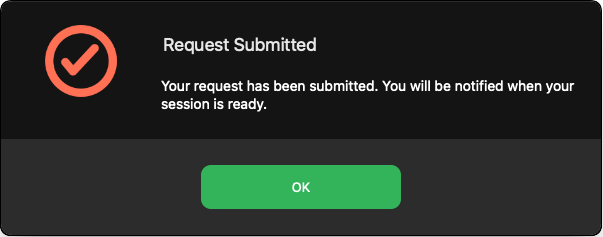
-
The request is submitted to the IT administration team and the user is advised accordingly:
-
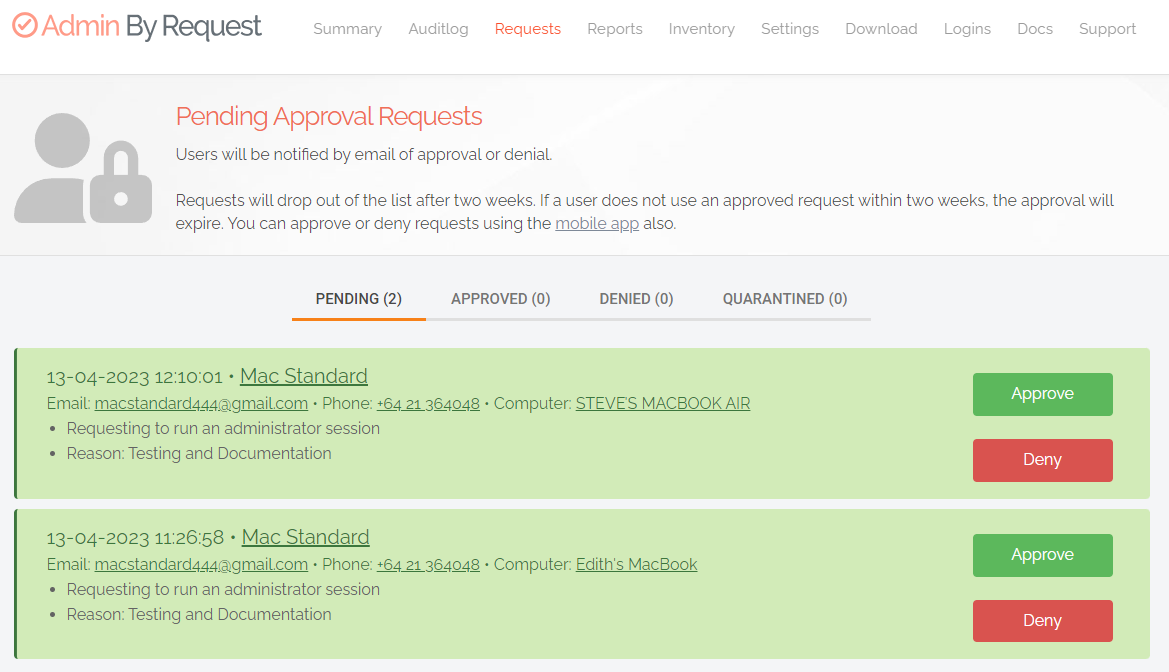
The IT administration team is notified via the Admin By Request portal that a new request for administrator access has arrived.
The following example shows how two new requests might appear in the portal:
-
One of the team either approves or denies the request. If approved, the user is advised accordingly:
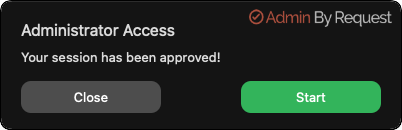
-
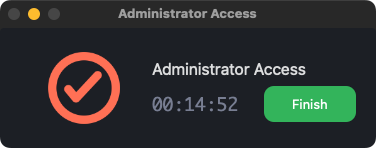
The user clicks Yes, which starts the session and displays a countdown timer:
-
The duration of an admin session is set via the portal (15 minutes in this example) and the countdown timer ticks down to zero, at which time the session ends. The user can optionally end the session at any time once it has started by clicking Finish.
See Changing Admin Session Duration for more information on changing the duration of the countdown timer.
During an Admin Session, users can install programs requiring admin rights, install drivers and change system settings other than user administration. All activity during the elevated session is audited, so you can see in the audit log the reason why the person needs the elevation; anything installed, uninstalled, or executed.
During an Admin Session, users cannot uninstall Admin By Request, or add, remove or modify user accounts.
MFA with Admin Sessions
MFA is available as an option for authenticating users prior to allowing an Admin Session. The three options in the portal for authenticating users are:
-
Confirm - User must confirm with Yes or No to start an Admin Session.
-
Multi-factor Authentication - User must validate identity using MFA through SSO.
-
Authenticate - User must validate with credentials, face recognition, fingerprint, smartcard or similar.
Refer to Mac Settings (Authentication tab) for more information.
Requesting Remote Support
To request a Remote Support session as an end user, the end user does the following:
-
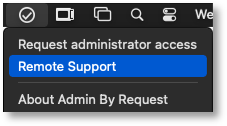
From the endpoint with the Admin By Request client installed, navigate to the Admin By Request menu bar.
-
Select Remote Support:
-
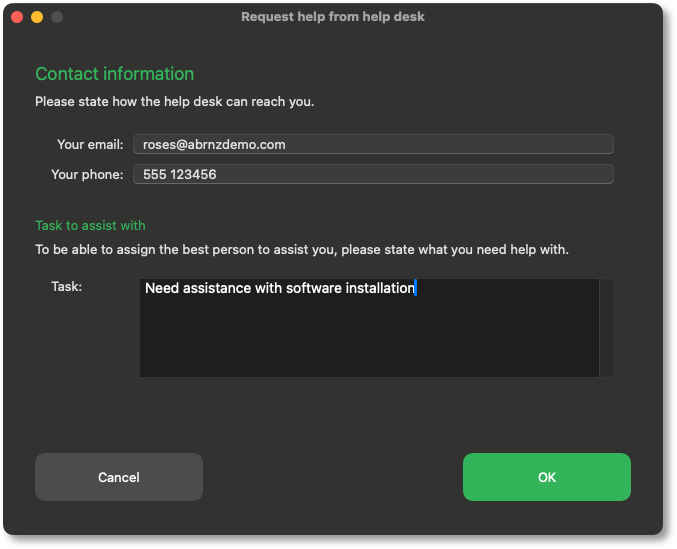
This prompts the user for contact information as well as a reason for the Remote Support request:
-
Click OK to submit the request and OK again to acknowledge the notification.
-
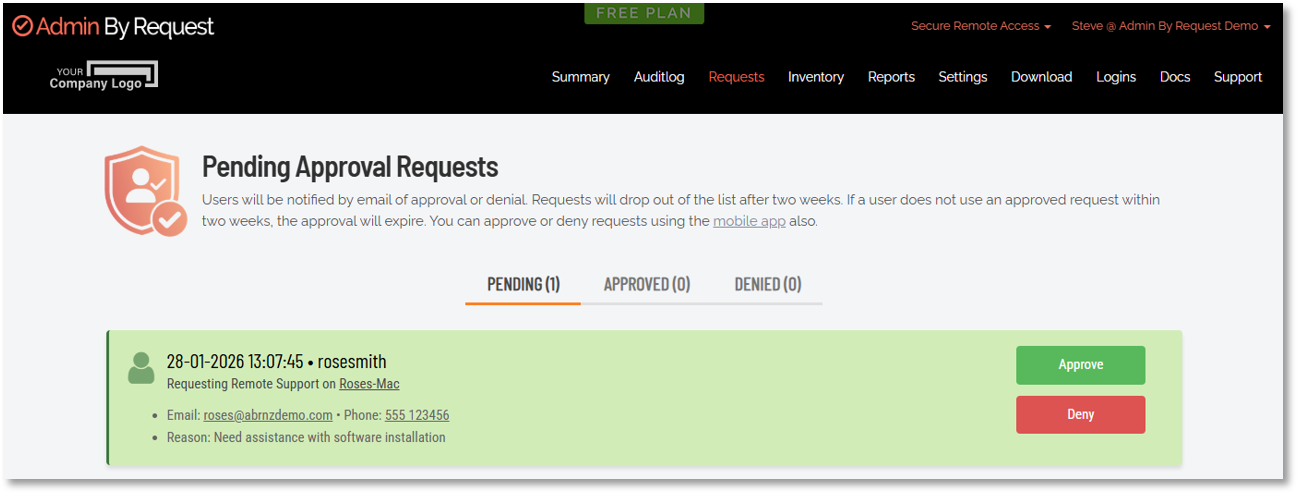
All Remote Support requests awaiting approval can be found by the portal admin in the Admin By Request portal under “Requests” with the “Secure Remote Access” view selected in the product selector:
-
The portal admin can now approve or deny the request. If the request is approved, the end user is prompted to allow the connection:
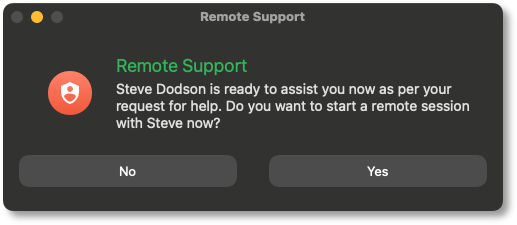
-
By clicking Yes, the secure tunnel and just-in-time server session is initialized, and the portal user is connected to a Remote Support session – sharing the screen and input directly in the browser (if enabled - see Specify View Only for portal admin).
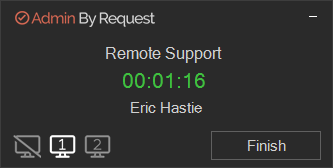
Once the session starts, a timer appears in the lower, right corner of the screen, showing the amount of time used so far during the session:
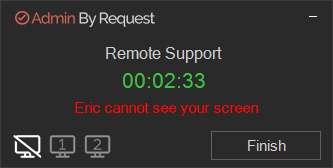
Click the Hide icon at any time to hide the screen from the remote person.
If the endpoint has multiple monitors, the monitor currently being viewed is indicated (Monitor 1 in this example). Click a monitor icon to switch the view to that screen:
To hide a screen, simply click the Hide icon:
Setting-up a Break Glass Account
About Break Glass
The Break Glass feature provides additional security for
Specifically, a Break Glass account is for situations such as when the domain trust relationship is broken or someone without logon credentials needs to service the endpoint. The provisioned account is a temporary local user in the local administrators group that must be used within one hour of creation, so do not create a Break Glass account until you are ready to use it.
Once logged-in via the Break Glass account, you have a limited time (typically 2 hours) to get the work done before Expiry. At expiry time, the temporary local user is forcibly logged off (if still logged-in), the session terminated and the temporary account removed.
For
-
Break Glass extends the functionality of MS LAPS.
-
Unused Break Glass accounts are automatically removed on reboot.
-
In the portal, access Break Glass settings via menu : Inventory > [Computer] > Break Glass
Security benefits
The Break Glass feature includes the following security benefits:
-
Break Glass circumvents the need to use the built-in local Administrator account – you can disable it completely to add an extra later of security to your endpoints.
-
The account must be used within an hour of being generated, minimizing the potential attack window and risk of account compromise.
-
Risk is further minimized by a one-time-only log in functionality: the user can log in once, and after log out, the account is terminated.
-
The user has only the time specified under Expiry when the Break Glass account was generated to use the administrator account; this duration is indicated on the built-in desktop background of each account. When the time-period is up, the session is terminated.
-
Measures are in place to ensure the Expiry time cannot be tampered with: if the Account user attempts to extend their time limit by adjusting the clock, the Account automatically logs out / terminates.
-
All Usernames and Passwords are automatically generated, random, and complex, minimizing the possibility for a successful brute force attack.
-
Passwords are stored within the web application, only accessible by Portal users / IT Admins via credentials – a safer option compared to MS LAPS' storage of admin account passwords in plain text along with the AD computer record.
When would I use a Break Glass account?
A Break Glass account is useful in the following scenarios:
-
Regaining Domain-Trust Relationship
As the name suggests, the Break Glass feature is ideal for "last resort" situations, such as when the domain-trust relationship is broken and needs to be reconnected using an Administrator account. -
Provisioning a Just-In-Time Administrator Account
The Break Glass Account doubles up as a Just-In-Time account that can be used for specific purposes / situations when necessary; e.g., provisioning an account for someone who doesn’t have credentials, but requires access to service an endpoint. -
Extra Possibilities with Server Edition
Further to point 2, with Admin By Request Windows Server Edition you can provision an admin account to a consultant without giving them domain-wide permissions at any point in time.
Break Glass Prerequisites
Endpoints making use of this feature must be able to contact the MQTT broker:
Outbound MQTT broker connectivity via Websockets - port 443 - for the following:
-
If your data is located in Europe (Netherlands):
Ten nodes (FastTrackHubEU1.azure-devices.net to FastTrackHubEU10.azure-devices.net) -
If your data is located in the USA (East):
Ten nodes (FastTrackHubUS1.azure-devices.net to FastTrackHubUS10.azure-devices.net) -
If your data is located in the UK:
Ten nodes (FastTrackHubUK1.azure-devices.net to FastTrackHubUK10.azure-devices.net) -
If your data is located in Europe (Germany):
Ten nodes (FastTrackHubGermany1.azure-devices.net to FastTrackHubGermany10.azure-devices.net) -
If your data is located in the USA (West):
Ten nodes (FastTrackHubUSWest1.azure-devices.net to FastTrackHubUSWest10.azure-devices.net) -
If your data is located in Asia:
Ten nodes (FastTrackHubSingapore1.azure-devices.net to FastTrackHubSingapore10.azure-devices.net)
Using the Break Glass feature
Setting-up and using a Break Glass account comprises three tasks:
-
Generate
Create a Break Glass account:
-
Log in to the Portal and navigate to the Inventory page. Select an endpoint on which you want to enable the Break Glass account and select Break Glass from the left-hand menu.
-
From the Expiry drop-down menu, select an amount of time for which you want the account to be active once logged-in. The default is 2 hours, but the period can range from a minimum of 15 minutes, to an unlimited amount of time.
-
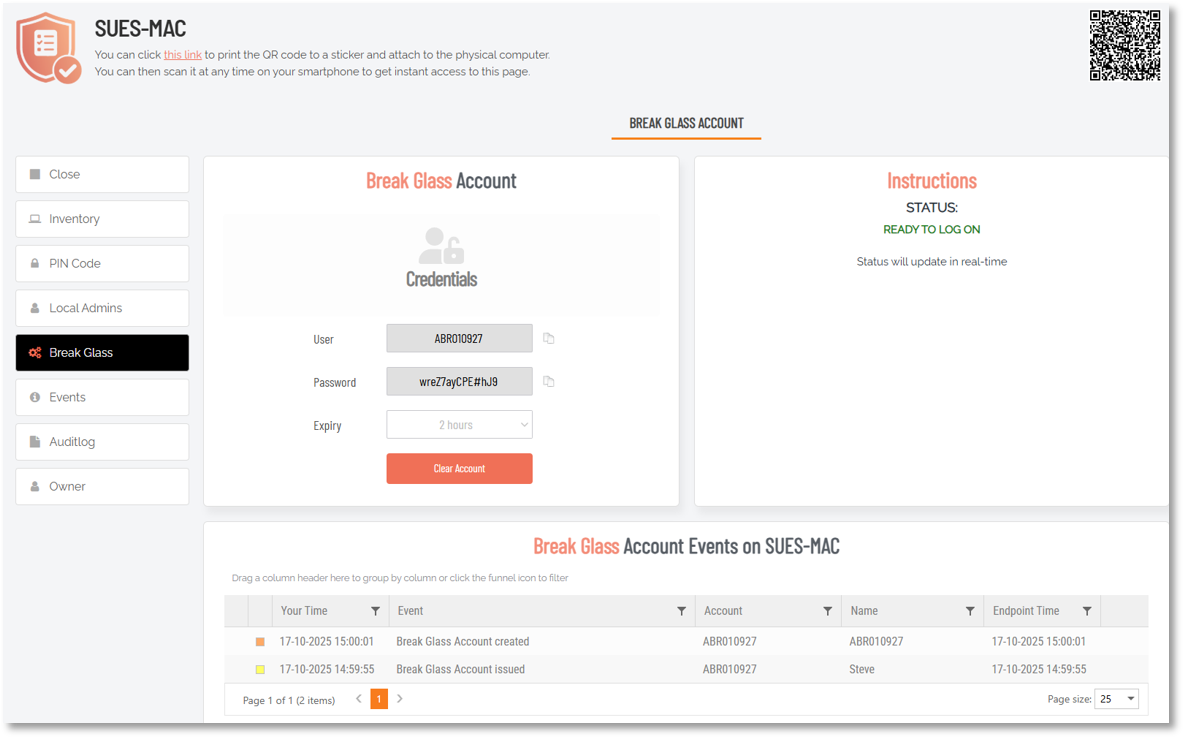
Click the Generate Account button, which issues a Break Glass account and displays its User and Password in the read-only text boxes:
 IMPORTANT
If the account is not used within one hour of generation, it is automatically removed and you will need to create another. All creation activity is logged.
-
Once generated, the status of the Break Glass account is updated in real-time in the Portal. The four possible states are:
-
Waiting for Endpoint – The account is generated in the User Portal but not yet created on the endpoint (to create the account on the endpoint, see the next section Activate).
-
Ready to Log On – The account is created but has not yet been activated / used (i.e., logged-in to).
-
Session in Progress – The account is currently in use.
-
Account Removed – The account has been terminated either due to the user logging out, or the pre-defined Expiry time being reached.
The following screenshots illustrate a Windows endpoint example - Mac and Linux endpoints display similar status messages and events:
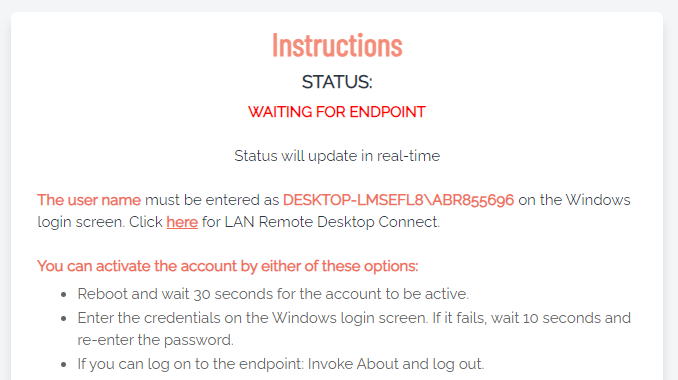
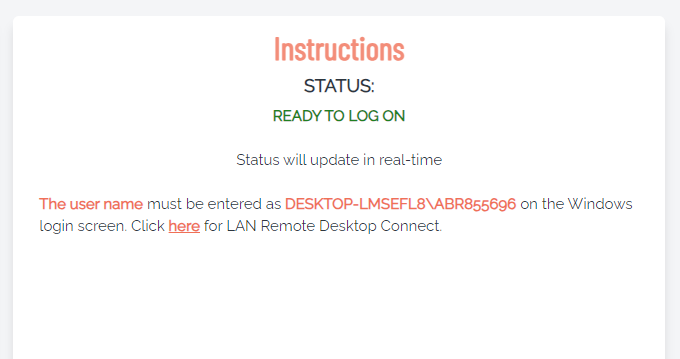
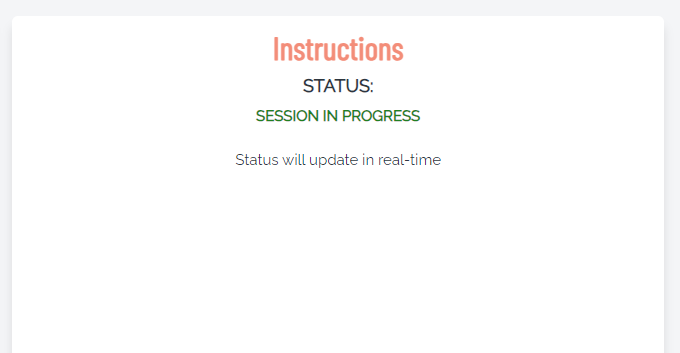
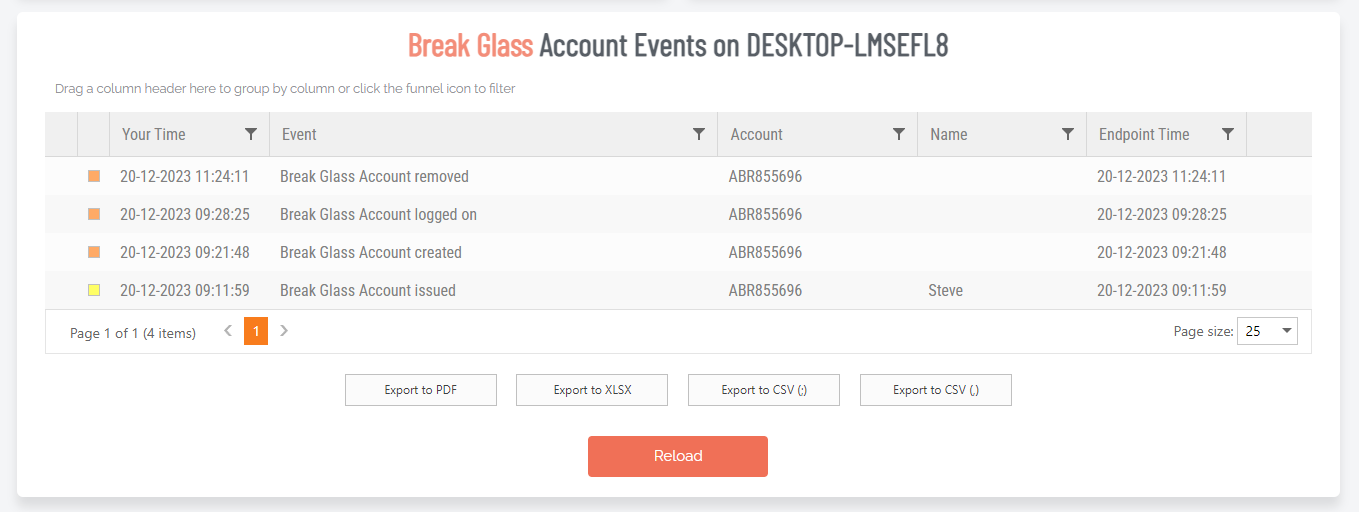
-
-
Optionally, you can send the new Break Glass account credentials via SMS (i.e., text message) by entering the intended recipient’s mobile number into the text box and clicking Send SMS.
-
-
Activate
Activate the Break Glass account using one of the following methods:
-
Restart the device, then wait approximately 30 seconds for the account to be created.
-
If enabled, you can select on the login screen and enter the generated Break Glass account at the credential prompt.
NOTERemember, this may fail on the first attempt; if so, wait 10 seconds and then try again.
-
A third method to activate the account is by logging in to another account on the endpoint (if possible), selecting the Admin By Request icon from the toolbar, and clicking the About item from the menu.
-
-
Terminate
Use the account and log out:
-
Once logged in to the Break Glass account, the user has administrator privileges to do what they need to do, within the Expiry time displayed:
-
Terminate the account by either logging-out, or allowing the account to log out automatically when the Expiry time is reached – whichever comes sooner.
-
Refer to Features > Break Glass / LAPS for more information on the feature.