Portal Administration for Mac
Introduction
This topic documents configuration parameters in the Admin Portal that can be used to manage Mac Settings and Sub Settings.
Fields that can be set/configured in the portal are presented in tables, with each table showing:
-
Setting - the name of the field that controls the setting
-
Type - the type of value that can be entered or selected and its default value
-
Description - how the setting is used and notes about any implications it may have on other settings
To change any of the settings in the portal, log in to the portal and select the setting from the menu.
In this topic
Pre-Approval and Blocked Settings
Supplementary Technical Information
Entra ID Support
Portal menu: Settings > Tenant Settings > Identity > ENTRA ID
Azure AD has been renamed by Microsoft to Entra ID. This version of the
A selling point for the Admin By Request EPM solution is its flexibility and tools for granular access control; organizations can configure every setting to their specific needs and the needs of all, some, or even individual users.
Settings act as rules, such as whether the Run as Admin or Admin Session features are enabled, and whether or not users need approval to use them. You likely wouldn’t want the rules applied for an IT Administrator to be the same as those applied for a Customer Relations employee, so settings can be differentiated based on Sub-Settings, which allow different rules to be applied to different users and/or groups.
For Windows and Mac endpoint clients, we’ve built in support for Entra ID groups, meaning you can now apply Sub-Settings to existing Entra ID / Azure AD user and device groups.
For more information, refer to the Entra ID Connector.
Okta groups on macOS (subsettings)
For group-based subsettings on macOS, use the following prerequisites:
-
Admin By Request for Mac 5.2 or newer
-
Platform SSO sign-in with Okta as the identity provider
This prerequisite applies to group and subsettings resolution. MFA via SAML remains a separate flow.
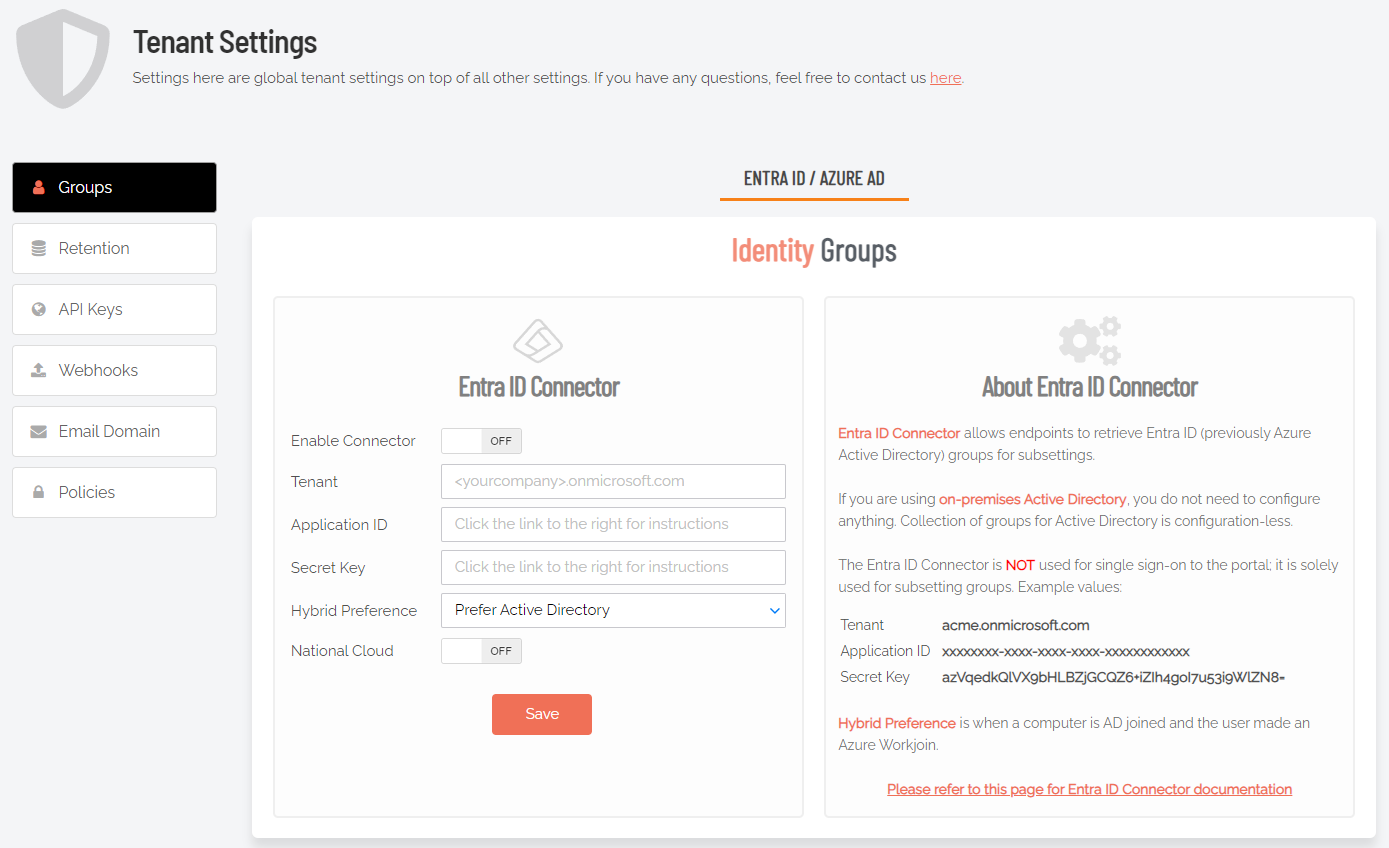
The Entra ID Connector allows endpoints to retrieve Entra ID (previously Azure AD) groups for sub-settings. The Entra ID Connector is NOT used for single sign-on to the portal; it is used solely for sub-setting groups.
If you are using on-premise Active Directory, you do not need to configure anything - collection of groups for Active Directory is "configuration-less".
Example values:
|
acme.onmicrosoft.com |
|
xxxxxxxx-xxxx-xxxx-xxxx-xxxxxxxxxxxx |
|
azVqedkQlVX9bHLBZjGCQZ6+iZIh4goI7u53i9WlZN8= |
Refer to https://learn.microsoft.com/en-us/entra/identity-platform/quickstart-register-app for more information on registering apps with the Microsoft identity platform.
The National Cloud regions of Azure are designed to make sure that data residency, sovereignty, and compliance requirements are honored within geographical boundaries.
|
Setting |
Type |
Description |
|---|---|---|
|
Enable Connector |
Toggle Default: Off |
On - Turns on the Entra ID Connector and allows endpoints to retrieve Entra ID groups for sub-settings. Off - The Entra ID Connector is disabled and endpoints will use sub-settings as described under "Sub-Settings", rather than using Entra ID rules. |
|
Tenant |
Text |
Standard email address format. Use a new line for each address. |
|
Application ID |
Text |
The value assigned to an application when it is registered with the Microsoft identity platform. |
|
Secret Key |
Text |
The application certificate or client secret generated when the app is registered. |
|
Hybrid Preference |
Selection Default: Prefer Active Directory |
An option available for selection when a computer is both AD-joined and the user makes an Entra ID Workjoin:
|
|
National Cloud |
Toggle Default: Off |
On - Enables selection of a physically isolated instance of Azure. Reveals National Service, which is where the actual geographic instance is selected. Off - Disables selection of a physically isolated instance of Azure. Hides National Service. |
|
National Service (hidden if National Cloud is Off) |
Selection Default: US Government L4 / GCC High |
The geographic instance selected:
|
|
Save |
Button |
Saves customization and changes to any fields. Note that reloading any defaults does not take effect until Save is clicked. |
Run As Admin Settings
Portal menu: Endpoint Privilege Management > Settings > Mac Settings > Authorization > AUTHORIZATION
Run As Admin (also known as Application Elevation) elevates privileges for only the file or application selected.
It is invoked when a user drops an application on the Admin By Request dock icon to install it or by running a .pkg file. After re-authenticating with credentials, the user is able to install the application or .pkg file without having administrator rights.
Full Disk Access must be enabled. Please refer to Mac Client - Install / Uninstall for more information.
|
Setting |
Type |
Description |
|---|---|---|
|
Allow Run As Admin |
Toggle Default: On |
On - Allows users to elevate privileges for a selected file. Enables Require approval and Require reason. Disables Block Run As Admin. Off - Denies users the ability to elevate privileges for a selected file. Enables Block Run As Admin, which is how users with admin credentials can still elevate privileges. |
|
Require approval (hidden if Allow Run As Admin is OFF) |
Toggle Default: Off |
On - Sends a request to the IT team, which must be approved before elevation is granted. Makes Require reason mandatory (i.e. must be On). Off - Allows the user to elevate file privileges (and thus perform the action) as soon as the action is selected. For example, selecting "Run as administrator" to execute a program occurs immediately, without requiring approval. Makes Require reason optional (i.e. can be either On or Off). IMPORTANT
The Free Plan default for this setting is Off, which means that users simply have to request elevated access and it will be automatically granted. We recommend changing this setting to On. Note that the default setting may be changed in a future release. |
|
Require reason (hidden if Allow Run As Admin is OFF) |
Toggle Default: On |
On - Extends the Off - No reason is required by the user, but details of the actions performed are stored in the Auditlog. |
|
Save |
Button |
Saves customization and changes to any fields. Note that reloading any defaults does not take effect until Save is clicked. |
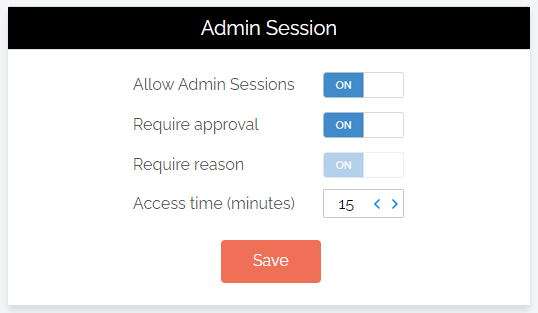
Admin Session Settings
Portal menu: Endpoint Privilege Management > Settings > Mac Settings > Authorization > AUTHORIZATION
Admin Session (also known as User Elevation) elevates the current user's privileges across the endpoint for the duration of the session.
Invoked when the user clicks the
|
Setting |
Type |
Description |
|---|---|---|
|
Allow Admin Sessions |
Toggle Default: On |
On - Allows users to effectively become a local administrator for the number of minutes specified in Access time (minutes). Enables Require approval, Require reason and Access time (minutes). Off - Denies users the ability to become a local administrator. Hides all other options under Admin Session. |
|
Require approval |
Toggle Default: Off |
On - Sends a request to the IT team, which must be approved before the request is granted. Makes Require reason mandatory (i.e. must be On). Off - Allows the user to become a local administrator as soon as the request is made. Makes Require reason optional (i.e. can be either On or Off). IMPORTANT
The Free Plan default for this setting is Off, which means that users simply have to request elevated access and it will be automatically granted. We recommend changing this setting to On. Note that the default setting may be changed in a future release. |
|
Require reason |
Toggle Default: Off |
On - Extends the Off - No further information is required by the user, but user and computer details are stored in the Auditlog. |
|
Access time (minutes) |
Integer Default: 15 (minutes) |
The maximum duration in minutes an Admin Session may last. This time must be sufficient for the user to install software or perform any other tasks that require elevation. |
|
Save |
Button |
Saves customization and changes to any fields. Note that reloading any defaults does not take effect until Save is clicked. |
Changing Admin Session Duration
Admin session duration (access time) is the maximum amount of time in minutes an Admin Session may last. This time must be sufficient for the user to install software or perform any other necessary tasks.
To change the time allocated for an administrator session:
-
Log in to the Portal and select menu Settings > Mac Settings.
-
From the Authorization left menu, make sure the AUTHORIZATION tab is displayed (it is the default) and update the Access time (minutes) field in the Admin Session panel:
-
Click Save when done.
Authentication Setting
Portal menu: Endpoint Privilege Management > Settings > Mac Settings > Endpoint > AUTHENTICATION
The setting allows portal administrators to specify the style of prompt that is presented when users must authenticate to elevate privileges.
|
Setting |
Type |
Description |
|---|---|---|
|
Mode |
Choice:
Default: Confirm |
Confirm - User must confirm with Yes or No (or via the reason screen) to perform the operation.. Multi-factor Authentication - User must validate identity using MFA through Single Sign-on. Choosing this option reveals Multi-factor Configuration (see table below). |
|
Save |
Button |
Saves customization and changes to any fields. Note that reloading any defaults does not take effect until Save is clicked. |
Multi-factor Configuration
Appears when Multi-factor Authentication is chosen as the Mode.
|
Setting |
Type |
Description |
|---|---|---|
|
Sign-on method |
Selection:
Default: |
Microsoft 365 / Entra ID - Use this as the SSO method. -- ADD NEW METHOD -- - Create a new method. Choosing this option takes you to the portal's Single Sign-on (SSO) Setup page. Note the following:
|
|
Email match |
Selection:
Default: |
No matching - If using Entra ID and this option is selected for Email match, the Entra ID Connector must be configured. This ensures that only users within the same Azure tenant can authenticate. Email match - MFA authentication must match the email address or User Principal Name (UPN) from Entra ID or Active Directory. Account separation - MFA authentication must be done via a secondary account. This is a requirement for those organizations wishing to maintain compliance with Cyber Essentials Plus. |
|
MFA on pre-approvals |
Toggle Default: Off |
On - Force multi-factor authentication on pre-approved applications. Off - Multi-factor authentication is not required on pre-approved applications |
System Settings
Portal menu: Endpoint Privilege Management > Settings > Mac Settings > Lockdown > SYSTEM SETTINGS
System Settings (also known as System Preferences in earlier macOS versions) have long been part of the macOS platform, enabling users to locally customize the look and feel of their Macs. This can lead to problems if users have admin rights, because some settings chosen by users might conflict with requirements of the organization.
Both Standard and Admin users can make changes to selected System Settings panes through ABR authentication (Standard users without being granted a full admin session). Portal administrators choose which panes to pre-approve from an expanded list under Endpoint Privilege Management > Settings > Mac Settings > Lockdown > SYSTEM SETTINGS in the portal.
When a user opens a pre-approved pane, ABR intercepts the standard macOS admin prompt and authorizes the change in place:
-
When a control is toggled OFF (blocked) - that control is blocked/disabled.
-
When a control is toggled ON (pre-approved) - the user can modify the control via an authorization prompt.
MDM policies take precedence over ABR's System Settings handling. Any pane restricted by an MDM configuration profile stays restricted, including outside an admin session, so customers can enforce any combination (i.e. mix and match) MDM-enforced controls with ABR pre-approval.
System Settings that are enabled are effectively pre-approved and do not require intervention from an Administrator to allow or deny. Each of the panels in the following table can be enabled or disabled from the portal simply by setting a toggle to On or Off.
|
Setting |
Type |
Description |
|---|---|---|
|
Energy |
Toggle Default: On |
On - Energy panel is not blocked for this user and will display. Off - Panel is blocked for this user and will not display. No changes can be made. |
|
Network |
Toggle Default: Off |
On - Network panel is not blocked for this user and will display. Off - Panel is blocked for this user and will not display. No changes can be made. |
|
Printing |
Toggle Default: Off |
On - Printing panel is not blocked for this user and will display. Off - Panel is blocked for this user and will not display. No changes can be made. |
|
Software Update |
Toggle Default: On |
On - Software Update panel is not blocked for this user and will display. Off - Panel is blocked for this user and will not display. No changes can be made. |
|
Startup Disk |
Toggle Default: Off |
On - Startup Disk panel is not blocked for this user and will display. Off - Panel is blocked for this user and will not display. No changes can be made. |
|
Time Machine |
Toggle Default: On |
On - Time Machine panel is not blocked for this user and will display. Off - Panel is blocked for this user and will not display. No changes can be made. |
|
Transfer or Reset |
Toggle Default: Off |
On - Transfer or Reset panel is not blocked for this user and will display. Off - Panel is blocked for this user and will not display. No changes can be made. |
|
Wi-Fi |
Toggle Default: Off |
On - Wi-Fi panel is not blocked for this user and will display. Off - Panel is blocked for this user and will not display. No changes can be made. |
|
Date & Time |
Toggle Default: On |
On - Date & Time panel is not blocked for this user and will display. Off - Panel is blocked for this user and will not display. No changes can be made. |
|
Login Items |
Toggle Default: Off |
On - Login Items panel is not blocked for this user and will display. Off - Panel is blocked for this user and will not display. No changes can be made. |
|
Sharing |
Toggle Default: On |
On - Sharing panel is not blocked for this user and will display. Off - Panel is blocked for this user and will not display. No changes can be made. |
|
System Network Extensions |
Toggle Default: On |
On - System Network Extensions panel is not blocked for this user and will display. Off - Panel is blocked for this user and will not display. No changes can be made. |
|
Users & Groups |
Toggle Default: Off |
On - Users & Groups panel is not blocked for this user and will display. Off - Panel is blocked for this user and will not display. No changes can be made. |
|
Save |
Button |
Saves customization and changes to any fields. Note that reloading any defaults does not take effect until Save is clicked. |
Enabling sudo
Portal menu: Endpoint Privilege Management > Settings > Mac Settings > Lockdown > ADMIN SESSION
These settings control whether or not users are able to run sudo commands during a terminal session.
|
Setting |
Type |
Description |
|---|---|---|
|
Deny PIN code unlock |
Toggle Default: Off |
On - Remove the option to use a PIN Code to unlock an admin session or unlock a blocked application. If this option is Off and admin sessions are disabled, the system tray menu item to start an admin session will be removed. Off - Allow access to the PIN Code unlock option (unless Allow Admin Sessions is Off under Authorization > AUTHORIZATION). |
|
Force sudo close at end |
Toggle Default: On |
On - Forcibly close any sudo command or interactive sudo session at the end of the admin session. Off - Do not force closure of sudo sessions. |
|
Allow sudo terminal commands |
Toggle Default: Off |
On - Allow user to issue sudo commands from a terminal prompt. Off - Do not allow user to issue sudo commands. |
|
Save |
Button |
Saves customization and changes to any fields. Note that reloading any defaults does not take effect until Save is clicked. |
For security reasons, sudo access is disabled during administrator sessions by default. This can be enabled in the settings or a policy file (see Portal Administration for Mac). We do not recommend enabling sudo access unless absolutely necessary.
To enable sudo for Mac devices, login to the portal, go to Endpoint Privilege Management > Settings > Mac Settings > Lockdown > ADMIN SESSION and set Allow sudo terminal commands to On.
Admin By Request has checks in place to prevent system tampering using sudo, but due to the root-level access, it is impossible to fully protect against tampering using sudo.
If only certain commands need to be run with sudo, consider using the built-in /etc/sudoers file. The Admin By Request sudo settings will not override normal /etc/sudoers settings.
Pre-Approval and Blocked Settings
Portal menu: Endpoint Privilege Management > Settings > Mac Settings > App Control > PRE-APPROVE | BLOCKED
From version 5.3, App Blocking is available on macOS and both it and App Pre-Approval are extended to match on Team ID and/or Bundle ID. Further, optional minimum and maximum version numbers can be bound to both lists. The three features are configured from the same App Control screen, share the same entry form, and use the same identifier set (vendor, Team ID, Team ID + Bundle ID, checksum).
They are easiest understood as two sides of one rule engine: one list permits, one list denies, and either rule can be narrowed to a version range. A single application can be permitted in a tested version range and blocked outside it from the same screen.
Pre-approved applications are application files that are pre-approved to run "Run As Admin", when approval is otherwise required. The intention is to remove trivial approval flows and avoid flooding the auditlog with trivial data for applications known to be good.
When an application is on the pre-approval list the difference is:
-
The application is auto-approved; the approval flow is bypassed
-
A reason is not required, as the application is known to be good
-
You have the option to not log to the Auditlog (trivial data)
-
If "Run As Admin" is disabled, a pre-approved application will still run
Different behavior between macOS and Windows
On macOS, App Blocking is enforced when a blocked application is launched. It does not prevent an application from being copied or installed to disk. If a blocked application is installed by a package installer or copied from a disk image, Downloads, or another location, the application is blocked when the user attempts to launch it.
This behavior is different to Windows - on Windows, App Blocking prevents an app from being installed, whereas on macOS, an app can be installed, but App Blocking will prevent it from running.
Where they live in the portal
Both lists sit under the same App Control screen, on sibling tabs:
-
Endpoint Privilege Management > Settings > Mac Settings > App Control > PRE-APPROVE
-
Endpoint Privilege Management > Settings > Mac Settings > App Control > BLOCKED
Each tab has an Enabled toggle and a New entry button that opens an entry form. The list views show Application, File, Protection, Type and Log columns, with per-row edit and delete actions. At the bottom are export buttons for PDF, XLSX and two types of CSV (; and , delimited).
The Mac App Store itself is blocked separately, under Endpoint Privilege Management > Settings > Mac Settings > App Control > APP-STORE, which lets administrators retain Store access while standard users are restricted.
Pre-approve/Block via Team ID and Auditlog
Pre-Approval (known sometimes as Whitelisting) refers to the method of working out which applications are trusted and frequently used, and adding them to a list that automatically allows users to elevate those applications when they need to. This is essentially the opposite of Blocklisting/Blacklisting – creating a list of applications that cannot be elevated.
This method of “allow most, deny some” has proven to be extremely resource-efficient for large enterprises compared to the method of denying all applications and only allowing elevations on a case-by-case basis.
Use the following commands to get a vendor’s name for the files for Pre-Approval, without having to use the Auditlog in the portal. For example:
|
For applications (.app) |
For packages (.pkg) |
|---|---|
|
Command:
|
Command:
|
|
Result:
|
Result:
|
In these examples, VideoLAN and Oracle America, Inc. are the vendors, while 75GAHG3SZQ and VB5E2TV963 are their respective Team IDs.
Admin By Request allows for quick pre-approval/blocking of trusted/untrusted applications from the Auditlog, based on the application vendor or checksum, visible when the Application Control screen is displayed (step 3 below).
Once an application has been installed on an endpoint with Admin By Request:
-
Log in to the portal and navigate to the application’s corresponding entry in the portal Auditlog.
-
Expand on the application entry, and select Pre-approve this file under Actions:

-
On the Application Control screen, modify any settings as required. For more information on pre-approval settings, refer to the Settings Table below.
-
Click Save verify that the app has been added to the list of pre-approved applications.
For example, the following applications are pre-approved:

The Pre-Approval and Blocked entry forms are nearly identical. Both forms share the following fields:
|
Field |
Notes |
|---|---|
|
Type |
Run As Admin application (rule targets one app) or Run As Admin vendor (rule covers a vendor's catalog). |
|
Protection |
The matcher. See Protection matchers. |
|
Application name |
Free text, used in the list view. |
|
File name |
Bundle file name (for example Microsoft Teams.app). |
|
Vendor |
Vendor string from the signing certificate. |
|
Min version |
"Starts with" semantics. |
|
Max version |
"Less than" semantics. |
|
Internal Comments |
Free text, not shown to users. |
The Pre-approval form additionally has a Log to auditlog toggle (default Off). The Blocked form does not, because blocked launches are always recorded.
Protection matchers
The Protection dropdown is where the new identifiers appear, and it is identical on both forms:
-
File must match vendor (pre-5.3 behavior, still available)
-
File must match team id (5.3+)
-
File must match team and bundle id (5.3+)
-
File must match checksum
-
No protection (not recommended)
Team ID alone is vendor-level: it covers every app a vendor signs. Team ID + Bundle ID narrows the rule to a single application within that vendor's catalog.
The same matcher set on the Blocked form is what gives App Blocking on macOS parity with Windows. Older agents that receive a rule using a 5.3-only matcher will ignore that rule rather than misinterpret it, so older version endpoints are safe during rollout.
Version constraints
Min version and Max version turn an identity match into a range match, and they apply to pre-approval and block rules equally.
Either bound can be left blank to make the range open on that end. The semantics are deliberately asymmetric:
-
Min version uses "starts with". Setting it to
14matches any14.x.x.xbuild; setting it to14.1narrows to14.1.x.x. -
Max version uses "less than". Setting it to
15matches anything below15.0.0.0.
The intended use cases are:
-
Avoid pre-approving known-vulnerable old builds. Pin Min version to the first patched release so older builds on disk are no longer covered by the rule.
-
Avoid pre-approving unverified new builds. Cap Max version at the last tested release so a silent in-place update does not inherit trust.
-
Block specific vulnerable versions. Add a Block rule keyed to the same Team ID + Bundle ID with a Max version covering only the affected range, rather than blocking the whole application.
-
Phased rollout. Approve only a tested version window during a transition; widen it once a newer build is qualified.
This brings macOS to parity with the equivalent capability planned in Windows.
A simple worked example
Suppose Microsoft Teams is approved corporate software but Microsoft Edge is not. Both apps are signed by Microsoft under the same Team ID, UBF8T346G9. Before 5.3, a Team ID pre-approval for Microsoft would have implicitly trusted Edge as well, and there would have been no way to scope either rule to a version range.
In 5.3 the administrator configures three rules from the same App Control screen:
-
Pre-approve Teams, recent versions only (PRE-APPROVE tab > New entry):
-
Type:
Run As Admin application pre-approval -
Protection:
File must match team and bundle id -
Application name:
Microsoft Teams -
File name:
Microsoft Teams.app -
Vendor (Team ID):
UBF8T346G9 -
Bundle ID:
com.microsoft.teams2 -
Min version:
24.0 -
Max version: (empty)
-
-
Block older Teams builds explicitly (BLOCKED tab > New entry):
-
- Type:
Run As Admin application block -
- Protection:
File must match team and bundle id -
- Application name:
Microsoft Teams(legacy) -
- File name:
Microsoft Teams.app -
- Vendor (Team ID):
UBF8T346G9 -
- Bundle ID:
com.microsoft.teams2 -
- Max version:
24.0
-
-
Block Microsoft Edge for standard users (BLOCKED tab > New entry):
-
- Type:
Run As Admin application block -
- Protection:
File must match team and bundle id -
- Application name:
Microsoft Edge -
- File name:
Microsoft Edge.app -
- Vendor (Team ID):
UBF8T346G9 -
- Bundle ID:
com.microsoft.edgemac
-
On the endpoint:
-
A standard user launches Teams
24.3. The agent matches the pre-approval rule, the launch proceeds, and the event is recorded against that rule. -
The same user launches a leftover Teams
23.5build. The pre-approval rule does not match (Min version24.0). The block rule does match (Max version24.0). The launch is prevented and the user is notified. -
The same user launches Edge. The Edge block rule matches, the launch is prevented, and the user sees a notification.
The example shows the three features cooperating: the same Team ID appears on multiple rules, Bundle ID differentiates which application each rule applies to, and the version range decides which builds fall on which side.
Machine Learning
Portal menu: Endpoint Privilege Management > Settings > Mac Settings > App Control > MACHINE LEARNING
The idea behind Machine Learning Auto-Approval is to kill two birds with one stone by allowing customers to build a Pre-Approved list as their employees use the software. This removes the need for enterprises to spend considerable amounts of time and effort figuring out and manually configuring which applications should be pre-approved ahead of time.
The way it works is, it allows you to create a simple rule that says:
“If approval for elevation of an application is granted X times, that application is now automatically approved for incoming requests from then on.”
This allows the system to handle creating the list of applications that are safe for approval as applications are used.
For more information, including step-by-step procedures, refer to Machine Learning.
Privacy Settings
Portal menu: Endpoint Privilege Management > Settings > Mac Settings > Data > PRIVACY
The PRIVACY tab provides a way to anonymize data collection, so that data is still logged and available for analysis, but identification of individual users is not possible.
Key points:
-
Obfuscation creates an alias for each user. You can track activity, but you cannot decode the true identity of any user.
-
Collection of data should be left on unless you have a reason not to do this. If disabled, you will have to find contact information elsewhere.
-
Inventory collects both hardware and software inventory. If disabled, only the computer name is collected and shown in the "Inventory" menu.
-
Geo-tracking maps the endpoint IP address to location using a public IP-to-location database to show in inventory and reports.
Changes apply only to new data. This is by design to avoid accidentally deleting existing data.
|
Setting |
Type |
Description |
|---|---|---|
|
Obfuscate user accounts |
Toggle Default: Off |
On - Create an alias for each user. Off - Do not create aliases for users. |
|
Collect user names |
Toggle Default: On |
On - Record the name of each user associated with an ABR event. Off - Do not record user names. |
|
Collect user email addresses |
Toggle Default: On |
On - Record email addresses associated with a user. Off - Do not record email addresses. |
|
Collect user phone numbers |
Toggle Default: On |
On - Record phone numbers associated with a user. Off - Do not record phone numbers. |
|
Collect inventory |
Toggle Default: On |
On - Record hardware and software inventory data. Off - Do not record inventory data. |
|
Allow geo-tracking |
Toggle Default: On |
On - Record the location of the public IP address associated with the user’s endpoint. Off - Do not record IP addresses. |
|
Save |
Button |
Saves customization and changes to any fields. Note that reloading any defaults does not take effect until Save is clicked. |
Preventing Abuse
So what prevents the user from abusing an Admin Session? The fact that the user has to ask IT for access will in itself prevent the most obvious abuse. But as part of your settings, you can also configure a Code of Conduct page. Here you customize wording that suits your company policy. For example, what the penalty is for using the administrator session for personal objectives. You can also choose to explain the things you can monitor from the portal.
When you enable the Code of Conduct ("instructions") screen in the settings, this screen appears right before the administrative session starts. You can also customize company name and logo for all screens, so there is no doubt this message is authentic and indeed from the user’s own company. This is the configuration part of the portal, where you set authorization, company logo, policies, email communications, etc.
For example:

Clean up Local Admins
The Clean Up Local Admins feature in Admin By Request is designed to help IT administrators easily manage and remove unused or rogue local administrator accounts across multiple endpoints. A quick check (and subsequent clean up if necessary) can be done directly from the portal, giving administrators an immediate and holistic view of just who currently has admin access on which computers.
The feature simplifies the process of identifying and revoking unnecessary admin rights, reducing the attack surface and enhancing security within an organization.
Purpose
The feature addresses the common problem of unmanaged or forgotten local admin accounts that could pose security risks. These accounts may belong to former employees or be leftover from previous configurations, making them prime targets for cybercriminals seeking to exploit elevated privileges.
Functionality
The feature centralizes the management of local admin accounts by allowing administrators to revoke admin rights from a single interface within the portal. This eliminates the need to manually disable accounts on individual endpoints.
How It Works
-
Access the Feature:
Navigate to the Inventory page within the portal.
Select the desired endpoint and click Local Admins from the left-hand menu. This brings up a 'birds-eye' view of all administrator accounts associated with that endpoint, displayed as individual account cards.
-
Identify Admin Accounts:
Each account card is labeled with an icon and a name indicating the type of account (e.g., Local Administrator, Domain Administrator etc.).
Rogue or unused accounts may be identified by non-descriptive names, often represented by long numeric sequences.
-
Revoke Admin Rights:
To revoke admin rights, click the Revoke Rights button located on the account card. This button is highlighted in orange.
The button will change to Cancel Revoke, allowing you to undo the action if it was selected by mistake.
-
Restore Admin Rights:
Admin rights can be restored by selecting the Restore Rights button within the Restore Revoked Local Administrators section during the two-week window.
Safeguards
The feature includes built-in safeguards to prevent the removal of essential accounts, such as the first Administrator account used to setup the computer. This ensures that critical administrative access is not inadvertently revoked, which could otherwise render endpoints inaccessible.
Using the Feature via Reports Page
Alternative Access
The Clean Up Local Admins feature can also be accessed through the Reports page for bulk management of admin accounts.
Navigate to Reports > User Reports > Local Admins to view admin accounts in a list format, grouped by account type.
Rogue accounts can be removed in bulk by selecting the Remove button next to the corresponding account group.
Undoing Removal:
If an admin account is mistakenly removed, the action can be reversed by going to the RESTORE RIGHTS tab on the Local Admins page.
The removed group will be listed, and selecting the Undo button will restore the admin rights to the affected accounts.
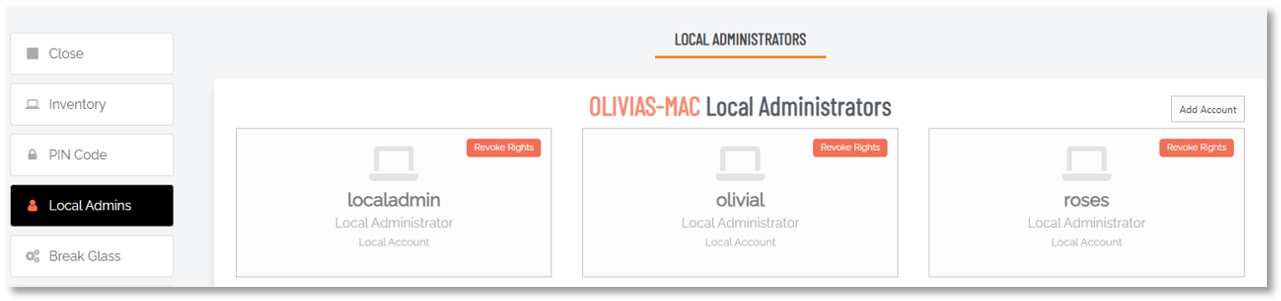
Example - Olivia's Mac
The procedure is straightforward:
-
Log in to the portal and go to the Inventory.
-
Locate the endpoint concerned and drill-down using either its name in the Computer column, or Details in the Details column.
-
In the left menu, click Local Admins:
-
Finally, identify the users who should not be admin and use the Revoke Rights button to remove their administrator privileges.
Supplementary Technical Information
This section provides more information on the following:
 Local Administrator Accounts
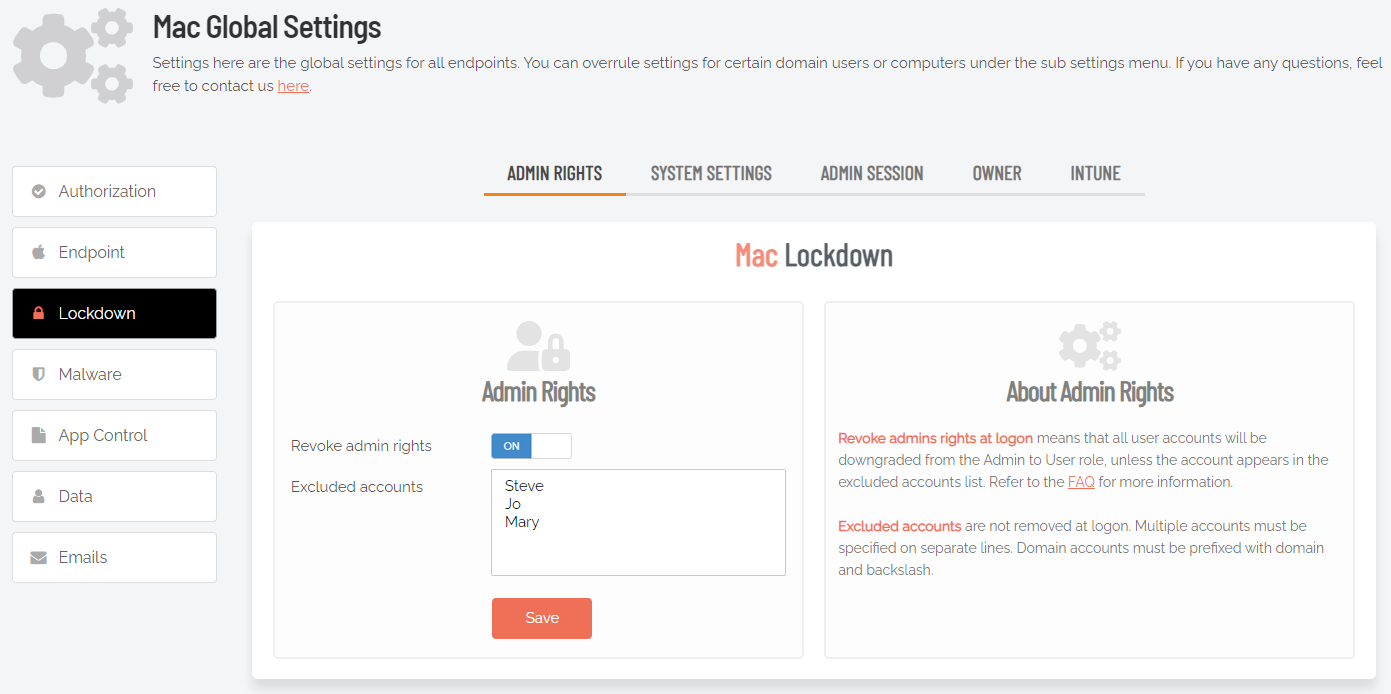
By default, users logging on to a Mac workstation are not downgraded from administrator to user unless the setting ‘Revoke admin rights’ is enabled in the portal and the user is not in the excluded accounts list. The reason all users are not downgraded immediately is because you may have service accounts that you have forgotten to list in the excluded accounts list.
Also, if someone cleared the excluded accounts list and clicked Save by mistake, the result would be unusable endpoints; no users would be able to gain elevated privileges and would instead have very limited ability on their devices.
The following graphic shows Revoke Admin Rights ON, except for user accounts Steve, Jo and Mary:
Active Directory
If a Mac is bound to an Active Directory, all local admin users will be downgraded unless listed in the excluded accounts setting. Admin By Request respects any group defined in the Directory Utility under “Allow administration by” and will not downgrade these users:
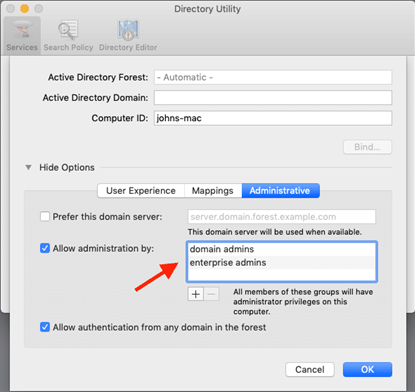
If no administrator groups are defined, the client will automatically grant administrator rights to members of the default Active Directory “Domain Admins” group. This is to prevent machines from ending up with no administrator accounts if the Active Directory binding is not setup correctly.
Sub-Settings
The portal has two levels of settings:
-
Mac Settings (also known as Global Settings) apply to all users by default, except those settings overridden under Sub Settings.
-
Mac Sub Settings, where you can define special settings based on Active Directory computer or user groups and/or Organizational Unit(s).
Settings here are the global settings for all endpoints participating in the feature. You can overrule settings for listed domain users or computers under the sub-settings menu.
Sub settings will overrule the global settings for the users or computers to which they apply. Both users and computers can be in Active Directory groups or organizational units.
If a user or computer hits multiple sub settings, the first in listed order that includes the setting concerned wins. Furthermore, it is better to use a full OU path rather than a partial OU path.
For example:
-
When Scope is set to \CloudObjects\GROUP1, \CloudObjects\GROUP2, only devices from GROUP1 will be shown, because it comes first in the list.
-
When Scope is set to \CloudObjects\GROUP2, \CloudObjects\GROUP1, only devices from GROUP2 will be shown, because it comes first in the list.
-
If scope is set to the full OU path \CloudObjects\GROUP1\Workstations, \CloudObjects\GROUP2\Workstations, then devices from both groups will be shown.
-
If scope is set to Workstations, then devices from both groups will be shown.
Sub-settings portal example
This can be used, for example, to allow sudo access for developers or automatically approve requests from users in the IT department.
For Macs, the feature is only available if the mac is bound to Active Directory or using NoMAD or Idaptive. Sub settings can also be used by specifying machine / user groups in the policy file. Refer to Portal Administration for Mac and Sub-Settings for more information.
Jamf Group-Based Sub-Settings
From version 5.3, ABR integrates with Jamf Pro so macOS sub-settings can be targeted by Jamf computer group membership instead of being scoped manually inside ABR. Both static and smart computer groups are supported.
Setup is done in two places:
-
In Jamf Pro: create an API role with read access to Computers, Static Computer Groups, and Smart Computer Groups, then create an API client bound to that role:
-
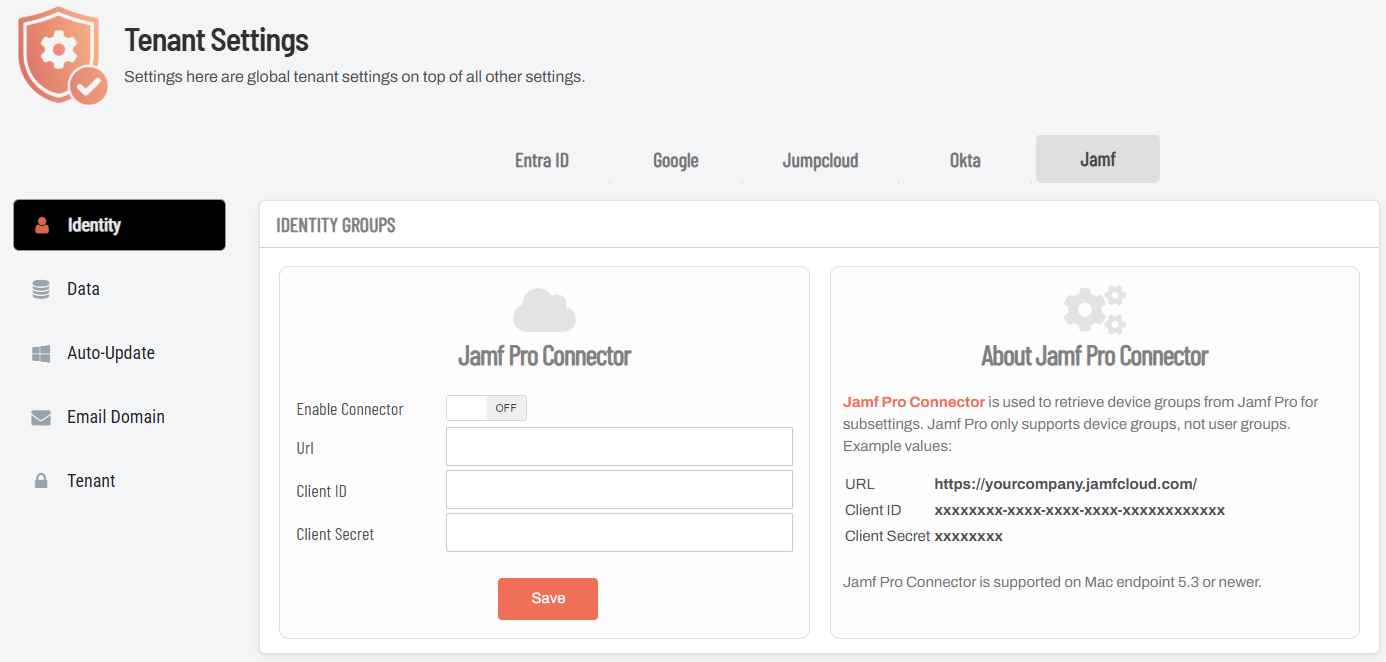
In the ABR portal: under Tenant Settings, configure the Jamf Pro Connector with the API client credentials (Settings > Tenant Settings > Identity > JAMF):
Once connected, sub-settings can use a rule of the form "computer must be in group X". When a user on an enrolled, Jamf Connect-installed endpoint requests an admin session, the sub-settings that match their device's Jamf group membership (for example a custom company name and authorization access time) are applied to that session.
Sudo
For security reasons, sudo access is disabled during administrator sessions by default. This can be enabled in the settings or a policy file (see Portal Administration for Mac). We do not recommend enabling sudo access unless absolutely necessary.
To enable sudo for Mac devices, login to the portal, go to Endpoint Privilege Management > Settings > Mac Settings > Lockdown > ADMIN SESSION and set Allow sudo terminal commands to On.
Admin By Request has checks in place to prevent system tampering using sudo, but due to the root-level access, it is impossible to fully protect against tampering using sudo.
If only certain commands need to be run with sudo, consider using the built-in /etc/sudoers file. The Admin By Request sudo settings will not override normal /etc/sudoers settings.
Machine Settings
You can use a local policy file to override all portal settings locally. Refer to Portal Administration for Mac for more information. Any setting defined in the policy file will override both default and sub settings. The policy file is locked during an Admin By Request administrator session, so users are unable to tamper with policy settings.
Tampering
To prevent tampering with Admin By Request, the software monitors all important files during an administrator session. During a session, access to the Users & Groups preference panel is disabled to prevent users from adding new administrators. Further, by default, sudo access is disabled to prevent calling system-critical tools and user management from the terminal.
The service also monitors users and groups during the session to prevent tampering if sudo access is enabled. If Admin By Request detects that the clock has been changed, the administrator session will end instantly to prevent users from extending their session.