API Overview
Public API
We offer a free REST API as part of your licensing. You can use the API to get your data into to your SIEM (security information and event management) system, such as Splunk or Power BI. Alternatively, you can offload the data into your own backend or integrate seamlessly into your ticketing system. You can read all data you can see in the portal and approve or deny requests through the API.
Pull (API) versus Push (WebHooks)
There are two ways you can get a copy of your data from us. The most typical way to get data is for you to call our public API in interval to download data (pull from your side). You can also subscribe to WebHooks (push from our side).
WebHooks
The advantage of WebHooks is that you get your data in real-time instead of pulling data in intervals. The drawback is that you have to have a public webserver to retrieve the data and you would still need the API to approve requests.
There are also many SaaS systems that allow you to integrate with WebHooks – such as getting notified in Teams or Slack by pointing a WebHook from Admin By Request to such a system.
WebHooks and public API have the same data structure. The difference is only in the delivery model – Push vs Pull. You configure WebHooks in your settings under Settings > Tenant Settings > Data > WEBHOOKS.
Refer to webhook settings and IP addresses for more information.
API
If you use the API instead of WebHooks, you must first enable the API and set up an API key. This is done by logging into your portal account and navigating to Settings > Tenant Settings > Data > API KEYS, then clicking Add New:
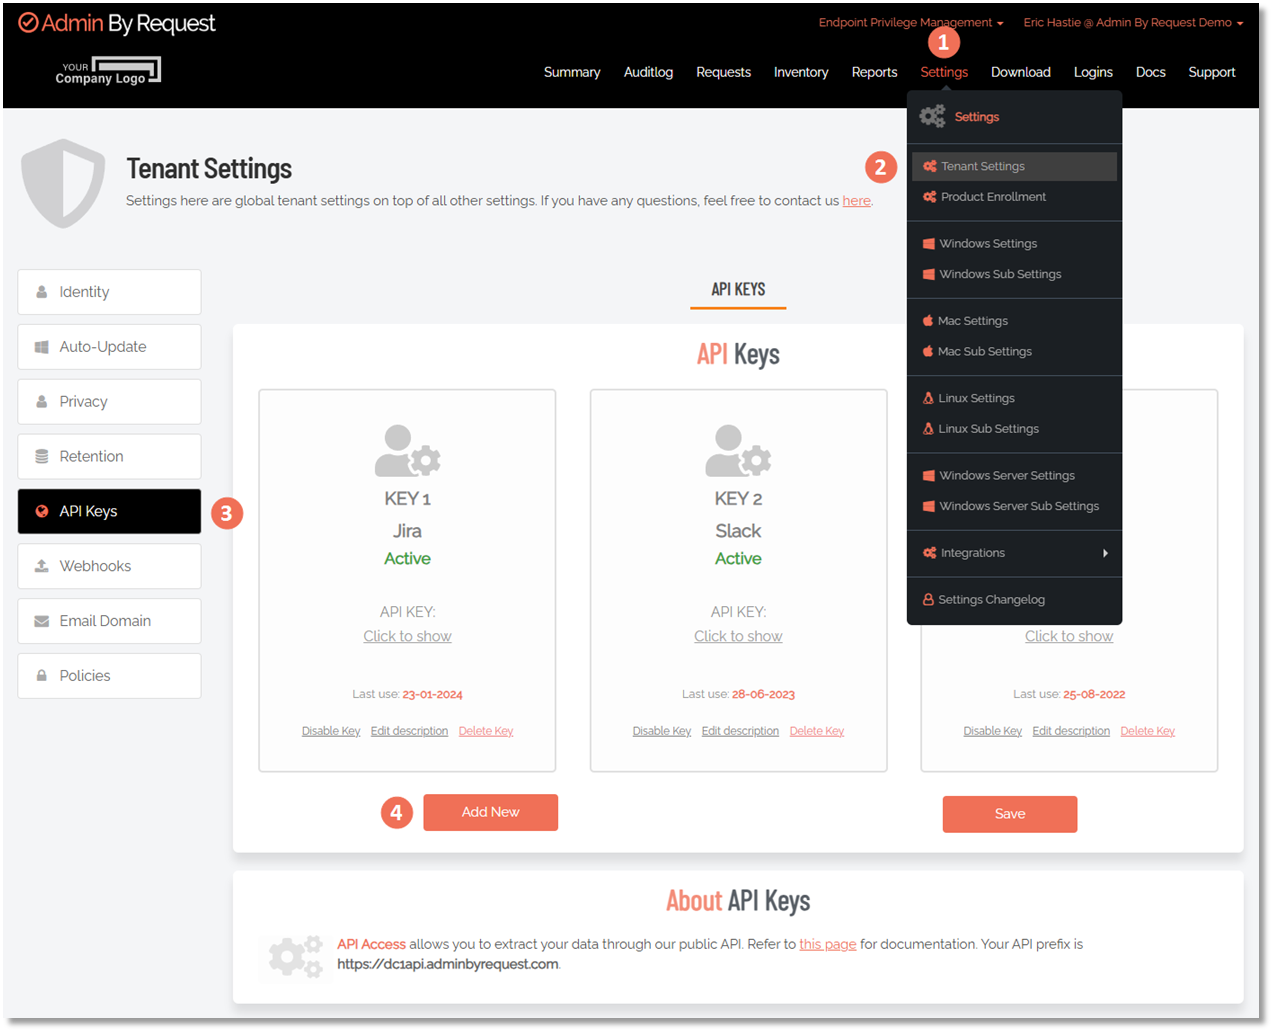
Once a key is generated, you can use Click to show, followed by Copy to clipboard in the api key window to copy and paste it.
Authentication
You can authenticate in two ways when consuming the API:
-
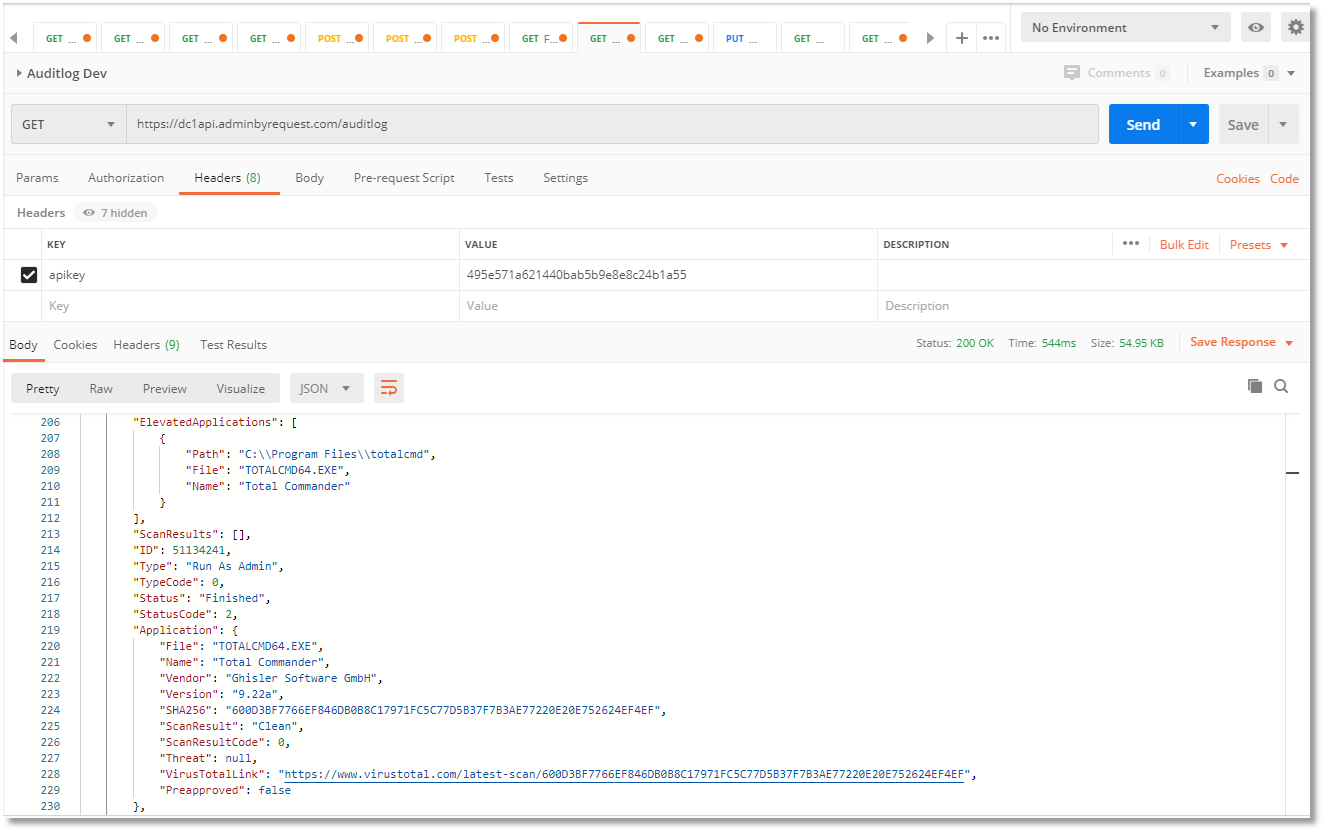
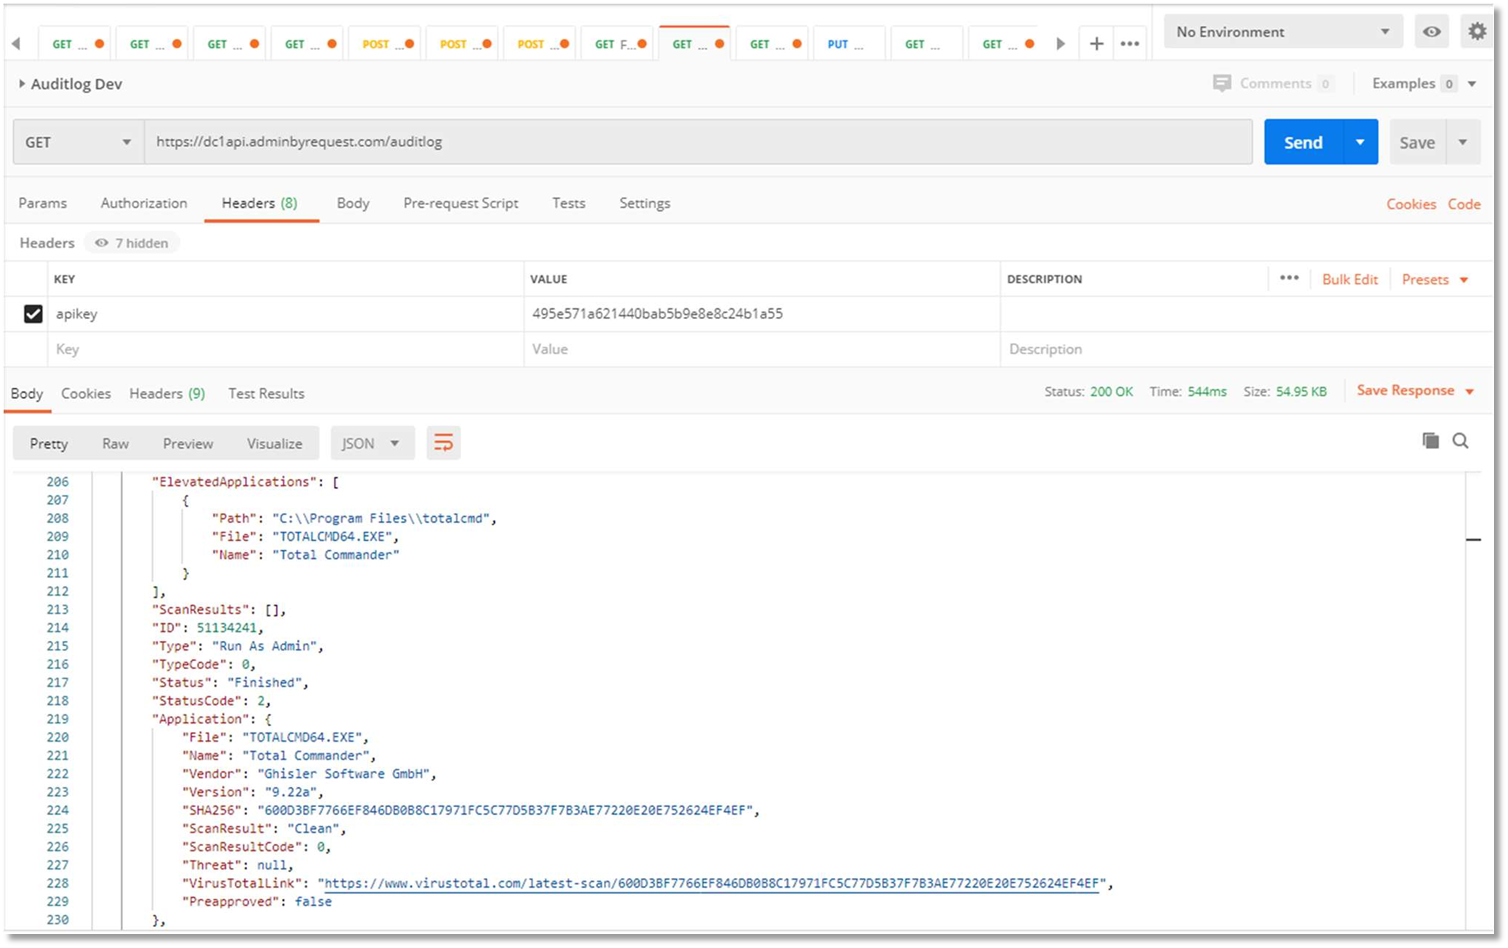
Send the api key as a header named “apikey”:
-
Use standard basic authentication and send api key as the password (username is ignored).
Please refer to Using PowerShell to Query ABR for further screenshots.
Quota
These quota rules are enforced to avoid flooding the API. If quotas are passed, access will automatically be blocked for your tenant until next business day.
Data
Data are returned in JSON format and standard http status codes apply (e.g. 200 = OK, 404 = Not Found, 500 = Internal Server Error).
The goal is to keep the structures as similar as possible to how they appear in the portal. If you need to do initial investigation or data mining, you can easily extract the data using Postman, Insomnia or other API tool of your choice. All you have to do is add the basic authentication password or add the apikey under “headers” and call a url, as shown above.
For more information on the available APIs from Admin By Request:
Emptying requests from an external system
This section demonstrates how requests can be retrieved and approved from an external system. The goal is to empty the request queue at an interval and approve or deny requests that are already stored in the external system. The scenario could be to create a recurring job in the external system (e.g. ServiceNow) and then add buttons on tickets to approve or deny requests.
Integration connectors are added periodically between Admin By Request and other systems. At the time of writing, we have several integrations, including Jira, Teams and ServiceNow. If you use any of the integrations for which there is a predefined application, you do not need to use the API. Refer to Integrations for more information.
API tasks
The following tasks are covered in this section:
To interact with the API, you must first generate an API key. The API key acts as a unique identifier that authenticates your requests, ensuring that only authorized users can access the API.
The API Key has a number of security features:
-
Default Security Settings - By default, your tenant's data is not publicly accessible. This means that without an API key, external systems or users cannot retrieve data.
-
Queries and Updates - Once generated, the API key must be included in API requests (usually in headers or query parameters). This allows the API to verify your identity and access permissions.
-
Brute Force Protection - The API has security mechanisms in place to prevent excessive or unauthorized requests. Brute force protection helps prevent attackers from trying multiple API keys or requests rapidly. This protects your data from abuse and ensures the API remains available for legitimate users.
-
Safe to Open - Since the API has built-in security measures (such as rate limiting and authentication), it is considered safe to expose it to external use. You should still follow best practices like:
-
Keeping your API key confidential.
-
Using secure storage for credentials.
-
Enforcing least privilege access (restricting API access to only necessary data).
-
-
Generate an API Key by logging into your portal account and navigating to Settings > Tenant Settings > Data > API KEYS, as described above (API).
-
Once we have this key, we can make a call to the API using the API key as the “apikey” header. This example uses the free Postman tool to demonstrate. Here we have called the Auditlog API to get entries:
The next task is to use the API to get outstanding "Pending" requests.
-
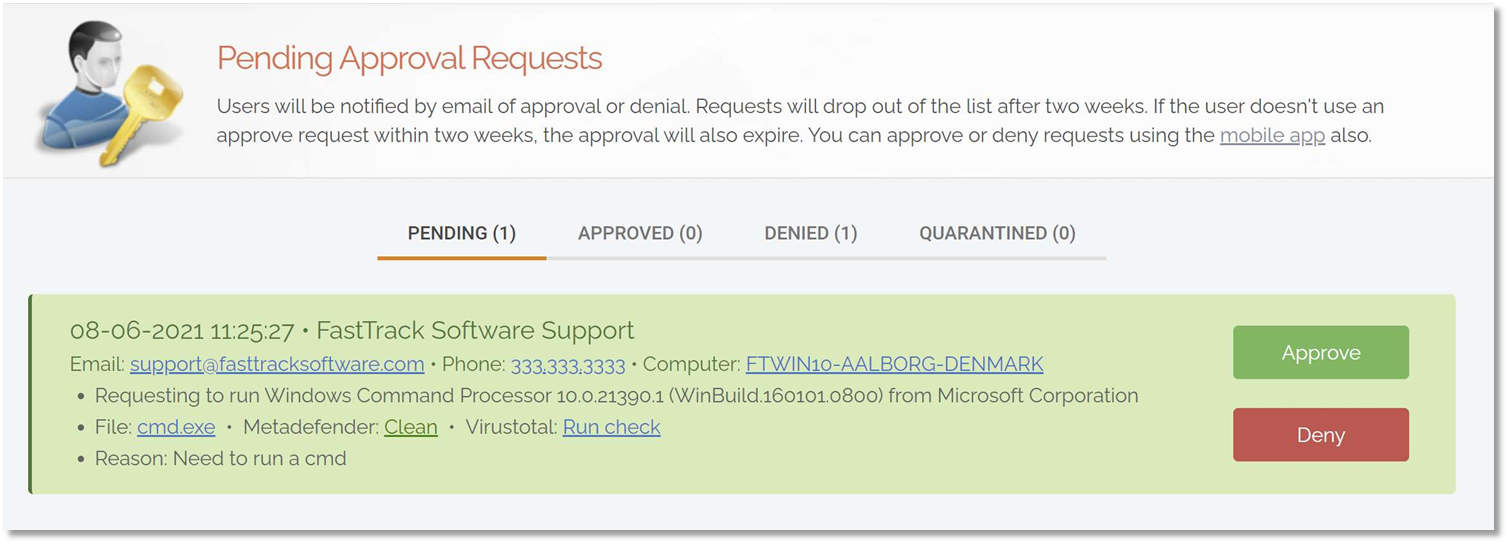
Requests will appear in the “Requests” top menu in the portal as shown here:
-
To get a list of pending requests for approval, we need to call the Requests API, indicating that we are only interested in “Pending” states. For this, you will need to know the data center to which you are connected.
To determine the API prefix for your data center, go to page Settings > Tenant Settings > Data > API KEYS in the portal and check which API prefix is shown under About API Keys. The data center API URL (also known as the API prefix) will be one of the following:
-
https://dc1api.adminbyrequest.com (Europe - Netherlands)
-
https://dc2api.adminbyrequest.com (US East)
-
https://dc3api.adminbyrequest.com (UK)
-
https://dc4api.adminbyrequest.com (Europe - Germany)
-
https://dc5api.adminbyrequest.com (US West)
-
https://dc6api.adminbyrequest.com (Asia)
Make a note of your prefix - among other things, this is the domain used when an API Key is created.
You can also see your API prefix on the API web pages (e.g. Public API > Auditlog API). However, a small script runs in the background that determines to which data center you are attached, so JavaScript must be enabled in your browser for this to work.
The URL for our example is then:
https://dc1api.adminbyrequest.com/requests?status=pendingSubmitting this via Send returns a list in json format with the same information that is shown in the portal:

-
The next step is to approve a request.
-
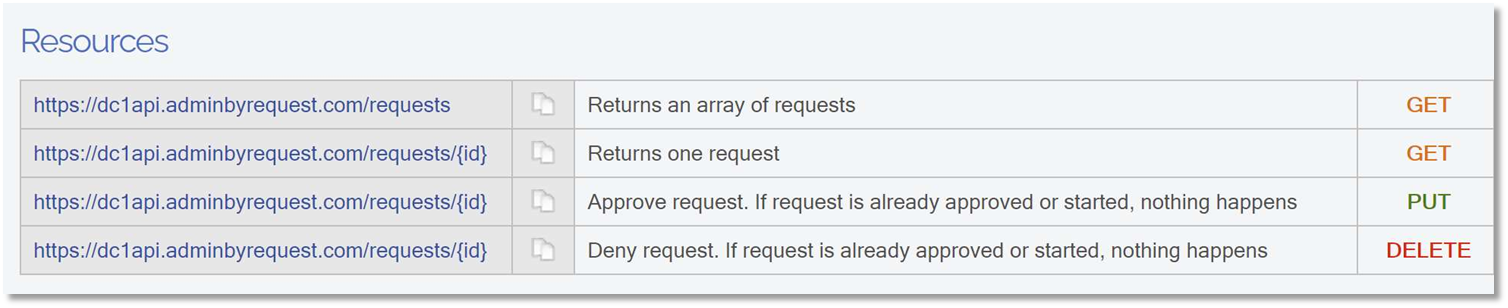
Notice that each request has an “id” field. This field is used to approve or deny a request as explained in Requests API:
-
So all we have to do is to make a simple PUT request with the ID:

-
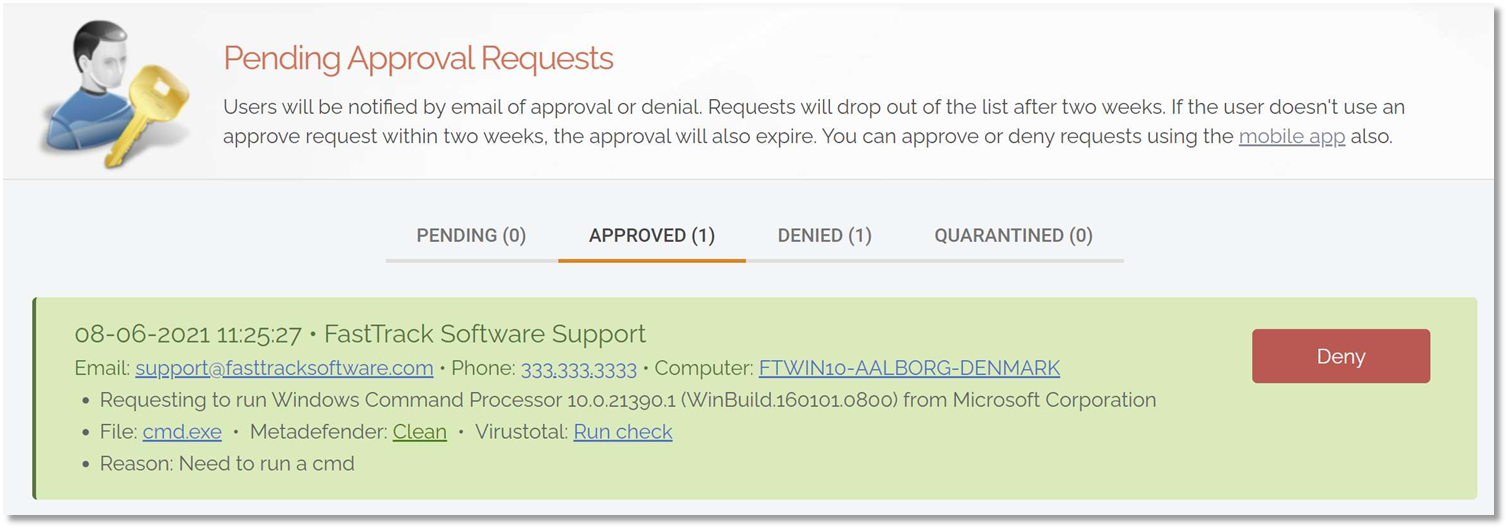
... and the request is now approved and the user is notified accordingly. It’s that simple!
-
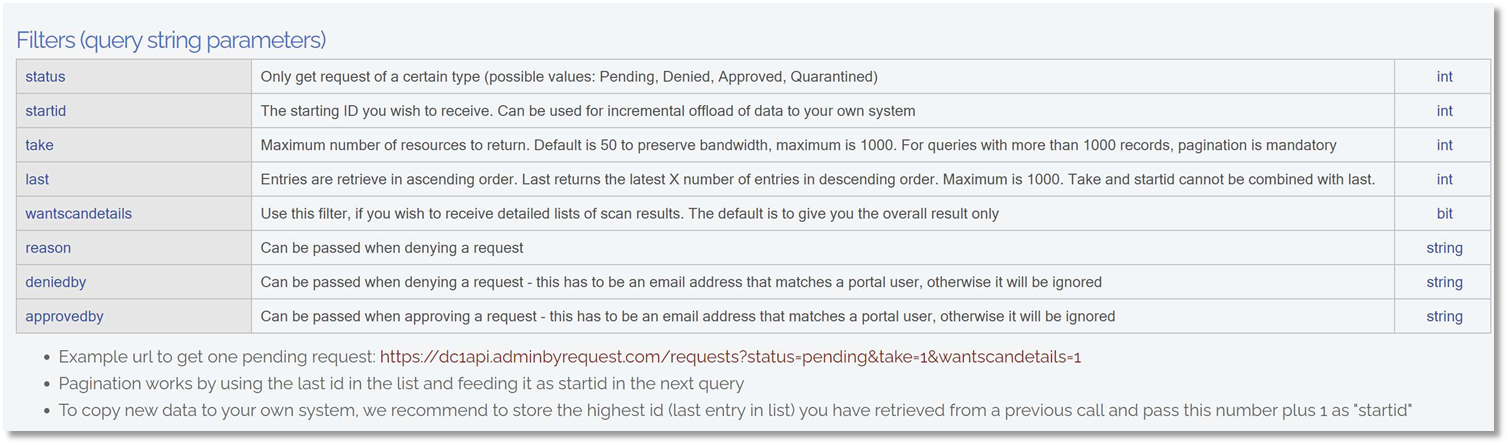
So how do you only get new requests? The easiest way is to store the highest id you have received before and use this for the next calls. Here are the filters for the Requests API:
-
Let’s say the last request we received was 65430930. Then we add one (since we already received 65430930) and use as startid, meaning that we only want to see any requests with an id higher than 65430930:

Questions?
Feel free to ask any questions you might have. If you do not have a direct contact at Admin By Request, contact us with any questions you might have, or submit a support ticket.