Integration Tasks V2
1. Creating custom fields in Jira
The integration requires three custom fields in Jira to store metadata about each ABR request. These fields are populated automatically by the integration's webhooks:
-
ABR Request ID - the unique identifier assigned to the request in Admin By Request, populated when the Jira issue is first created. This is also the value you need if you later build Jira automation rules that call back to the ABR API to approve or deny requests.
-
ABR Handled by - the name of the approver or administrator who acted on the request, populated once the request has been approved or denied in any channel.
-
ABR Reason - the reason text entered by the approver when a request is denied (if they provided one), populated when the denial is recorded.
All three fields are created in Jira's global field registry in this task. After creating them here, you also need to make them available in your specific Jira Space - that is a separate step covered in Task 2 below.
-
Log in to Jira Service Management and click the settings cog in the upper right corner. From the menu that appears, navigate to Jira settings - Work Items:
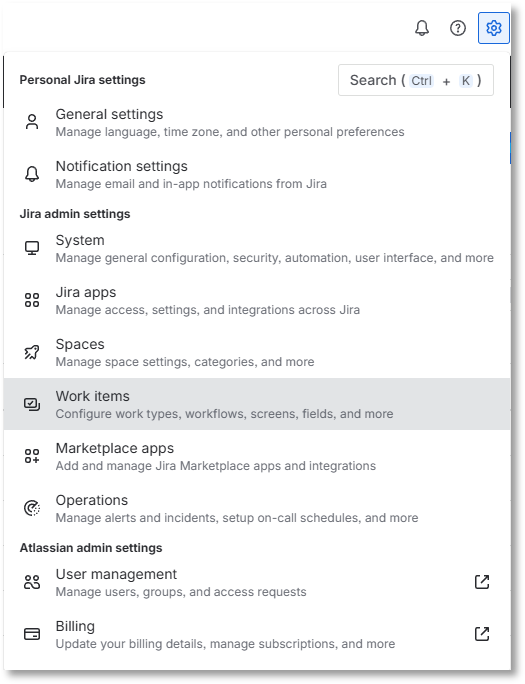
In older Jira documentation and older versions of the Jira interface, this section was called Issues. Atlassian has renamed it to Work Items in recent versions. If you see "Issues" in your menu instead of "Work Items", they are the same section - navigate to whichever label your instance shows.
-
In the left navigation panel, select Fields. You will see a list of all fields currently defined in your Jira instance, grouped under two tabs - Active fields and Deleted fields.
-
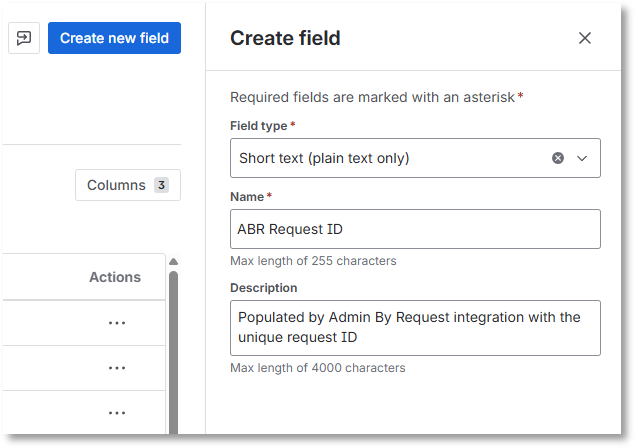
Click Create new field. A dialog or panel will appear asking you to select a field type. Choose Short text (plain text only).
The layout of this screen has changed in recent versions of Jira, so what you see may look different from older documentation screenshots. The field type you need is still named "Short text (plain text only)" or very similar - look for a single-line text type with no special formatting.
-
Name this field ABR Request ID. You can optionally add a description - for example, "Populated by Admin By Request integration with the unique request ID" Click Create to save the field:
-
Repeat steps 3 and 4 to create a second short text field named ABR Handled by.
-
Repeat steps 3 and 4 one more time to create a third field named ABR Reason. For this field, instead of "Short text (plain text only)", select Paragraph (supports rich text) as the field type. This allows the denial reason to contain longer text.
You do not need to assign any specific views to these fields during creation. View assignments are handled in Task 2 (via Field Configurations) and in Task 3 (when you add them to the Request Type form).
If you plan to configure the Example 2 automation rule (Approving or Denying ABR Requests from within Jira), you will also need to find the numeric IDs for your custom fields - for example, "customfield_10064". Field IDs are not required for the basic integration setup and are only needed when writing automation rules that reference fields by their ID. Instructions for finding field IDs are provided in the Creating Jira automation rules section.
2. Adding custom fields to your Jira Space
Creating a custom field in Jira adds it to the global field registry, but it does not automatically make it available in your Jira Space's forms. After creating the three ABR fields, you need to include them in the Field Configuration that applies to your Space. A Field Configuration is a named set of field settings that Jira uses to control which fields are visible and required in a given Space.
This step is new in V2 of the integration guide - earlier versions of the Jira interface handled this differently. Without completing this step, your custom fields may not appear in the Request Type form you configure in Task 3, and the integration will not be able to populate them.
-
In Jira, click the settings cog in the upper right corner and navigate to Jira settings - Work Items (the same location where you created the fields in Task 1).
-
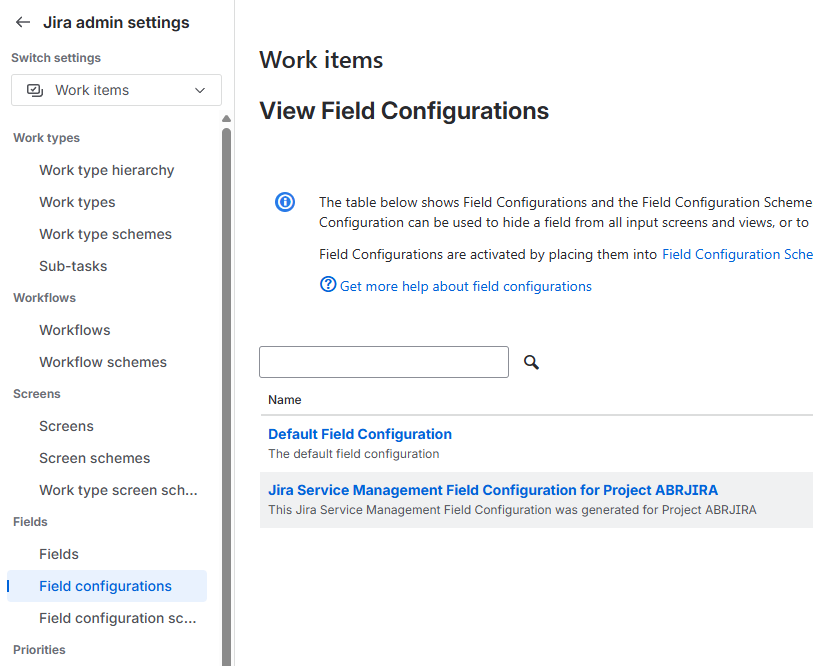
In the left navigation panel, locate the Fields section and select Field Configurations. This page lists all the field configurations defined in your Jira instance. Most instances have at least one entry called Default Field Configuration.
-
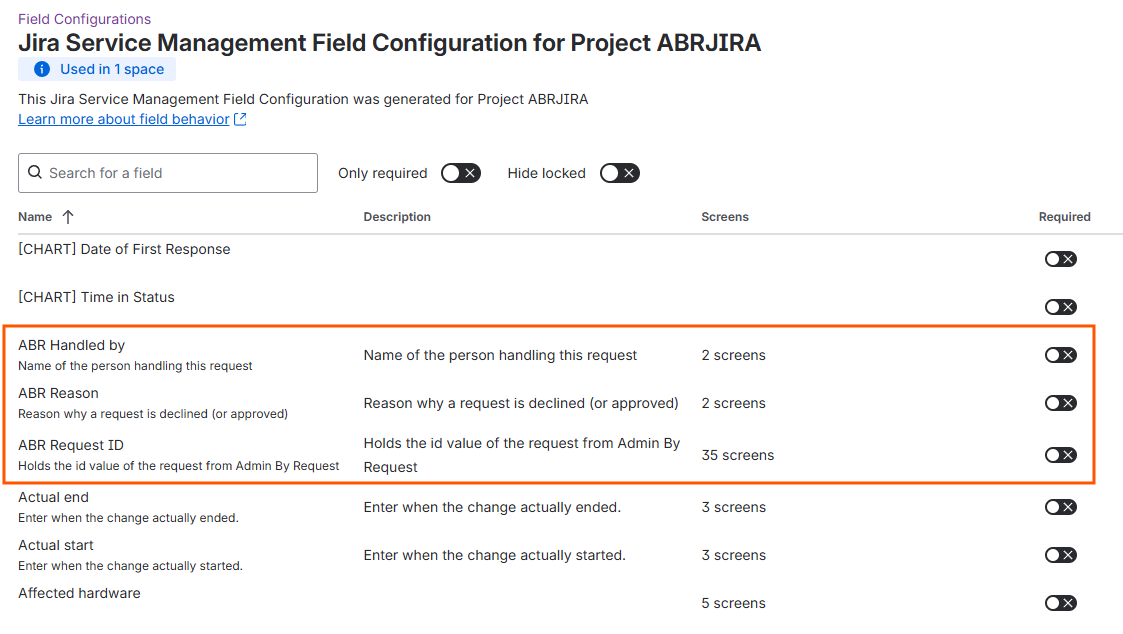
Click on the field configuration that applies to your Space - the example below uses space Project ABRJIRA. If you are not sure which one applies, use Default Field Configuration - it applies to any Space that does not have a dedicated field configuration assigned. If your Space uses a specific field configuration, use that one instead:
 NOTE: V2 terminology change in Jira
In recent versions of Jira Service Management, what was previously called a Project is often now referred to as a Space, and Project settings may appear as Space settings. These terms refer to the same thing. This guide uses the terminology interchangeably. If your Jira interface still shows "Project" or "Project settings", they are equivalent and the steps are the same.
-
On the field configuration detail page, find each of the three ABR fields (ABR Request ID, ABR Handled by, ABR Reason). Check the status of each field - make sure Required is optional (i.e. no check mark):
-
Save your changes.
If all three ABR custom fields already appear in the field configuration with a status of "not Required", this step is already complete. Some Jira configurations automatically include newly created fields in the Default Field Configuration. You can verify this by checking whether the fields appear in the list - if they do , you are good to proceed to Task 3.
If they don't appear:
-
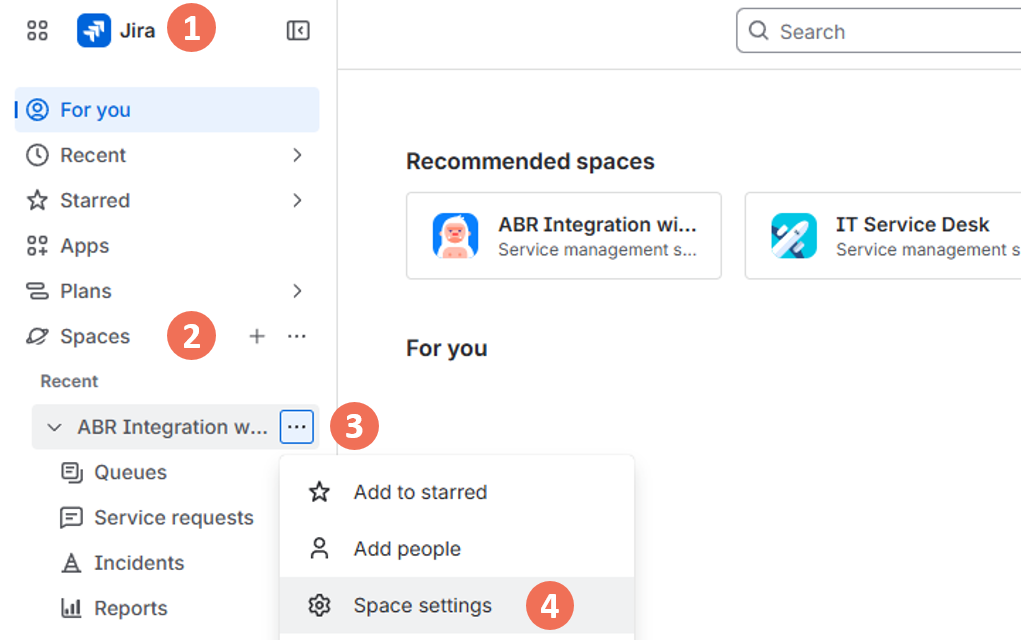
Go to Space settings for your space:
-
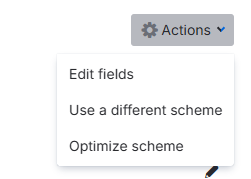
From the left menu, click Fields and from the top right Actions button, select Edit fields:
-
Click the Field configuration scheme for your space/project, followed by button Add field in the top right corner.
-
Add each of the three ABR fields. Your field configuration should now look similar to the example in step 4 above.
3. Creating a custom Request Type
A custom Request Type tells Jira Service Management how to categorize and route the issues that Admin By Request creates. This is also where you decide whether Jira will offer native "Approve" and "Decline" buttons on each issue, which enables approvers to act directly in Jira without going to the ABR portal.
-
Go to Space settings for your space/project (do step 1 under If they don't appear: above).
-
From the Space settings menu, select Request types. This displays all the request types currently configured for this Space.
-
Click Create request type (top-right area of the screen) and select Create blank to create a new request type from scratch.
-
Give the request type a descriptive name - for example, ABR Request for Access and click Add.
This name will appear on every Jira issue created by the integration and in your automation rules, so choose something that makes it clear these issues originated from Admin By Request.
Next, select the Work type for this request type. In older versions of Jira this option was labelled "Issue type". Depending on your space configuration, you might have a number of choices - two are relevant for requests from Admin By Request:
-
[System] Service request - Admin By Request creates a Jira issue for each elevation request and updates it when the request is approved or denied. Approvers act in the ABR portal, the mobile app, Teams, Slack, or another channel - Jira is used for visibility and audit. This is the simpler option and suits organizations that want Jira as a record-keeping layer rather than an action layer.
-
[System] Service request with approvals - works the same way as the option above, but also adds native Jira "Approve" and "Decline" buttons to each issue. With the automation rule in Example 2, clicking those buttons sends the decision back to ABR automatically. Use this option if you want approvers to be able to act entirely from within Jira, without navigating to the ABR portal.
IMPORTANT: Choosing a Work TypeIf you plan to set up Example 2 (Approving or Denying ABR Requests in Jira), you must choose [System] Service request with approvals here. The Work type cannot be changed after the request type is created. If you choose the wrong one, you would need to delete the request type and create a new one.
-
-
Depending on your Space configuration, you may be prompted to select a portal group to assign this request type to. If this prompt appears, choose the appropriate group or leave all options blank. If this screen does not appear, that is expected - not all Spaces have portal groups configured. Simply proceed to the next step.
-
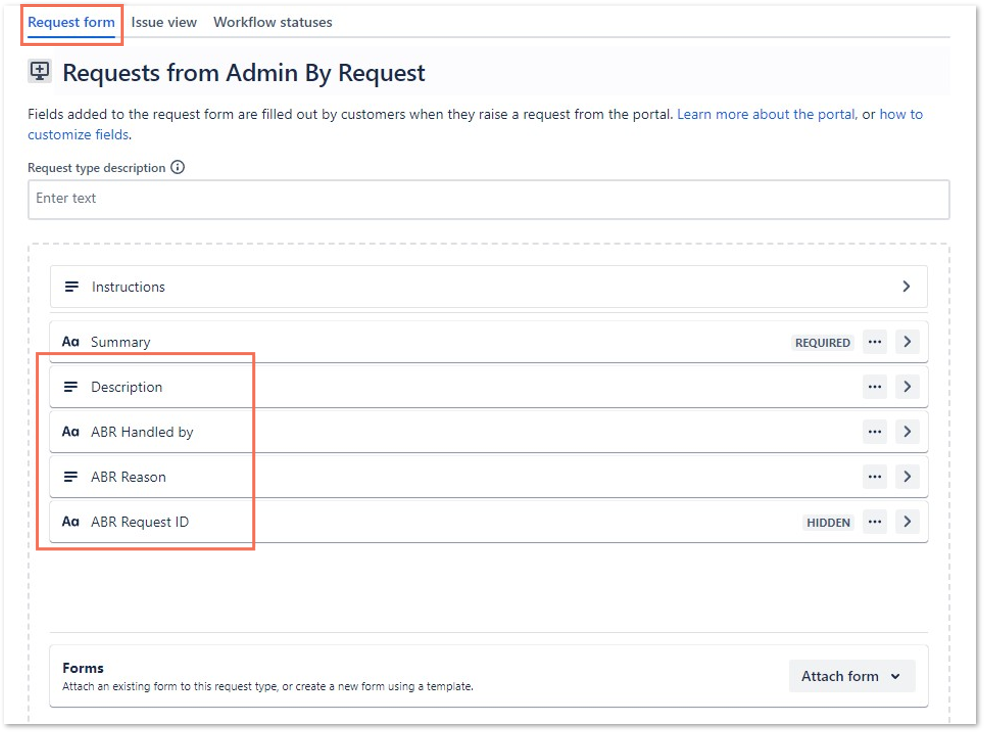
You will now see the Request form tab for your new request type.
Make sure you are on the Request form tab - not "Issue view", "Work item view" or "Workflow statuses".
Drag and drop all four of the following fields into the form:
-
ABR Request ID
-
ABR Handled by
-
ABR Reason
-
Description
The Summary and Instructions fields should already be present in the form - if not, drag them in also:
 IMPORTANT: Include the Description field
The Description field is critical. If it is missing from the Request Type form, ABR's webhook calls will fail silently: the integration setup will appear to complete successfully, and the status in the ABR portal may show as functional, but no Jira issues will actually be created. This is the single most common cause of a seemingly successful setup where nothing appears in Jira. Always add Description alongside the three ABR custom fields.
If you do not want end-users to see the ABR Request ID in the Jira customer portal, you can set the ABR Request ID field to "Use preset value and hide from portal". This hides it from the customer-facing portal view while still allowing the integration to populate it.
-
-
Click Save changes. Jira is now ready to receive requests from Admin By Request.
4. Integrating Jira with Admin By Request
Now that the prerequisites are in place and Jira has been prepared, go to https://jirav2.adminbyrequest.com/ to complete the integration. This is a dedicated setup wizard hosted by Admin By Request - it is separate from both the ABR portal and the Jira interface itself.
-
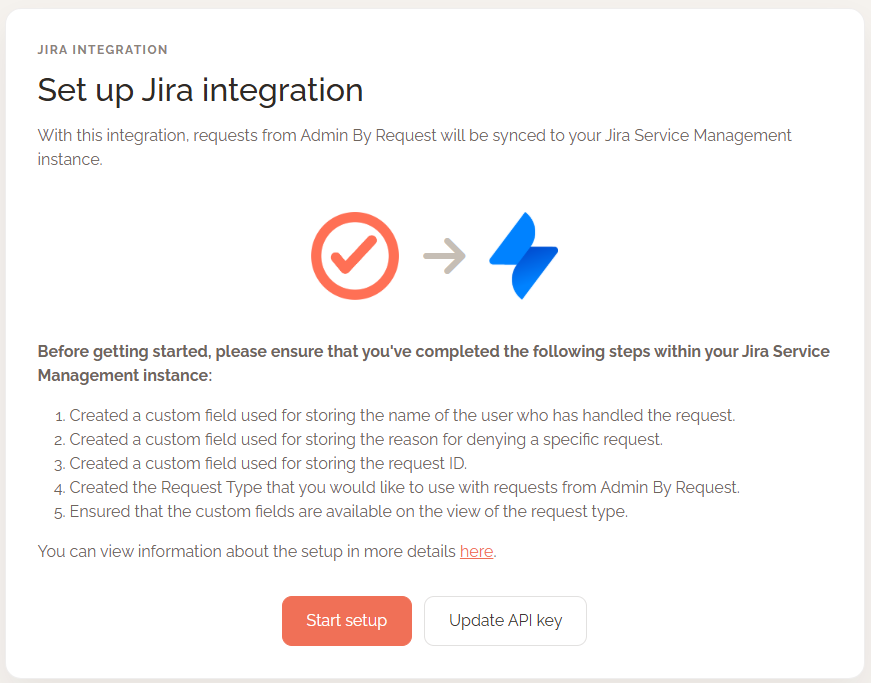
On the Set up Jira integration screen, confirm that you have completed all prerequisite steps and click Start setup.
-
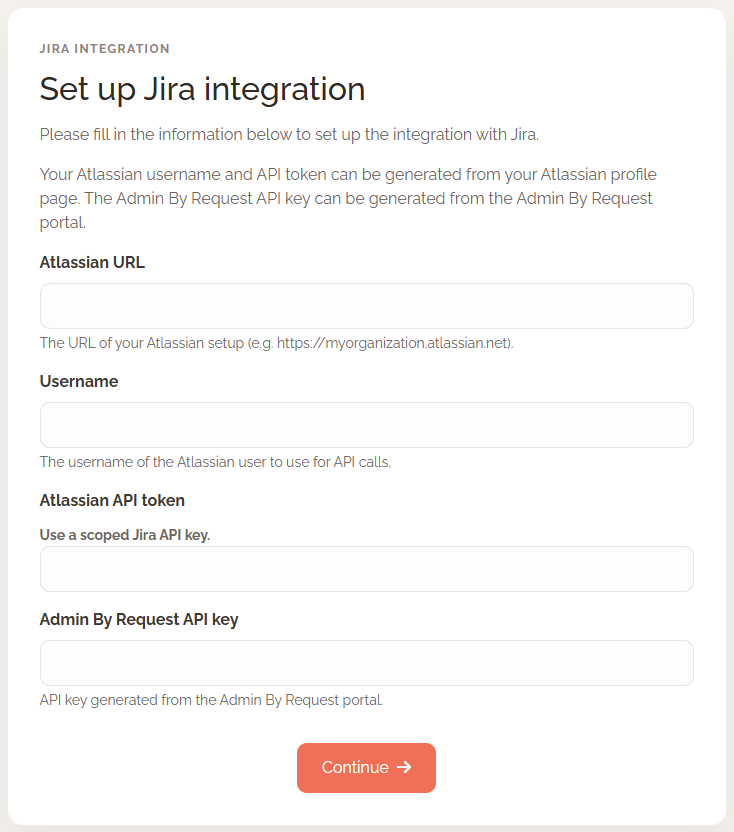
Enter your credentials into the setup form. You will need all four of the following:
-
Atlassian instance URL - your Jira subdomain in the format yourcompany.atlassian.net.
-
Atlassian username - the email address associated with your Atlassian account. This must be your email address - not a display name or a username. Entering a non-email value here causes the service desk dropdown in the next step to appear empty, which looks like a permissions problem but is actually a field format problem.
-
Atlassian API Token - the global or scoped token you created in the prerequisites.
-
ABR API Key - the key you copied from the ABR portal.
The form also includes a Scoped API key checkbox. Check this box if you created a scoped Atlassian API token (with the 14 specific scopes listed in the prerequisites). Leave it unchecked if you created a global (unscoped) token.
This setting tells the integration which type of validation to use when connecting to Atlassian - getting it wrong will cause a connection error.
 IMPORTANT
The ABR API key and the Atlassian subdomain you enter here are permanently associated with this integration instance once it is created. They cannot be changed after setup without completely reinstalling the integration from scratch. Choose these carefully. The Atlassian API token, by contrast, can be updated without reinstalling - see Updating your Atlassian API token.
-
-
Select the Jira service desk project (Space) you want ABR requests to be sent to. If you have multiple Spaces in Jira Service Management, a dropdown will appear allowing you to choose the correct one.
If the dropdown appears empty, check that the Atlassian username field in the previous step contains an email address rather than a display name - this is the most common cause of an empty service desk list.
-
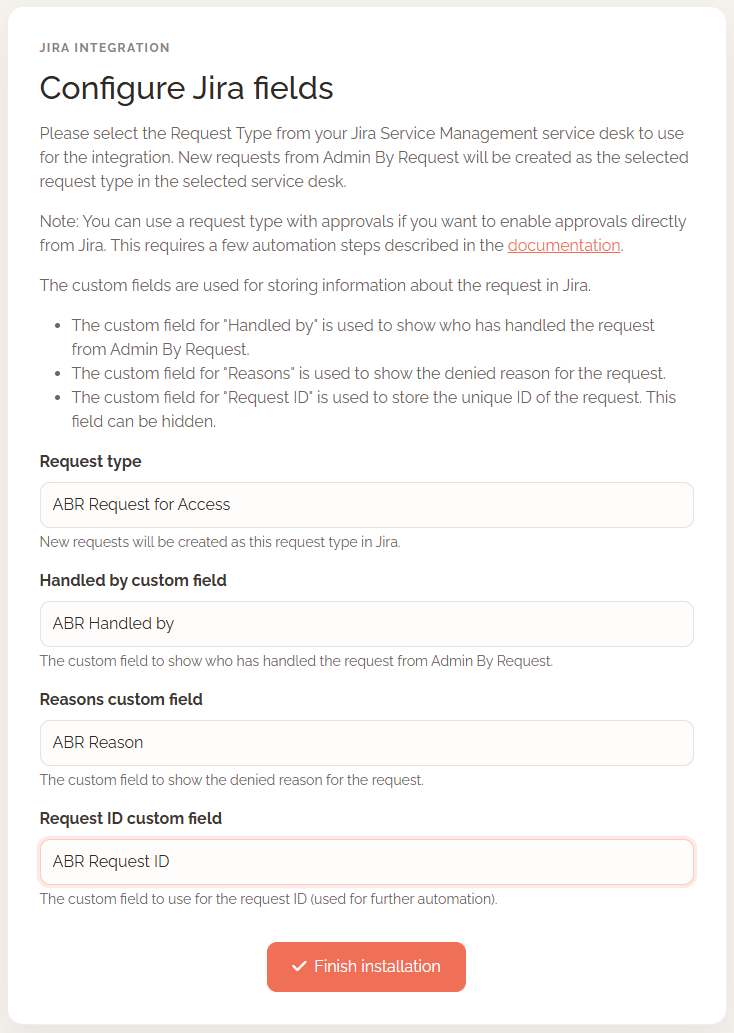
On the field mapping screen, associate the integration's three required fields with the custom fields you created in Task 1. The Request type field should be pre-selected based on your earlier choices.
For each of the remaining three field slots, choose the corresponding custom field name from the dropdown:
-
Map the integration's "Request type" to ABR Request for Access
-
Map "Request ID" slot to your ABR Request ID custom field.
-
Map "Handled by" to ABR Handled by.
-
Map "Reason" to ABR Reason.
-
-
Click Finish installation to complete the setup. New elevation requests from Admin By Request will now be sent to your Jira Space as service requests.
You can verify the integration status in the ABR portal at any time via Settings > Integrations > Jira. A status indicator shows whether the integration is connected and active.
Updating your Atlassian API token
Atlassian API tokens can expire, be rotated as part of credential hygiene, or be revoked. When a token becomes invalid, the integration stops working - ABR cannot create or update Jira issues. In V2 of the Admin By Request Jira integration, you can replace the Atlassian API token without going through the full reinstallation process.
Before you begin, note what the update procedure can and cannot change:
-
You can update the Atlassian API token (Jira best practice is to update to a scoped token, which is enforced by the integration).
-
You cannot change the ABR API key using this procedure.
-
You cannot change the Atlassian subdomain using this procedure.
-
If either the ABR API key or the Atlassian subdomain needs to change, a full reinstallation is required.
You will need your original ABR API key (the one used when the integration was first installed) to complete this update. It is used as a verification step to confirm you are authorized to modify the integration. If you do not have this key, you will need to reinstall the integration.
-
If you haven't already, generate a new Atlassian API token at id.atlassian.com - Security - API tokens. When creating a scoped token, enable the same 14 required scopes listed in the prerequisites. Set an expiration date. See Prerequisites step C for full details.
-
Navigate to https://jira.adminbyrequest.com in a browser.
-
On the main screen, select the option to update an existing integration rather than install a new one.
-
Enter your original ABR API key (the key used when the integration was first set up) and your Atlassian subdomain. These are used to identify and verify the integration you want to update.
-
Enter the new Atlassian API Token in the token field. Check the Scoped API key checkbox to match the type of token you created.
-
Save the change. The integration immediately begins using the new token.
-
Make a test elevation request from a device to confirm that a new Jira issue is created in your Space. This confirms the new token is working correctly.
What appears in Jira
When a user on an Admin By Request-managed device submits an elevation request (Admin Session or Run As Admin) while Require Approval is enabled, the integration creates a Jira issue in your selected Space.
It can take several minutes after the ABR request is submitted for the Jira issue to appear. This delay is expected and is due to webhook processing time. It is not an indication that anything has gone wrong.
Each Jira issue contains the following information:
-
Summary - set initially to "Admin session request" or "Run as admin request" depending on the request type. When the request is decided, the Summary is updated automatically by prepending "APPROVED" or "DENIED". This update occurs regardless of which channel was used to approve or deny - the ABR portal, the mobile app, a Teams or Slack integration, or a Jira automation rule.
-
ABR Request ID - populated at issue creation with the unique identifier of the ABR request.
-
ABR Handled by - populated when the request is approved or denied with the name of the person who acted on it.
-
ABR Reason - populated if the request was denied and the approver provided a reason.
-
Description - populated by ABR with a description of the elevation request (what was requested and from which device).
What next?
The preceding sections cover the full extent of what the Admin By Request Jira integration does on its own. Everything beyond creating and updating issues - notifying approvers by email, transitioning issue statuses, enabling Jira-native Approve/Decline buttons, adding custom context to issue descriptions - requires Jira's own automation tooling, which is the customer's responsibility to configure.
The automation examples provided in the next section are for convenience only. We do not support Jira automation rules and they must be used entirely at the customer's own risk. Test all automation rules in a non-production environment before enabling them in production.
When deciding which automation example to follow, consider the Work type you selected in Task 2:
-
If you selected [System] Service request, use Example 1 - Populating issue fields after issue creation as your starting point. It shows how to populate additional fields and send email notifications when an issue is created.
-
If you selected [System] Service request with approvals, you can use both Example 1 - Populating issue fields after issue creation and Example 2 - Approving or Denying ABR Requests in Jira. Example 2 shows how to wire up the native Jira Approve/Decline buttons so that a decision made in Jira is sent back to ABR via the ABR API.
Creating Jira automation rules
Using the Jira Audit log
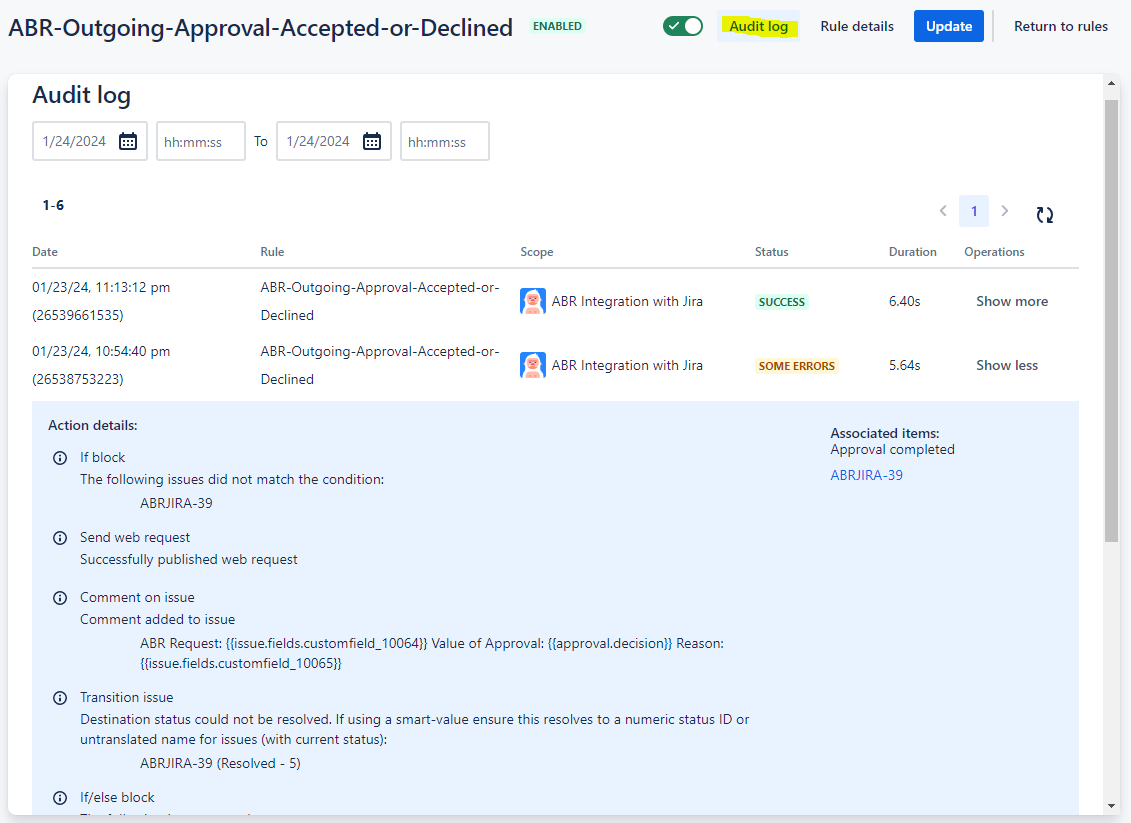
The Jira Audit log is your most useful diagnostic tool when working with automation rules. Every rule has its own Audit Log that records each time the rule was triggered, what actions ran, and whether they succeeded or failed. If a rule does not behave as expected, the Audit Log is the first place to look.
Access the Audit Log for each rule in the automation rule editor:
Finding custom field IDs (required for Example 2)
The Example 2 automation rule makes web requests to the ABR API that include your custom field values as Jira smart values. To reference a custom field in a Jira automation expression, you need its numeric field ID - for example, customfield_10064. Field IDs are assigned by your Jira instance and are not shown in the Jira UI directly. To find them:
-
Make sure at least one issue exists in your Jira Space. If none exist yet, create a test issue or make a test elevation request from an ABR-managed device.
-
Note the issue number of an existing issue. Issue numbers are visible in the issue list - for example, "ABRJIRA-40".
-
Enter the following URL in a browser, replacing the placeholders with your actual Jira subdomain and issue number:
Copyhttps://<your-jira-website>.atlassian.net/rest/api/2/issue/<your-jira-issue-number>?expand=names -
The response is a large JSON object. Paste it into a text editor that supports JSON formatting (VS Code, for example, can format JSON with Shift+Alt+F on Windows or Shift+Option+F on macOS). Search the formatted JSON for the field names "ABR Request ID", "ABR Handled by", and "ABR Reason". Each one will appear alongside its field ID in customfield_XXXXX format.
NOTEYour field IDs are unique to your Jira instance. They will be different from any examples in this documentation - there is no universal standard value. Note down all three field IDs; you will need the ABR Request ID field ID specifically when configuring Example 2.
The following example shows issue ABRJIRA-40 and the field ID for ABR Request ID:

Linking back to the ABR Portal
Example 1 below illustrates how to add a link back to the ABR Portal's Requests page in the Jira issue Description field. This gives approvers a direct path to the ABR portal from within the Jira issue, which is useful when they prefer to handle approvals there rather than in Jira.
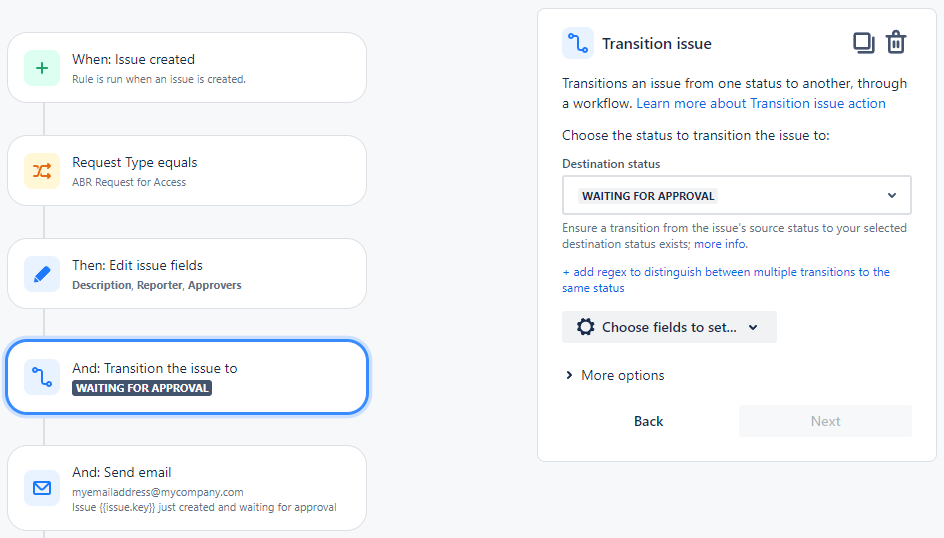
 Example 1 - Populating issue fields after issue creation
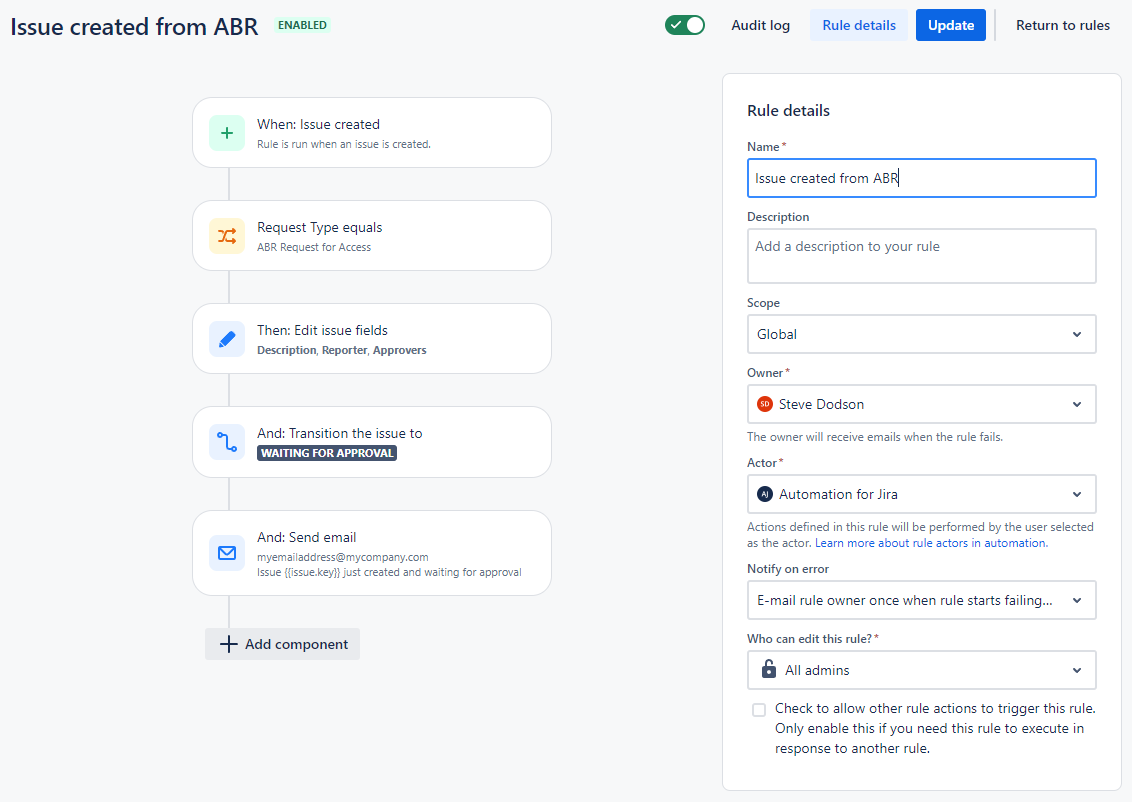
-
Trigger:
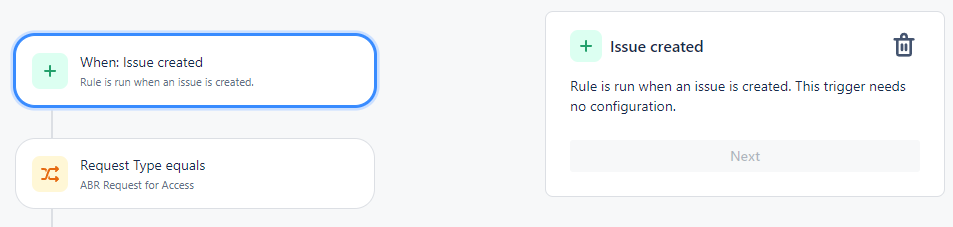
-
IF Request Type is ABR Request for Access:
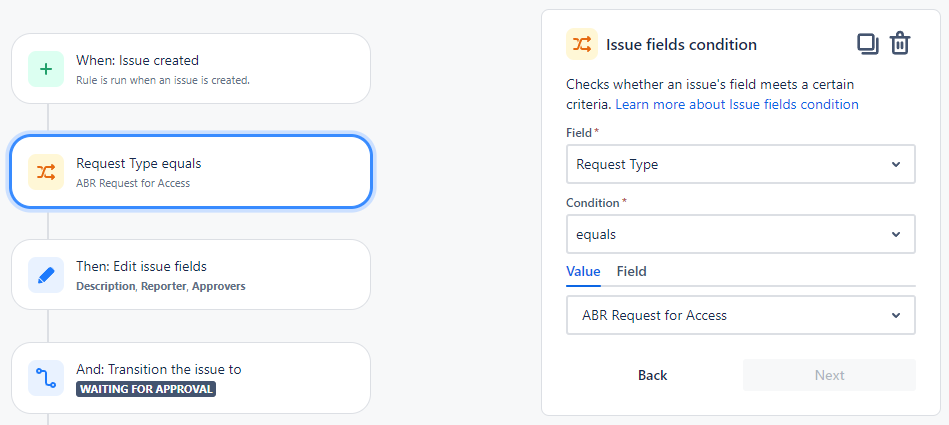
-
Action 1 - set fields:
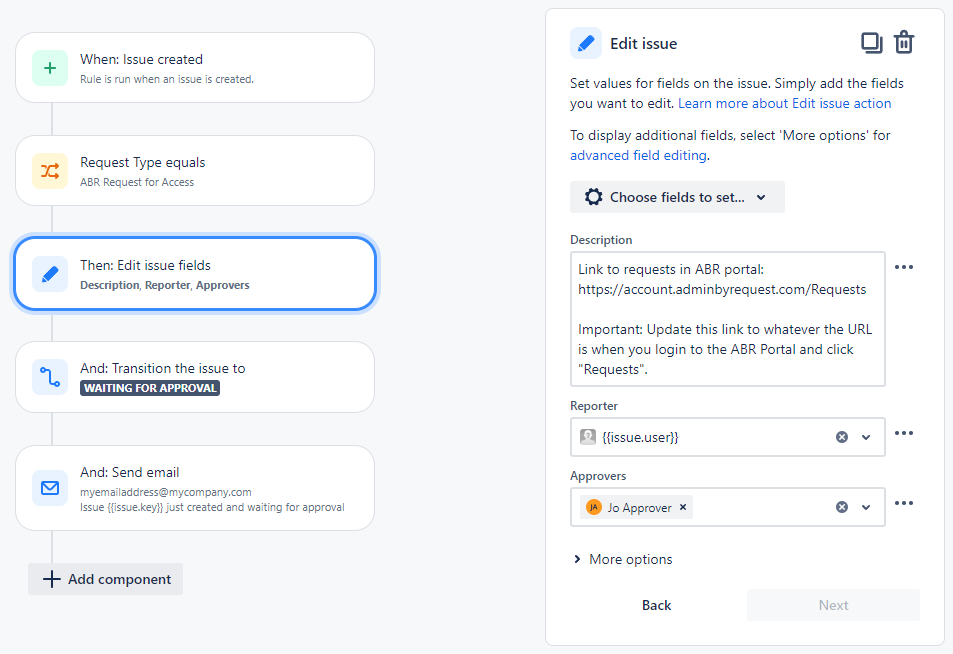
-
Action 2 - Set Status to Waiting for Approval (possibly optional, depending on workflow):
-
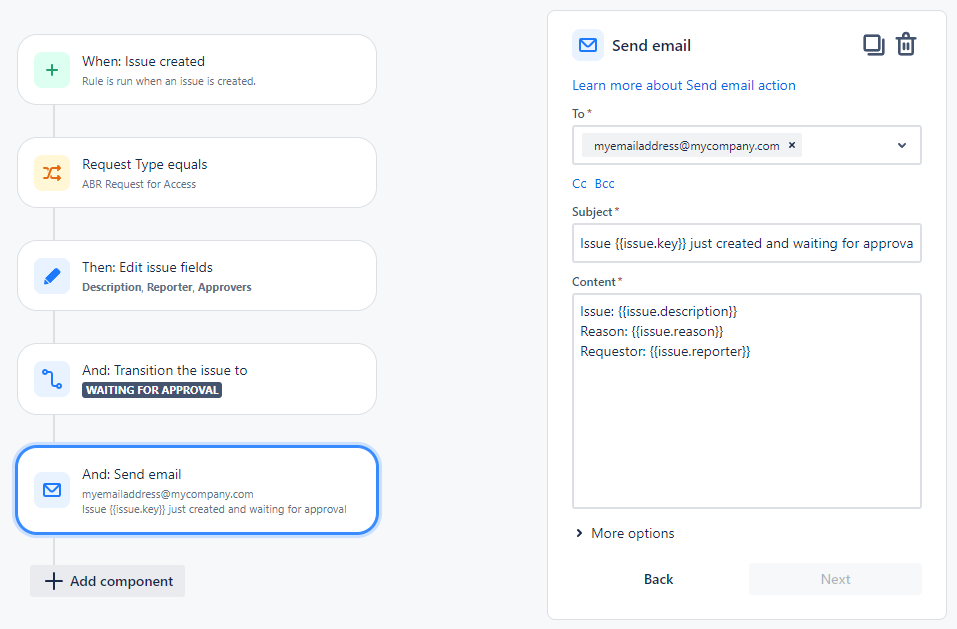
Action 3 - Send email:
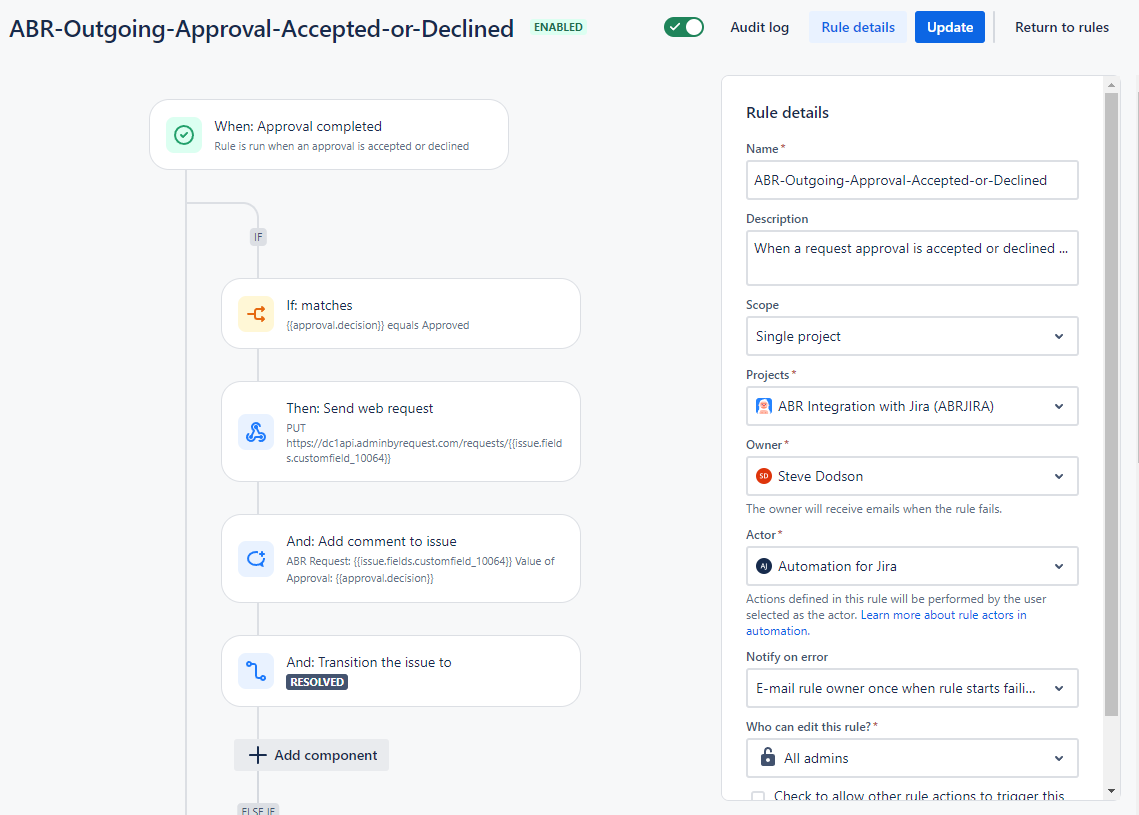
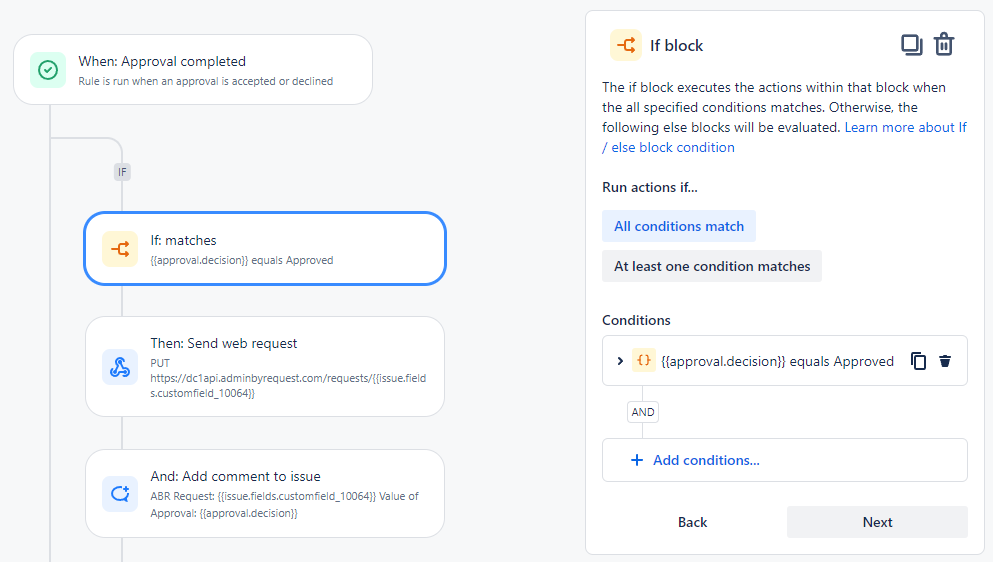
Example 2 - Approving or Denying ABR Requests in Jira
-
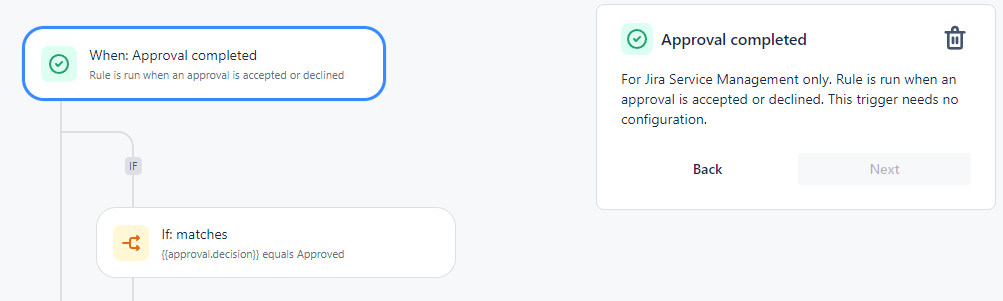
Trigger:
-
IF Approved:
-
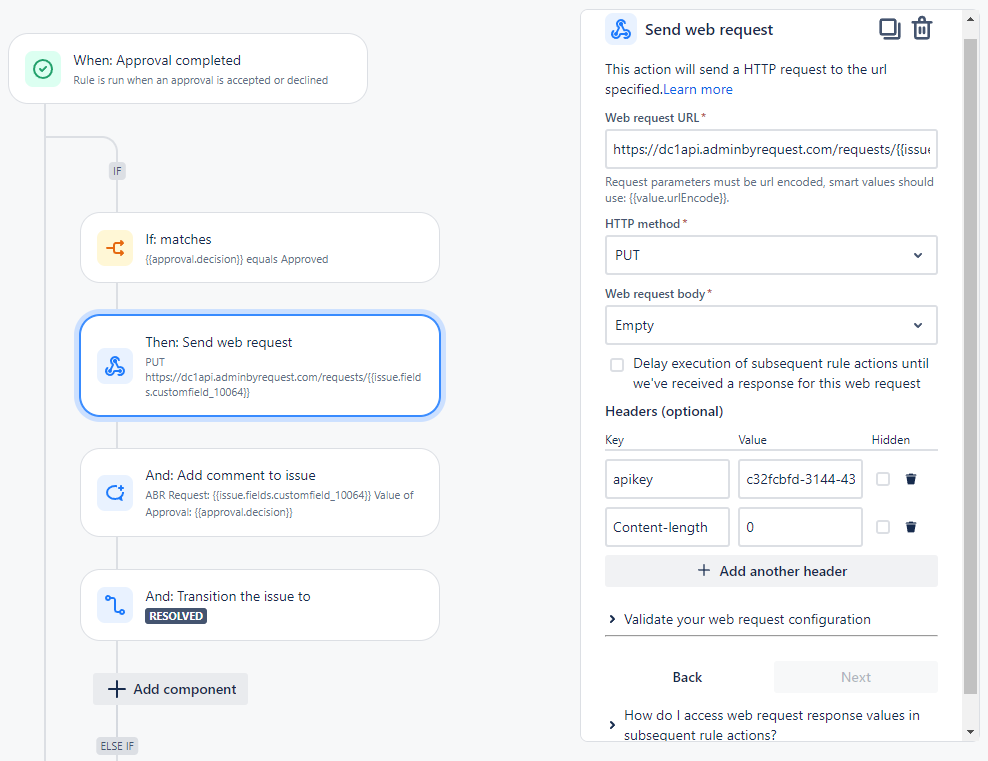
Action 1 - Send web request (PUT). Important - make sure you read up on API calls here (API Overview):
-
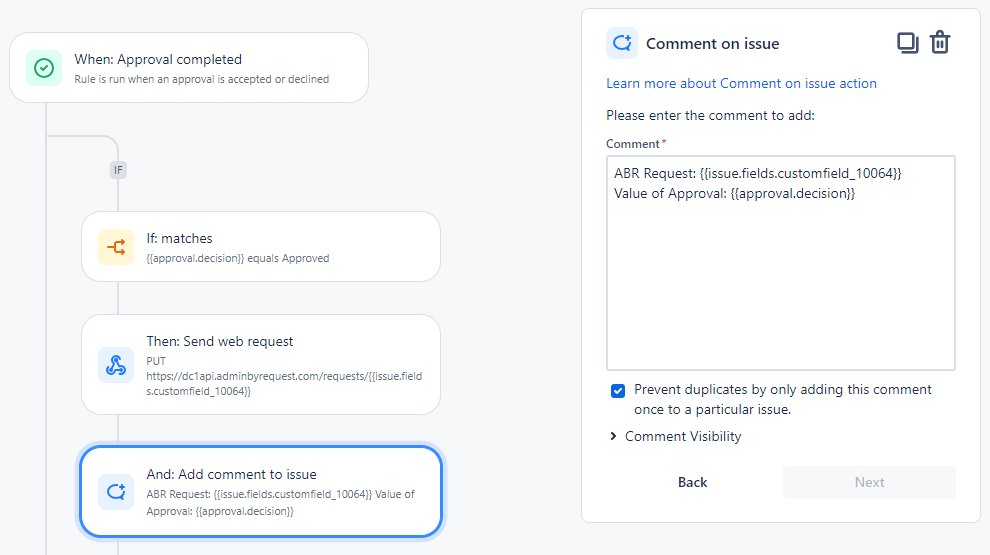
Action 2 - Add Comment to Jira issue (Important - make sure you identify the correct customfield ids - yours might be different from the example):
-
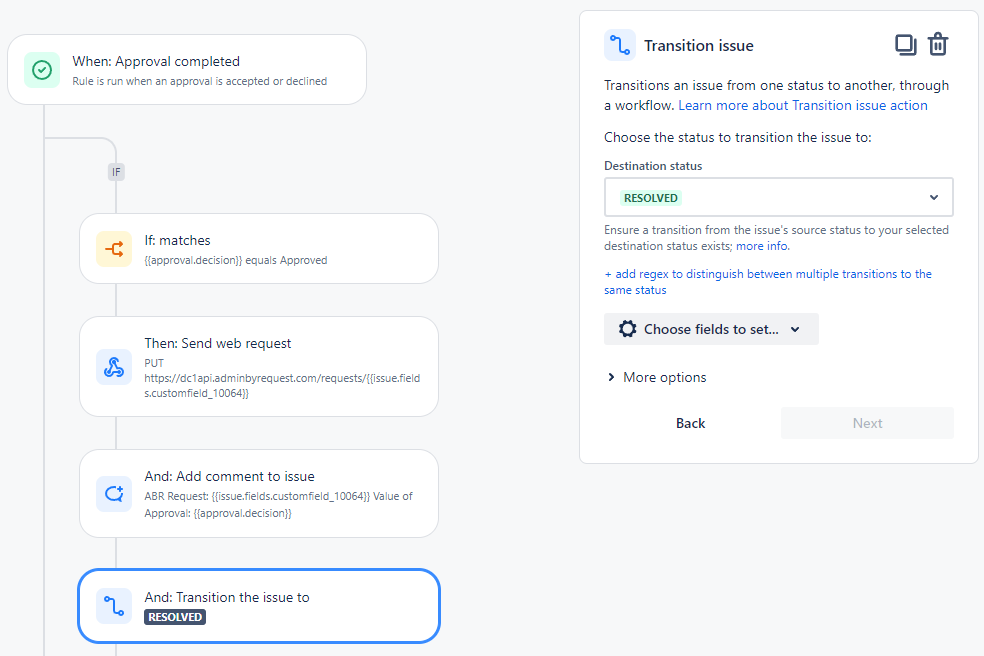
Action 3 - Set Status to Resolved:
-
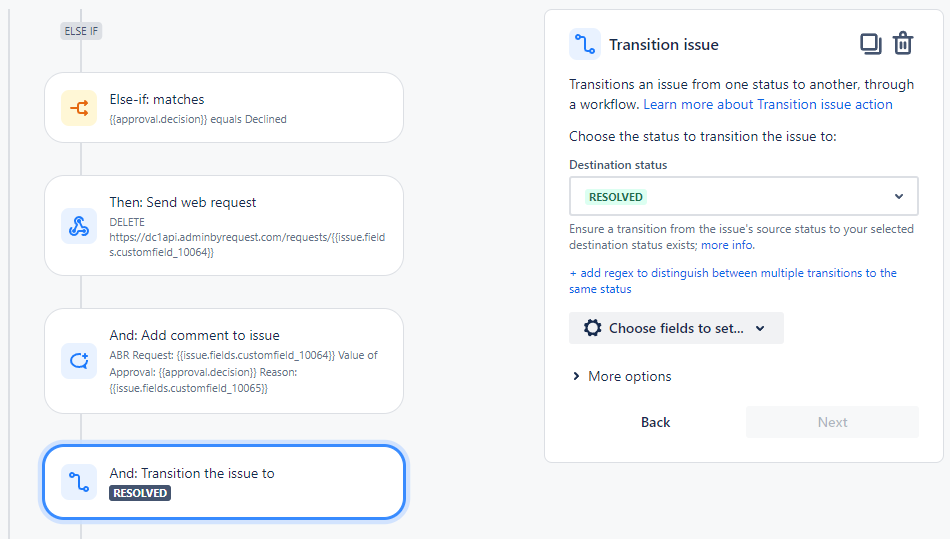
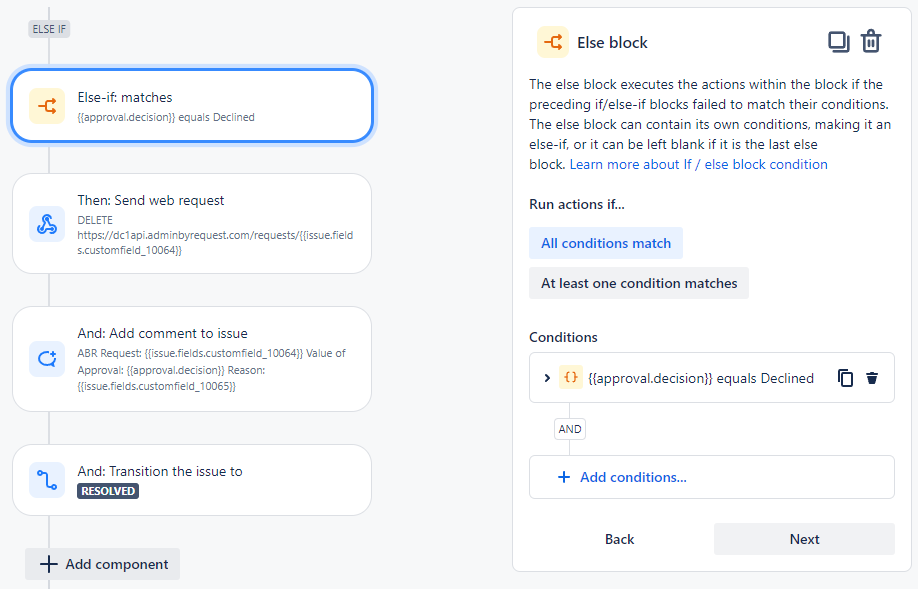
IF Declined:
-
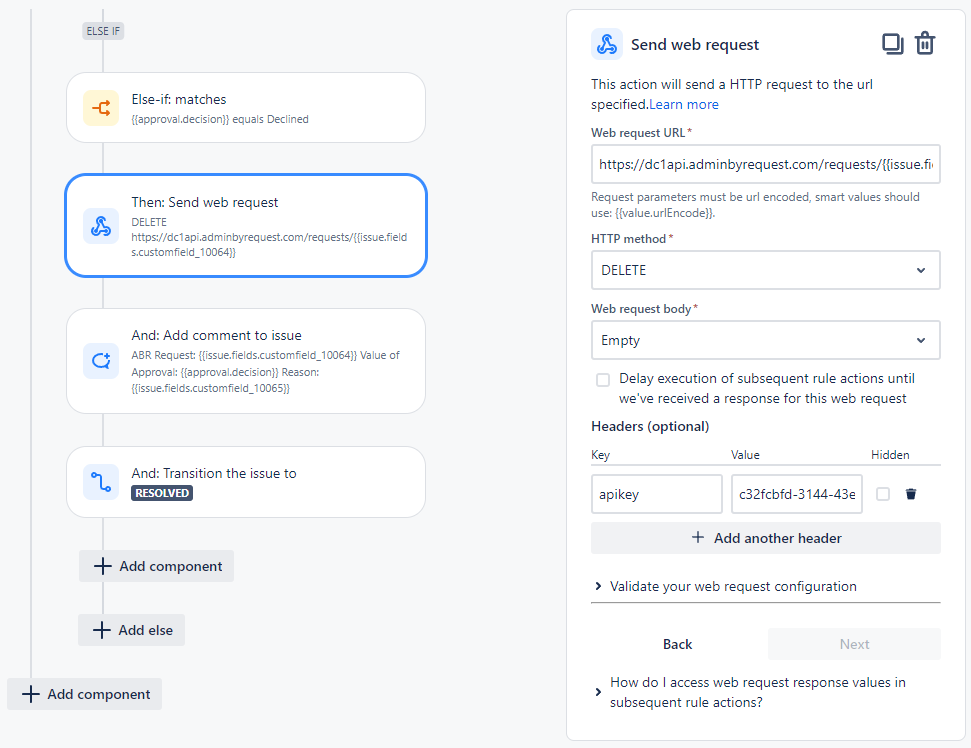
Action 1 - Send web request (DELETE). Important - make sure you read up on API calls here (API Overview) and here (Requests API):
-
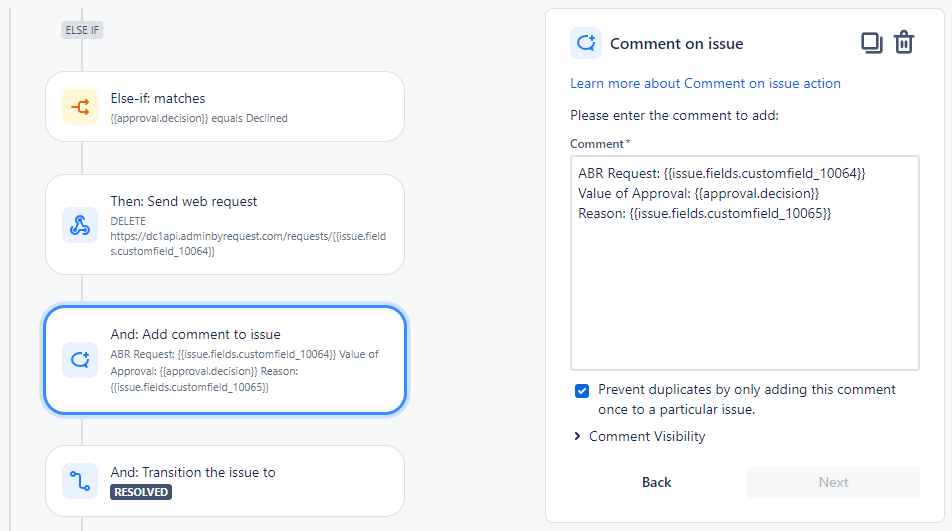
Action 2 - Add Comment to Jira issue (Important - make sure you identify the correct customfield ids as described in 1. Creating custom fields in Jira - even if your field names are the same as the example, your customfield ids might be different):
-
Action 3 - Set Status to Resolved: