Portal Administration for Windows
Introduction
This topic documents configuration parameters in the Admin Portal that can be used to manage Windows Settings and Sub Settings.
Fields that can be set/configured in the portal are presented in tables, with each table showing:
-
Setting - the name of the field that controls the setting
-
Type - the type of value that can be entered or selected and its default value
-
Description - how the setting is used and notes about any implications it may have on other settings
To change any of the settings in the portal, log in to the portal and select the setting from the menu.
In this topic
Supplementary Technical Information
Entra ID Support
Portal menu: Settings > Tenant Settings > Identity > ENTRA ID
Azure AD has been renamed by Microsoft to Entra ID. This version of the
A selling point for the Admin By Request EPM solution is its flexibility and tools for granular access control; organizations can configure every setting to their specific needs and the needs of all, some, or even individual users.
Settings act as rules, such as whether the Run as Admin or Admin Session features are enabled, and whether or not users need approval to use them. You likely wouldn’t want the rules applied for an IT Administrator to be the same as those applied for a Customer Relations employee, so settings can be differentiated based on Sub-Settings, which allow different rules to be applied to different users and/or groups.
For Windows and Mac endpoint clients, we’ve built in support for Entra ID groups, meaning you can now apply Sub-Settings to existing Entra ID / Azure AD user and device groups.
For more information, refer to the Entra ID Connector.
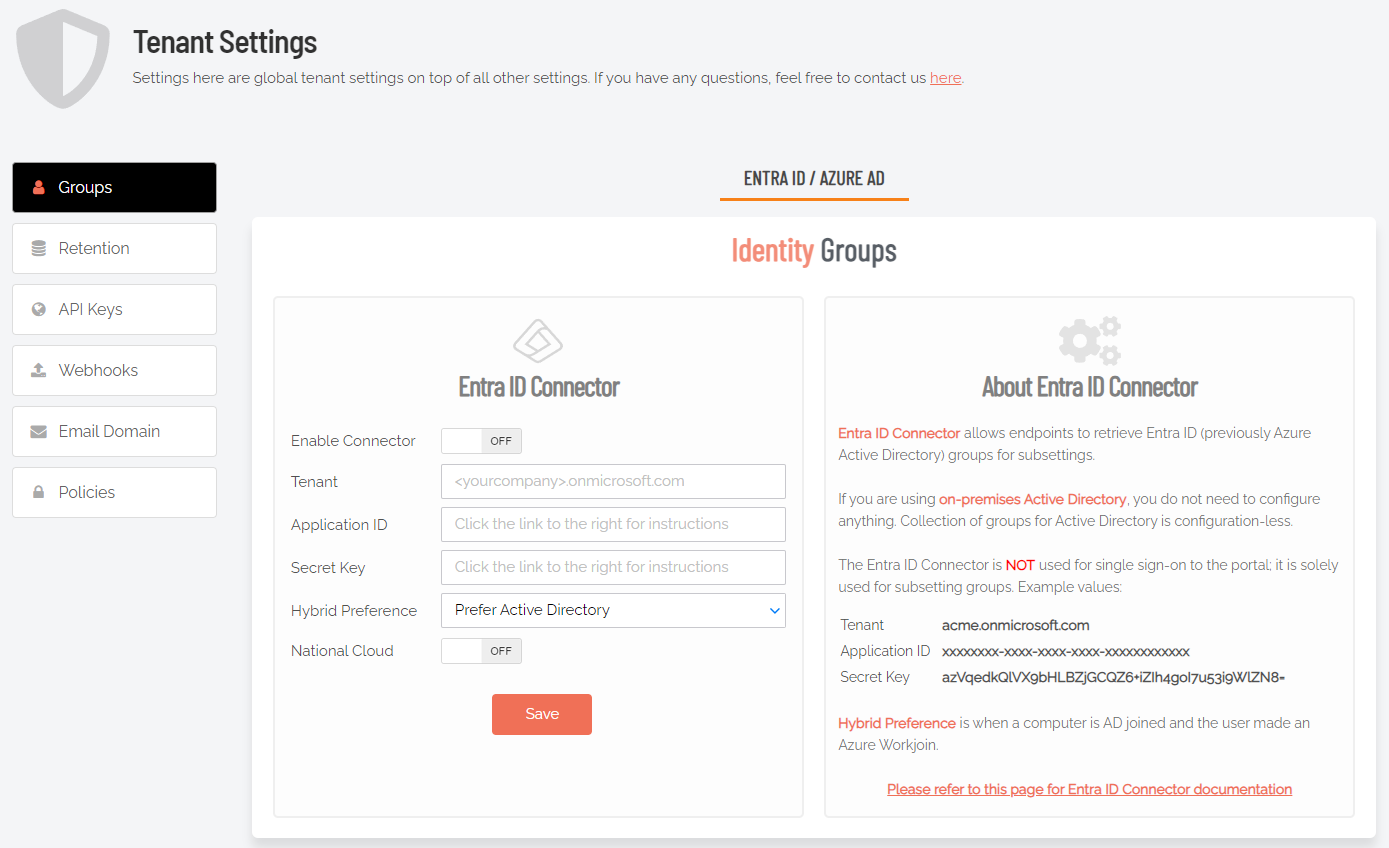
The Entra ID Connector allows endpoints to retrieve Entra ID (previously Azure AD) groups for sub-settings. The Entra ID Connector is NOT used for single sign-on to the portal; it is used solely for sub-setting groups.
If you are using on-premise Active Directory, you do not need to configure anything - collection of groups for Active Directory is "configuration-less".
Example values:
|
acme.onmicrosoft.com |
|
xxxxxxxx-xxxx-xxxx-xxxx-xxxxxxxxxxxx |
|
azVqedkQlVX9bHLBZjGCQZ6+iZIh4goI7u53i9WlZN8= |
Refer to https://learn.microsoft.com/en-us/entra/identity-platform/quickstart-register-app for more information on registering apps with the Microsoft identity platform.
The National Cloud regions of Azure are designed to make sure that data residency, sovereignty, and compliance requirements are honored within geographical boundaries.
|
Setting |
Type |
Description |
|---|---|---|
|
Enable Connector |
Toggle Default: Off |
On - Turns on the Entra ID Connector and allows endpoints to retrieve Entra ID groups for sub-settings. Off - The Entra ID Connector is disabled and endpoints will use sub-settings as described under "Sub-Settings", rather than using Entra ID rules. |
|
Tenant |
Text |
Standard email address format. Use a new line for each address. |
|
Application ID |
Text |
The value assigned to an application when it is registered with the Microsoft identity platform. |
|
Secret Key |
Text |
The application certificate or client secret generated when the app is registered. |
|
Hybrid Preference |
Selection Default: Prefer Active Directory |
An option available for selection when a computer is both AD-joined and the user makes an Entra ID Workjoin:
|
|
National Cloud |
Toggle Default: Off |
On - Enables selection of a physically isolated instance of Azure. Reveals National Service, which is where the actual geographic instance is selected. Off - Disables selection of a physically isolated instance of Azure. Hides National Service. |
|
National Service (hidden if National Cloud is Off) |
Selection Default: US Government L4 / GCC High |
The geographic instance selected:
|
|
Save |
Button |
Saves customization and changes to any fields. Note that reloading any defaults does not take effect until Save is clicked. |
Entra ID SSO (Single Sign On)
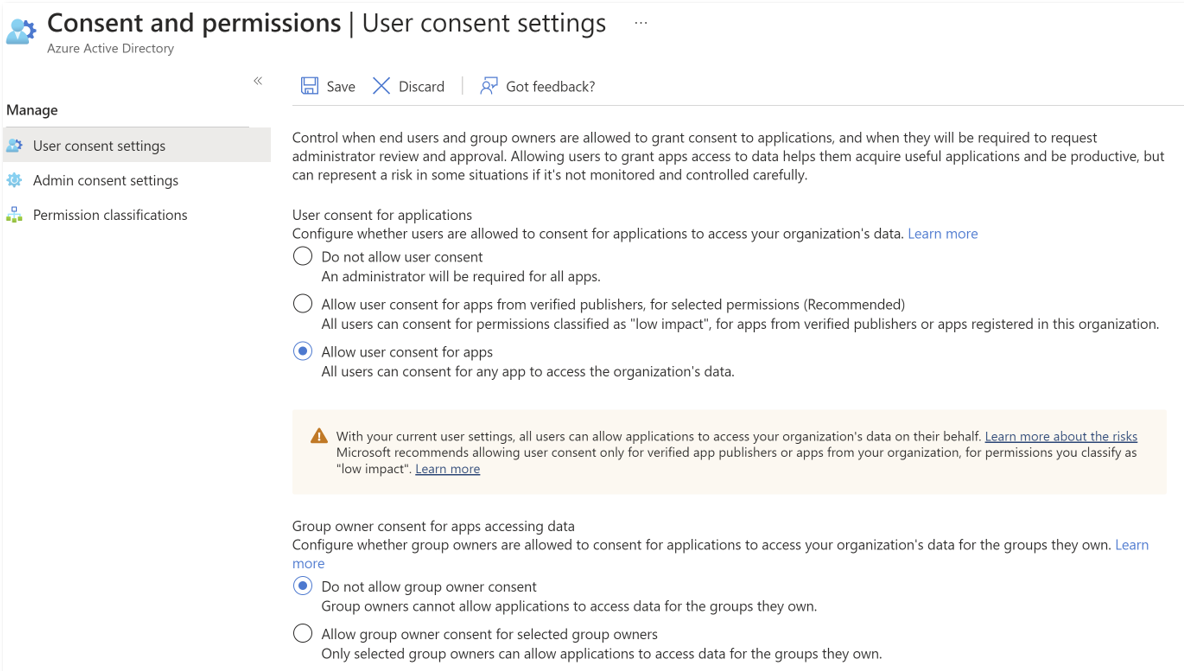
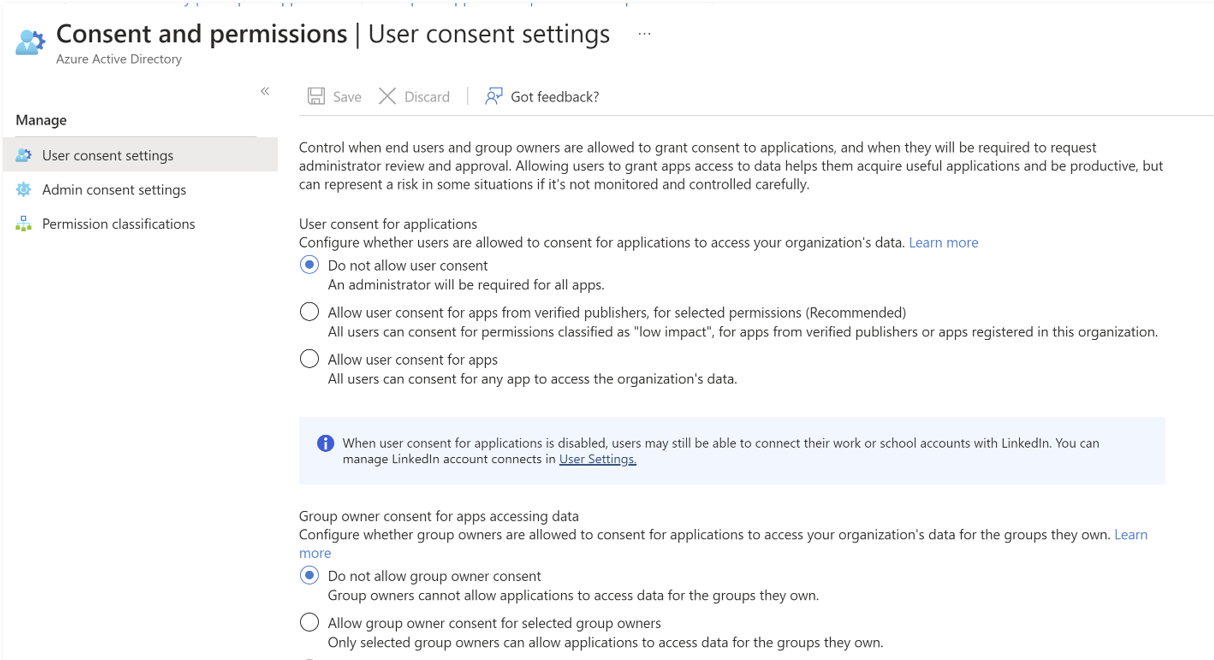
There are two methods that can be used to setup Admin By Request SSO in Entra ID, depending on whether or not users are allowed to grant consent to applications that might request access to data:
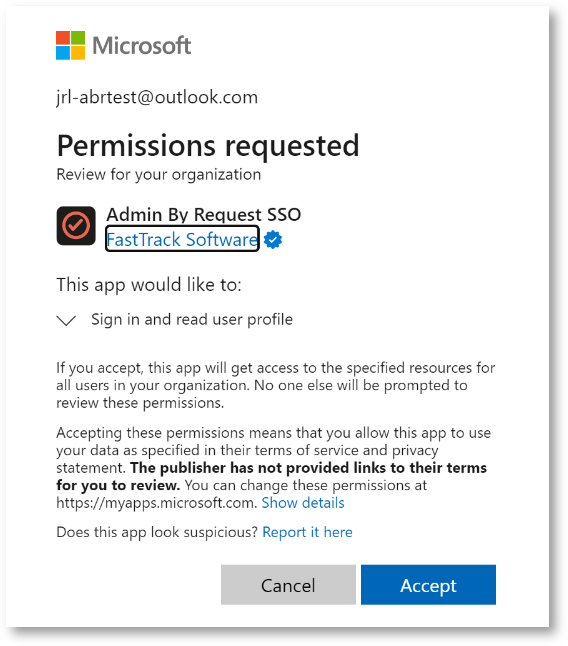
The first method requires that a user be allowed to grant consent to apps in Azure AD, as indicated in the screenshot below.
The first time Admin By Request requires SSO from an endpoint, a Microsoft Permissions requested dialog appears:
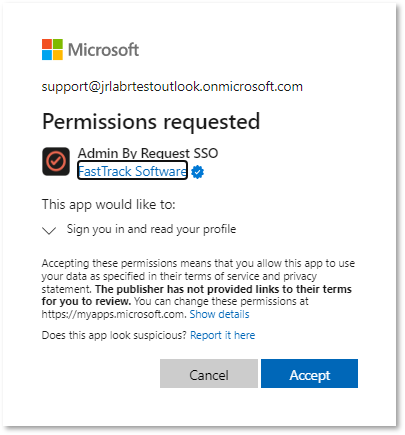
When the first user accepts, an Azure AD application is created for Admin By Request SSO. This application is now ready for any other user in the enterprise:
The second method is more complex and is needed when users are not permitted to grant consent to apps in Entra ID, as indicated in the screenshot below:
In this case, the following tasks must be completed:
-
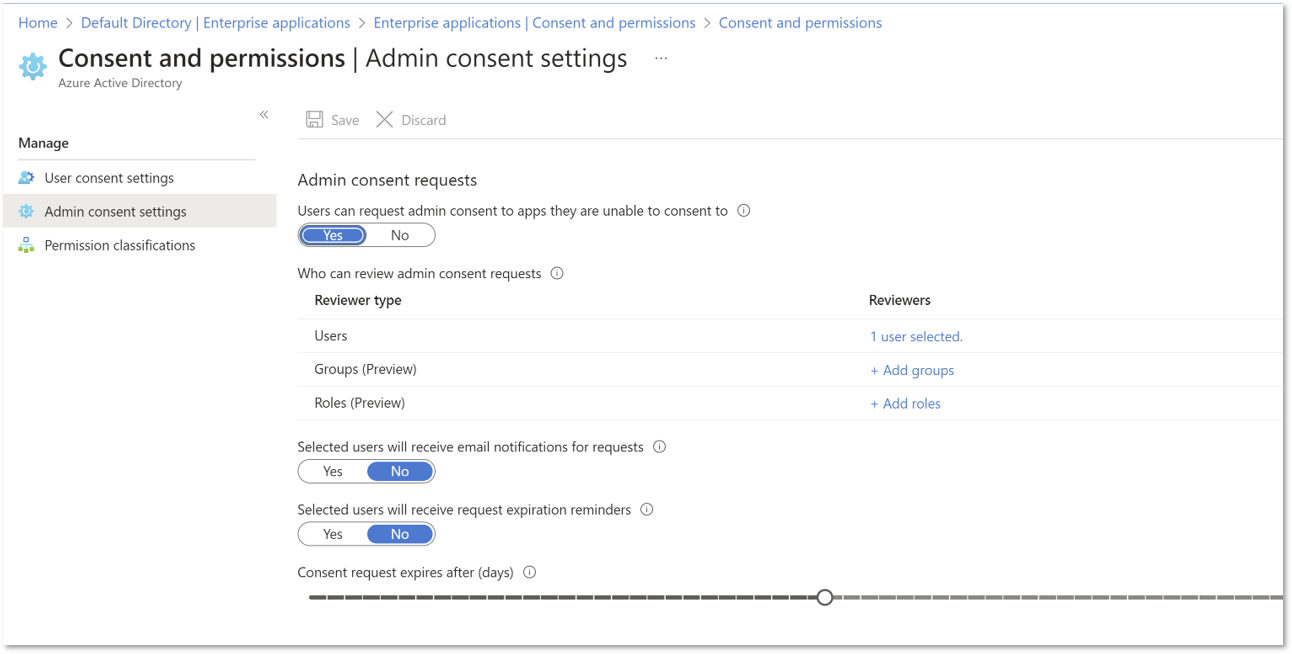
 Modify Admin consent settings:
-
Admin consent settings must be modified so that users can request admin consent to apps they are normally unable to consent to:
-
Determine which Users, Groups and/or Roles will be permitted to approve consent requests. To ensure approval requests are handled efficiently, those able to review requests for approval for a given application should be specified at this point.
-
-
Elevate a program as a normal user:
-
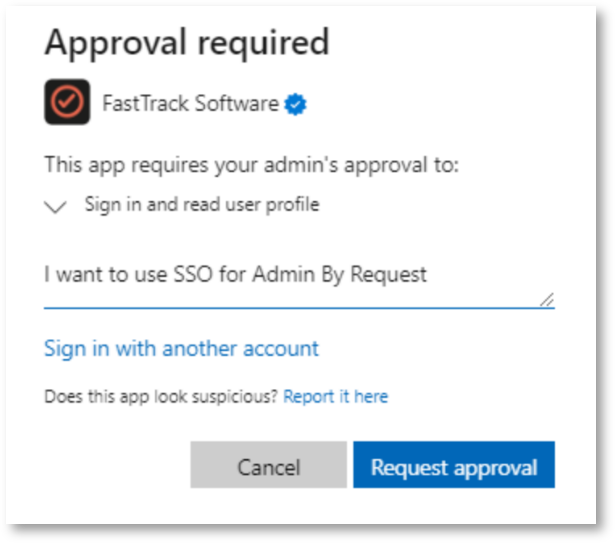
The first user to initiate SSO validation from an endpoint is required to request approval:
-
To ensure first use is controlled, login as an ordinary user and create a consent request for the application by elevating a program. Enter the reason why you want this and click Request approval.
-
-
Approve the request as an authorized approver:
-
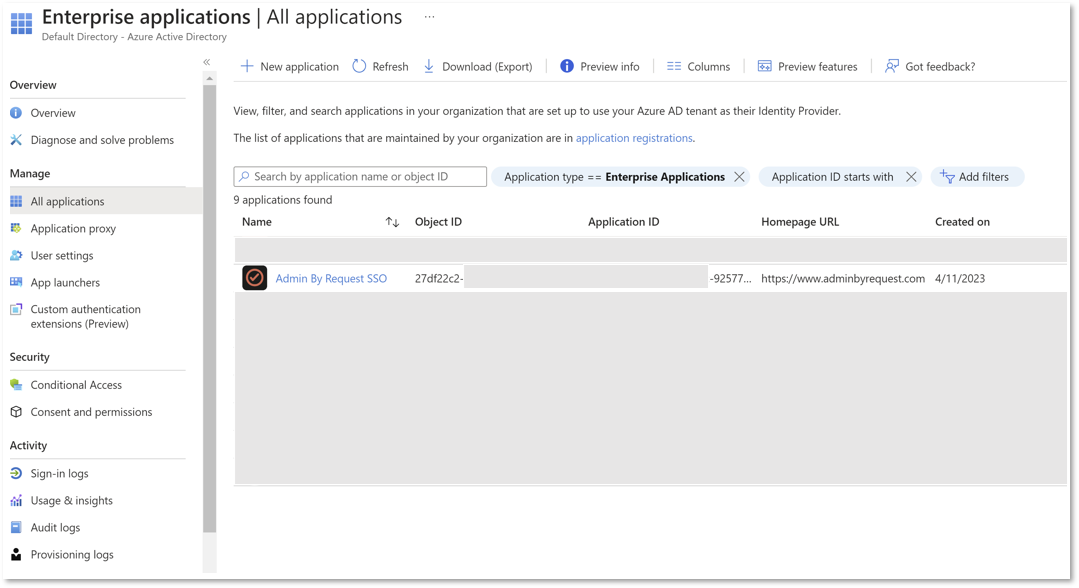
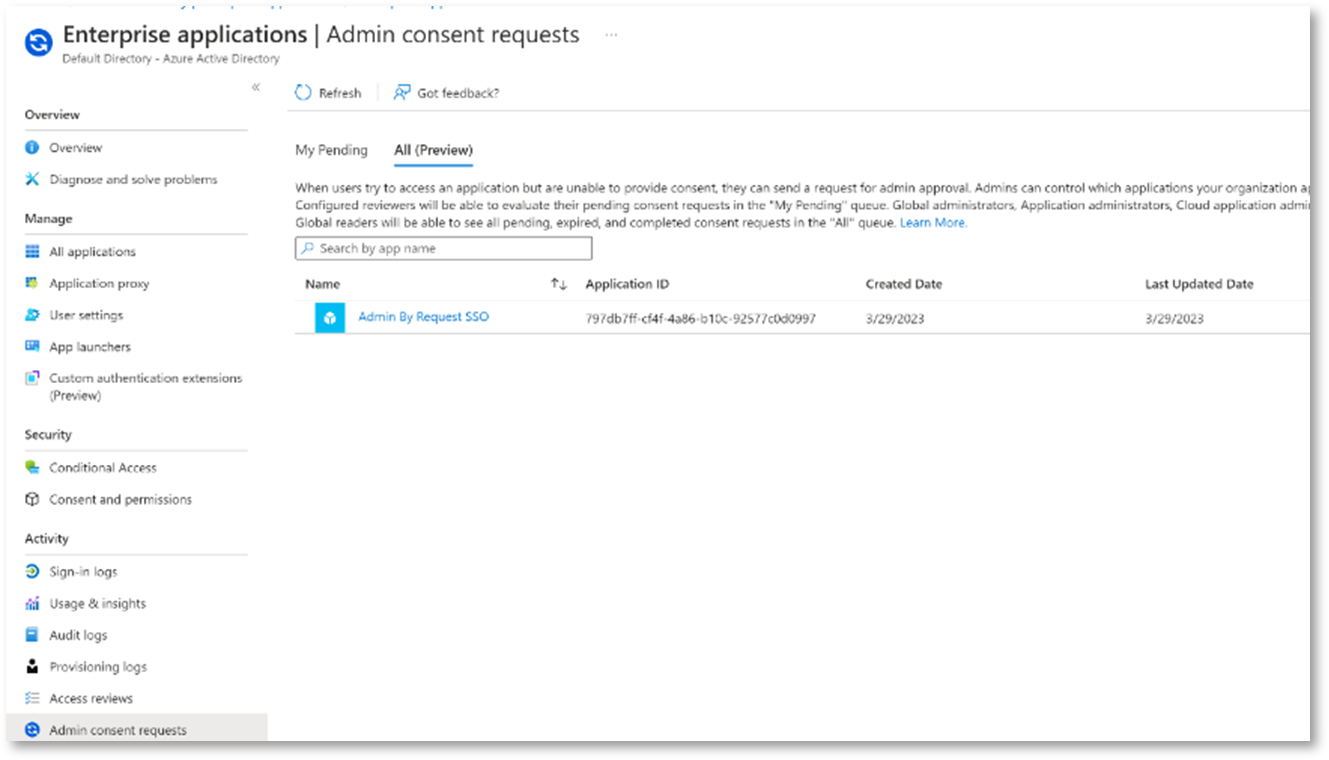
Once the first approval request is made, go to your AAD tenant > Enterprise Applications | Admin consent requests > All (Preview) as one of the Users/Groups/Roles specified earlier. The following shows one request in the list:
-
For the request shown, click Admin By Request SSO to open it.
-
Finally, click Accept to approve it:
Once accepted, all users can run the application.
-
Google Identity Support
Portal menu: Settings > Tenant Settings > Identity > GOOGLE
The Google Connector is used to retrieve Google groups for sub-settings from endpoints that use the Windows Google identity provider.
The configuration is tested when Save is clicked.
Version required
Google Connector is supported in Windows Endpoint 8.5 or newer.
|
Setting |
Type |
Description |
|---|---|---|
|
Enable Connector |
Toggle Default: Off |
On - Turns on the Google Connector, allowing the retrieval of groups from endpoints that use the Windows Google identity provider. Off - The Google Connector is disabled. |
|
Admin Account (disabled if Enable Connector is Off) |
Text |
The Google account that issues the secret key. |
|
JSON Private Key (disabled if Enable Connector is Off) |
Text |
The Google API key used to retrieve groups. |
|
Save |
Button |
Saves customization and changes to any fields. Note that reloading any defaults does not take effect until Save is clicked. |
JumpCloud Support
Portal menu: Settings > Tenant Settings > Identity > JUMPCLOUD
The JumpCloud Connector is used to retrieve groups for sub-settings from endpoints that use the Windows JumpCloud identity provider.
The configuration is tested when Save is clicked.
Version required
JumpCloud Connector is supported in Windows Endpoint 8.5 or newer.
|
Setting |
Type |
Description |
|---|---|---|
|
Enable Connector |
Toggle Default: Off |
On - Turns on the JumpCloud Connector, allowing the retrieval of groups from endpoints that use the Windows JumpCloud identity provider. Off - The JumpCloud Connector is disabled. |
|
API Key (disabled if Enable Connector is Off) |
Text |
The JumpCloud API key used to retrieve groups. |
|
Save |
Button |
Saves customization and changes to any fields. Note that reloading any defaults does not take effect until Save is clicked. |
Okta Support
Portal menu: Settings > Tenant Settings > Identity > OKTA
The Okta Connector is used to retrieve groups for sub-settings from Okta groups.
Endpoints must be joined to either Active Directory or Entra ID.
The configuration is tested when Save is clicked.
Version required
Okta Connector is supported in Windows Endpoint 8.5+ and Mac Endpoint 5.2+.
Platform SSO and Macs
It is a requirement for using the Okta Connector with Macs that users login to their Mac devices using Platform SSO.
Setting up Platform SSO on a Mac lets the user sign in with a centralized identity provider like Okta or Entra, instead of relying on a purely local username.
With Platform SSO, the Mac login is securely linked to the user’s unique identity in the IdP. That means Admin By Request can trust who the user is and consistently look up their group memberships in Okta, even if the local account name changes.
The Admin By Request flow is:
-
The user logs into the Mac using Okta via Platform SSO
-
Admin By Request uses that verified identity to query Okta for the user’s group memberships
-
Admin By Request applies the relevant sub-settings on the Mac based on those groups
Okta groups on macOS (subsettings)
For group-based subsettings on macOS, use the following prerequisites:
-
Admin By Request for Mac 5.2 or newer
-
Platform SSO sign-in with Okta as the identity provider
This prerequisite applies to group and subsettings resolution. MFA via SAML remains a separate flow.
When modifying a setting in the following table, make sure to click Save to apply changes.
|
Setting |
Type |
Description |
|---|---|---|
|
Enable Connector |
Toggle Default: Off |
On - Enables the Okta Connector. Off - The Okta Connector is disabled. |
|
URL (disabled if Enable Connector is Off) |
Text |
The Okta URL identifying the tenant. |
|
Secret Key (disabled if Enable Connector is Off) |
Text |
The Okta API key used to retrieve groups. |
|
Save |
Button |
Saves customization and changes to any fields. Note that reloading any defaults does not take effect until Save is clicked. |
These steps describe setting-up Group Identities with the Okta Connector. They cover getting the API from Okta and applying it to the Admin By Request Portal:
-
If you haven't already, login to Okta and navigate to the Admin Console.
-
On the left-hand side menu, scroll down and expand Security.
-
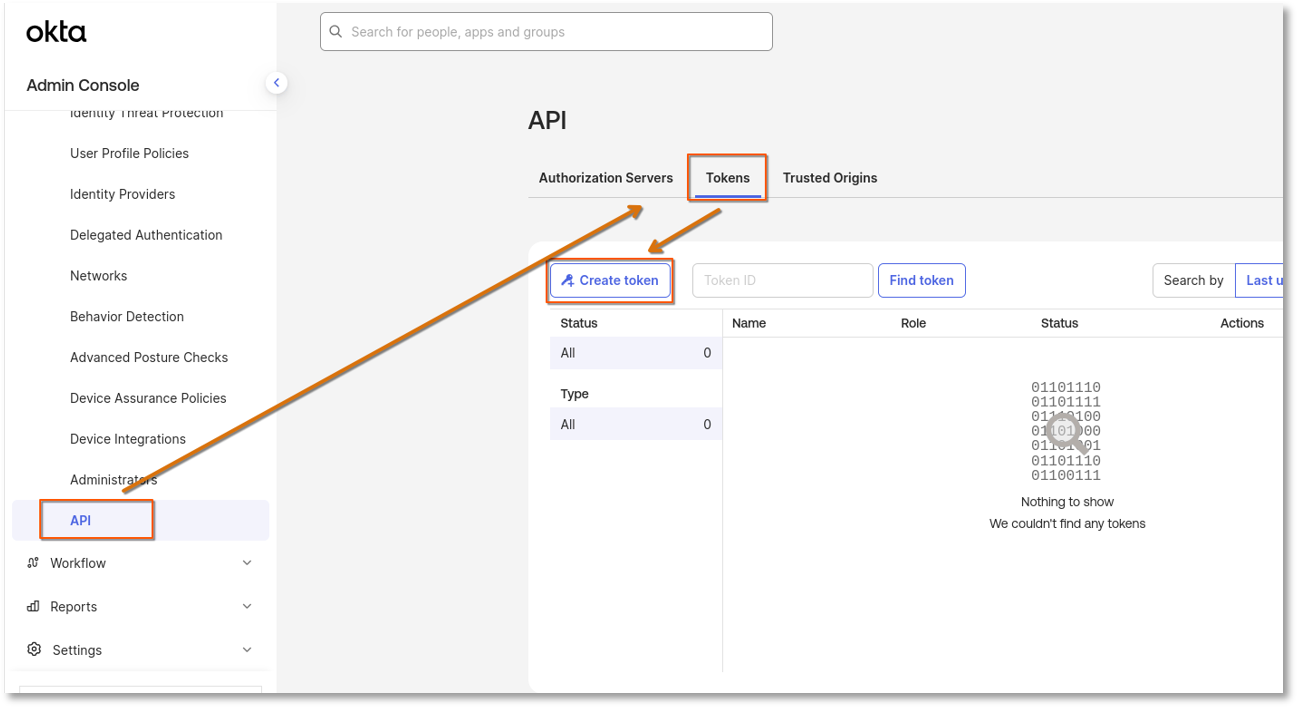
Under Security, towards the bottom, select API.
-
Go to the Tokens tab and click Create token:
-
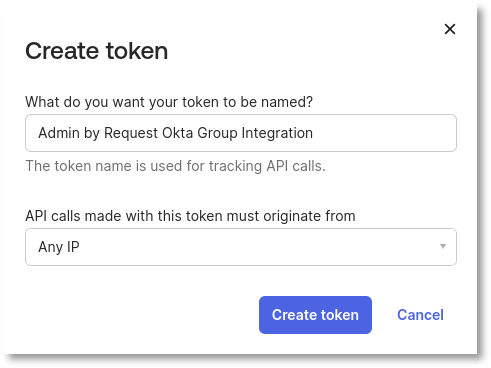
Name the token and click Create token:
-
Copy the created token to the clipboard. You can also save it if you wish.
-
If you haven't already, login to the ABR Portal.
-
Go to main menu Settings > Tenant Settings > Identity > OKTA and paste the Okta token into field Secret Key:
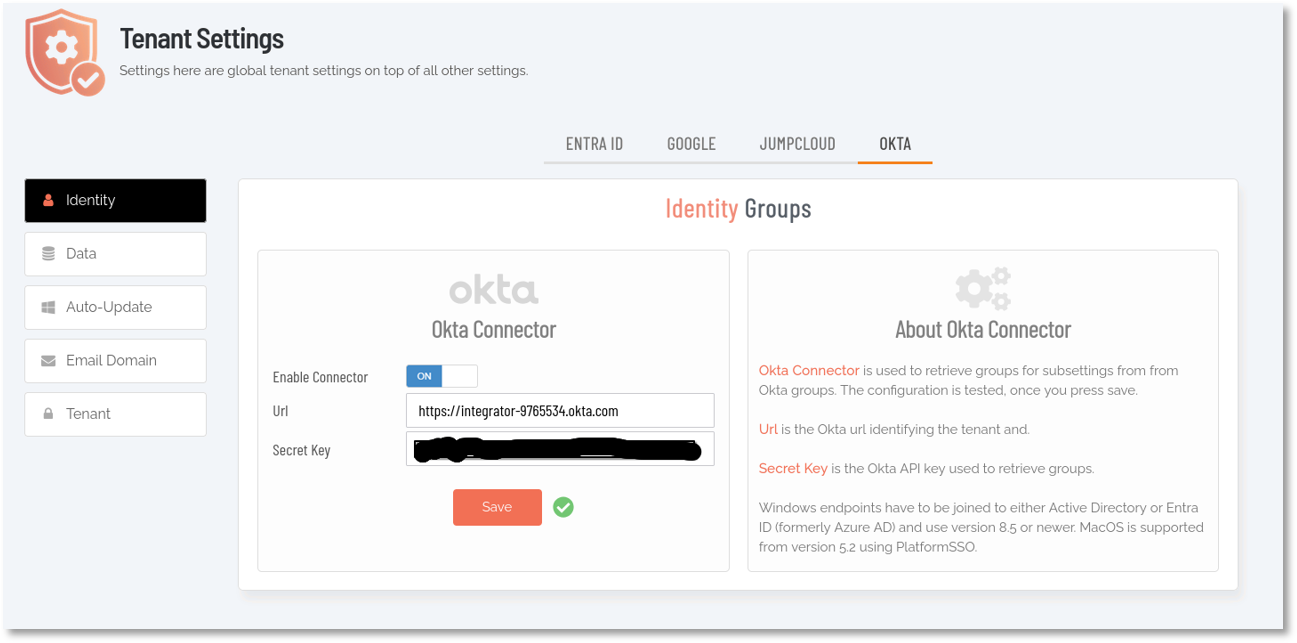
Make sure that Enable Connector is ON and that the Url matches your Okta tenant URL from the Okta Admin Console.
-
Click Save.
-
The ABR portal might show Entra Joined, but the Groups tab will show the correct groups.
-
Disable Entra from the ABR portal if you are using Entra/On-premise.
Run As Admin Settings
Portal menu: Endpoint Privilege Management > Settings > Windows Settings > Authorization > AUTHORIZATION
Run As Admin (also known as Application Elevation) elevates privileges for only the file or application selected.
It is invoked when a user runs a file that triggers User Account Control (UAC). The user is able to run the program sandboxed, without being local administrator. Only the process (not the user) has administrator rights. When enabled, the Explorer right-click icon is replaced by an Admin By Request icon.
|
Setting |
Type |
Description |
|---|---|---|
|
Allow Run As Admin |
Toggle Default: On |
On - Allows users to elevate privileges for a selected file. Enables Require approval and Require reason. Disables Block Run As Admin. Off - Denies users the ability to elevate privileges for a selected file. Enables Block Run As Admin, which is how users with admin credentials can still elevate privileges. |
|
Block Run As Admin (enabled only if Allow Run As Admin is OFF) |
Toggle Default: Off |
On - Denies users the ability to execute Run As Admin even if administrator credentials are available (i.e. no Off - Allows users with administrator credentials to execute Run As Admin (i.e. |
|
Require approval (hidden if Allow Run As Admin is OFF) |
Toggle Default: Off |
On - Sends a request to the IT team, which must be approved before elevation is granted. Makes Require reason mandatory (i.e. must be On). Off - Allows the user to elevate file privileges (and thus perform the action) as soon as the action is selected. For example, selecting "Run as administrator" to execute a program occurs immediately, without requiring approval. Makes Require reason optional (i.e. can be either On or Off). IMPORTANT
The Free Plan default for this setting is Off, which means that users simply have to request elevated access and it will be automatically granted. We recommend changing this setting to On. Note that the default setting may be changed in a future release. |
|
Require reason (hidden if Allow Run As Admin is OFF) |
Toggle Default: On |
On - Extends the Off - No reason is required by the user, but details of the actions performed are stored in the Auditlog. |
|
Save |
Button |
Saves customization and changes to any fields. Note that reloading any defaults does not take effect until Save is clicked. |
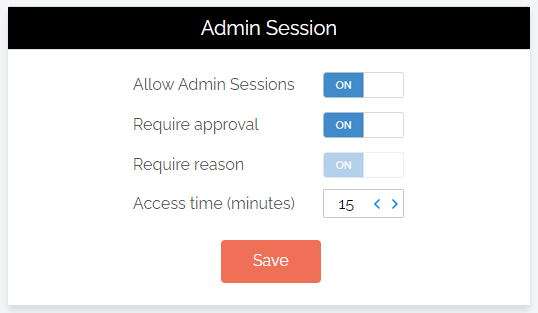
Admin Session Settings
Portal menu: Endpoint Privilege Management > Settings > Windows Settings > Authorization > AUTHORIZATION
Admin Session (also known as User Elevation) elevates the current user's privileges across the endpoint for the duration of the session.
Invoked when the user clicks the
|
Setting |
Type |
Description |
|---|---|---|
|
Allow Admin Sessions |
Toggle Default: On |
On - Allows users to effectively become a local administrator for the number of minutes specified in Access time (minutes). Enables Require approval, Require reason and Access time (minutes). Off - Denies users the ability to become a local administrator. Hides all other options under Admin Session. |
|
Require approval |
Toggle Default: Off |
On - Sends a request to the IT team, which must be approved before the request is granted. Makes Require reason mandatory (i.e. must be On). Off - Allows the user to become a local administrator as soon as the request is made. Makes Require reason optional (i.e. can be either On or Off). IMPORTANT
The Free Plan default for this setting is Off, which means that users simply have to request elevated access and it will be automatically granted. We recommend changing this setting to On. Note that the default setting may be changed in a future release. |
|
Require reason |
Toggle Default: Off |
On - Extends the Off - No further information is required by the user, but user and computer details are stored in the Auditlog. |
|
Access time (minutes) |
Integer Default: 15 (minutes) |
The maximum duration in minutes an Admin Session may last. This time must be sufficient for the user to install software or perform any other tasks that require elevation. |
|
Save |
Button |
Saves customization and changes to any fields. Note that reloading any defaults does not take effect until Save is clicked. |
Changing Admin Session Duration
Admin session duration (access time) is the maximum amount of time in minutes an Admin Session may last. This time must be sufficient for the user to install software or perform any other necessary tasks.
To change the time allocated for an administrator session:
-
Log in to the Portal and select menu Settings > Windows Settings.
-
From the Authorization left menu, make sure the AUTHORIZATION tab is displayed (it is the default) and update the Access time (minutes) field in the Admin Session panel:
-
Click Save when done.
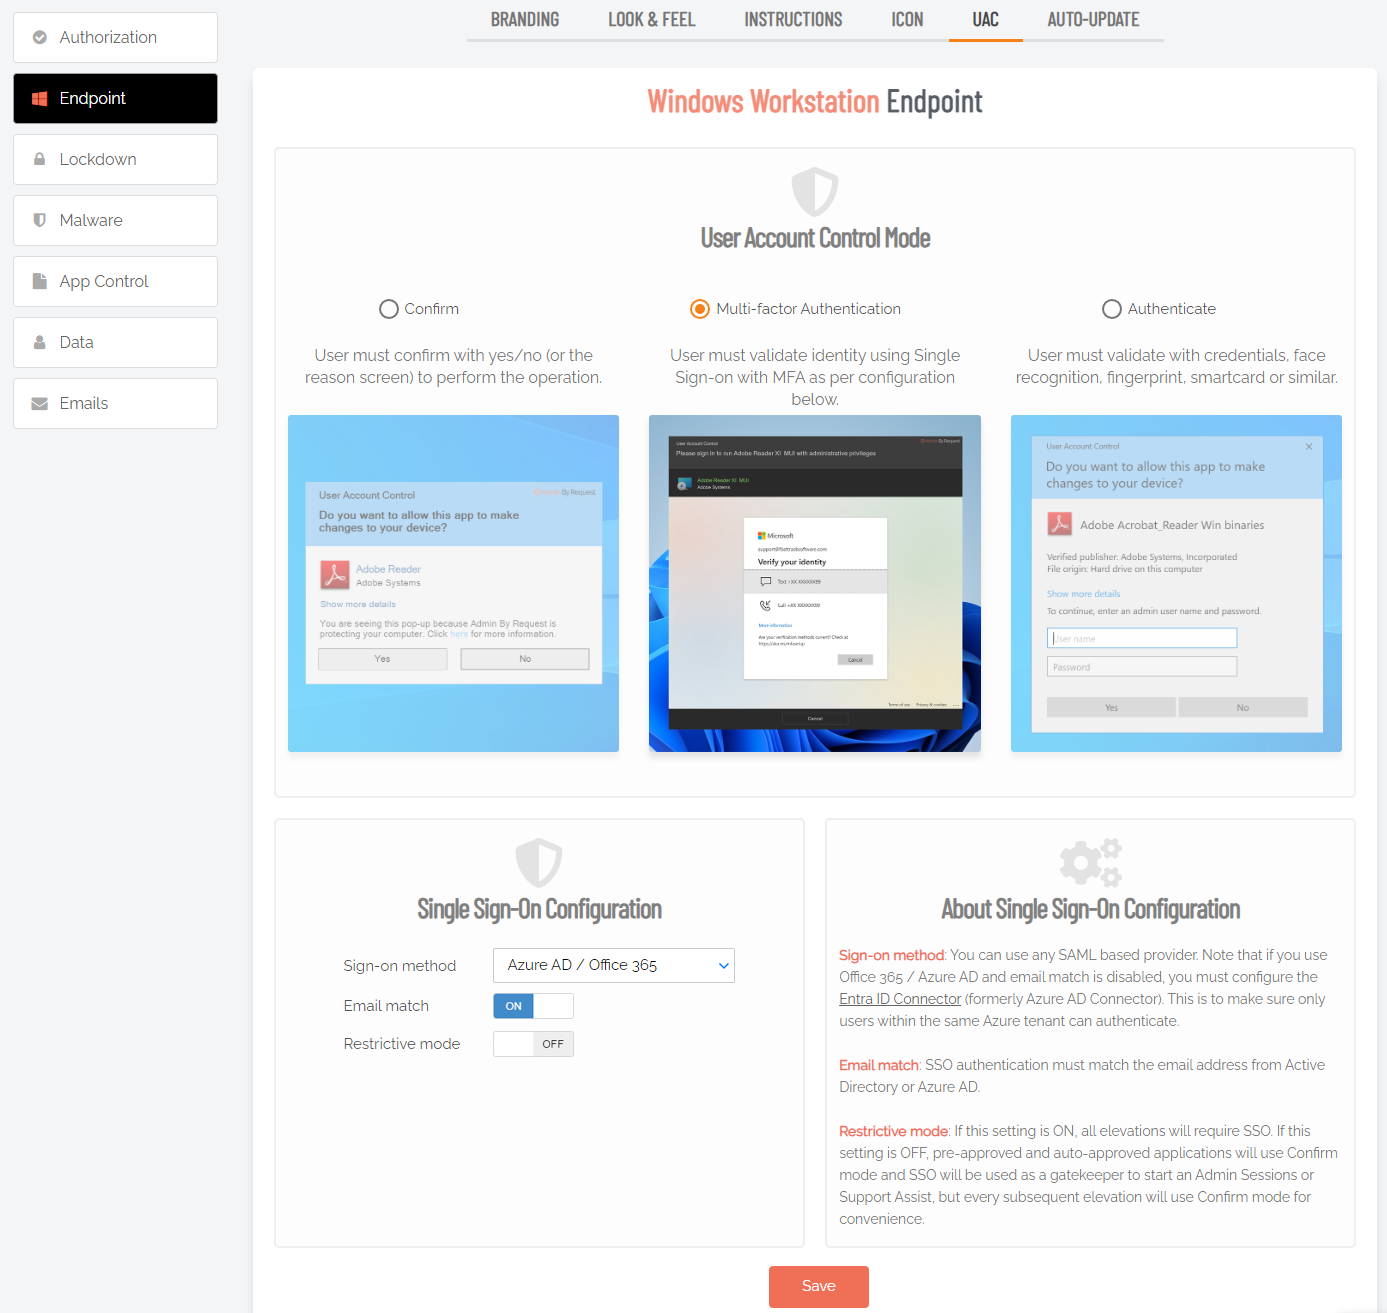
UAC Setting
Portal menu: Endpoint Privilege Management > Settings > Windows Settings > Endpoint > UAC
The
|
Setting |
Type |
Description |
|---|---|---|
|
|
Choice:
Default: Confirm |
Confirm - User must confirm with Yes or No (or via the reason screen) to perform the operation.. Multi-factor Authentication - User must validate identity using MFA through Single Sign-on. Choosing this option reveals Multi-factor Configuration (see table below). Authenticate - User must validate with credentials, face recognition, fingerprint, smartcard or similar.. |
|
Save |
Button |
Saves customization and changes to any fields. Note that reloading any defaults does not take effect until Save is clicked. |
Multi-factor Configuration
Appears when Multi-factor Authentication is chosen as the
|
Setting |
Type |
Description |
|---|---|---|
|
Sign-on method |
Selection:
Default: |
Microsoft 365 / Entra ID - Use this as the SSO method. -- ADD NEW METHOD -- - Create a new method. Choosing this option takes you to the portal's Single Sign-on (SSO) Setup page. Note the following:
|
|
Email match |
Selection:
Default: |
No matching - If using Entra ID and this option is selected for Email match, the Entra ID Connector must be configured. This ensures that only users within the same Azure tenant can authenticate. Email match - MFA authentication must match the email address or User Principal Name (UPN) from Entra ID or Active Directory. Account separation - MFA authentication must be done via a secondary account. This is a requirement for those organizations wishing to maintain compliance with Cyber Essentials Plus. |
|
MFA on pre-approvals |
Toggle Default: Off |
On - Force multi-factor authentication on pre-approved applications. Off - Multi-factor authentication is not required on pre-approved applications |
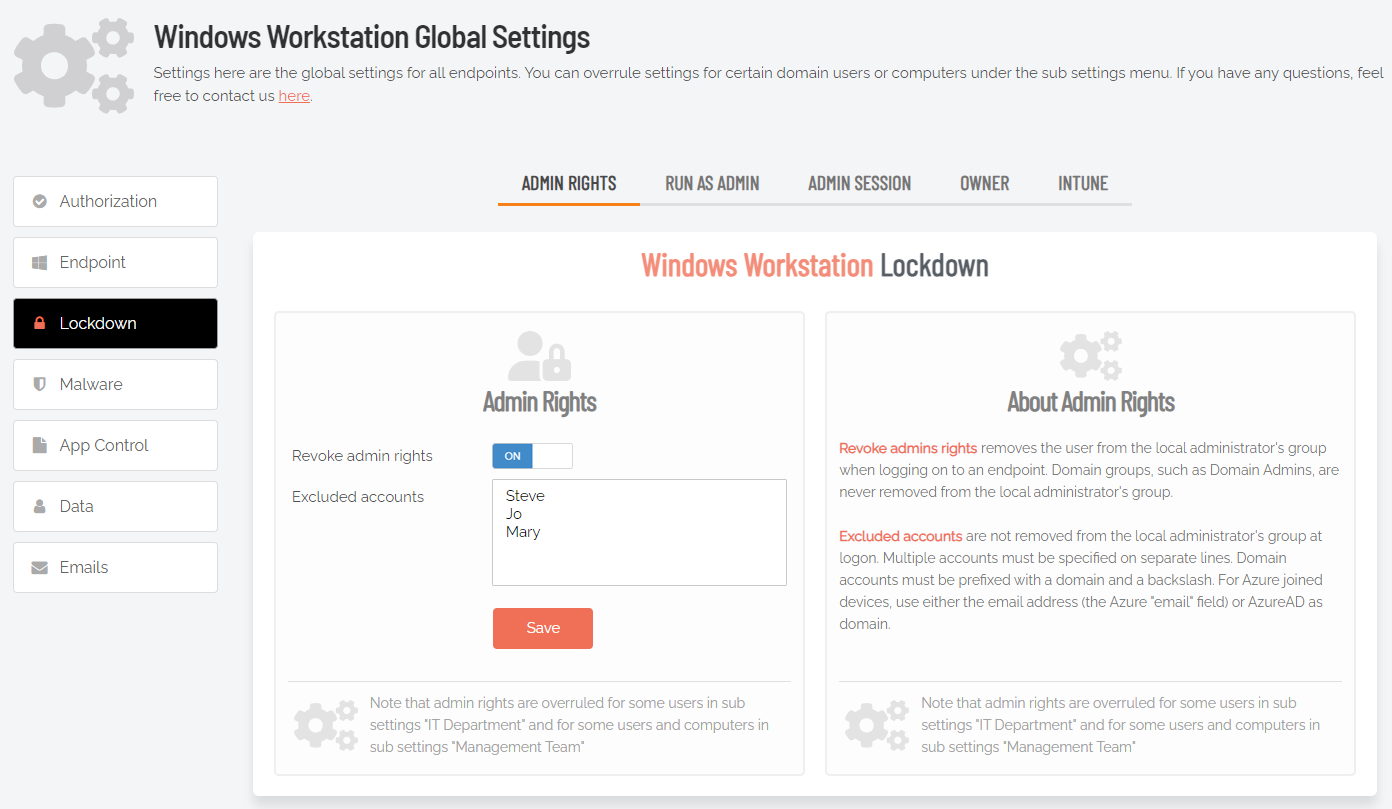
Admin Rights Setting
Portal menu: Endpoint Privilege Management > Settings > Windows Settings > Lockdown > ADMIN RIGHTS
Revoke admin rights at logon means that all user accounts will be downgraded from an Admin role to a User role, unless the account appears in the Excluded accounts list.
Excluded accounts are not removed at logon.
|
Setting |
Type |
Description |
|---|---|---|
|
Revoke admin rights |
Toggle Default: On |
On - Admin privileges are removed for all users except those appearing in the Excluded accounts list.. Off - Admin privileges are not removed for users configured locally as administrators. |
|
Excluded accounts |
Text |
The account name(s) to retain local admin privileges. Multiple accounts must be specified on separate lines. Domain accounts must be prefixed with domain and backslash. |
|
Save |
Button |
Saves customization and changes to any fields. Note that reloading any defaults does not take effect until Save is clicked. |
Run As Admin Lockdown Setting
Portal menu: Endpoint Privilege Management > Settings > Windows Settings > Lockdown > RUN AS ADMIN
These settings control whether or not:
-
Users are able to run individual system files with elevated permissions
-
PIN Code unlock is available on endpoints
-
Browser toast notifications are enabled for downloaded files (requires version 8.6+ on endpoints)
|
Setting |
Type |
Description |
|---|---|---|
|
Deny elevating system files |
Toggle Default: Off |
On - Prevent the user from starting any file from the System32 directory with administrative privileges, such as cmd.exe or regedit.exe. Define exceptions under App Control > PRE-APPROVE. Off - Allow user to run system files with admin privileges. |
|
Deny system file subprocesses |
Toggle Default: Off |
On - Prevent spawning any sub-processes of system files. Requires endpoint client version 8.3+. Off - Do not prevent spawning of sub-processes. |
|
Deny PIN code unlock |
Toggle Default: Off |
On - Remove the option to use a PIN code to unlock a blocked application. Off - Allow access to the PIN Code unlock option. |
|
Disable browser notifications |
Toggle Default: Off |
On - The browser extension is removed and no pop-up notification appears after files are downloaded, meaning that running a downloaded file requires users to go the Downloads folder to execute. Requires endpoint client version 8.6+. Off - Toast notifications are enabled for Edge, Chrome and Firefox. This means that files downloaded in these browsers display a pop-up notification at the end of the download, allowing users to execute the downloaded file. |
|
Save |
Button |
Saves customization and changes to any fields. Note that reloading any defaults does not take effect until Save is clicked. |
Browser extension registry values
The browser extension does not interact with any pages - its sole purpose is to register for download events. Unless disabled in the portal (Endpoint Privilege Management > Settings > Windows Settings > Lockdown > RUN AS ADMIN), it sets the following registry keys for the current user, which effectively installs the extension.
-
By default, keys are installed in HKCU. However, if other browser extensions are found installed via HKLM, the ABR keys are installed here instead as browsers won’t look in HKCU if a force list install exists under HKLM.
-
The ABR keys are not created if the CURRENT_USER is an administrator on the endpoint.
Edge
-
com.abr.startapp points to the Admin By Request native messaging manifest file for Edge.
-
ExtensionInstallForcelist creates a string value with the data set to the unique identifier of the extension.
Copy
Key: HKEY_CURRENT_USER\Software\Microsoft\Edge\NativeMessagingHosts\com.abr.startapp
Data: C:\ProgramData\FastTrack Software\Admin By Request\edge.json

Key: HKEY_CURRENT_USER\Software\Policies\Microsoft\Edge\ExtensionInstallForcelist
Data: epedcemobfdkplllcmmillfgcommghhi
Chrome
-
com.abr.startapp points to the Admin By Request native messaging manifest file for Chrome.
-
ExtensionInstallForcelist creates a string value with the data set to the unique identifier of the extension.
Copy
Key: HKEY_CURRENT_USER\Software\Google\Chrome\NativeMessagingHosts\com.abr.startapp
Data: C:\ProgramData\FastTrack Software\Admin By Request\chromium.json

Key: HKEY_CURRENT_USER\Software\Policies\Google\Chrome\ExtensionInstallForcelist
Data: plpgadlcmhefelnckjaaggemagdpoeen
Firefox
-
com.abr.startapp points to the Admin By Request native messaging manifest file for Firefox.
-
Under unique ID com.abr.startapp@adminbyrequest.com, we create the following keys:
-
install_url - points to the URL from where to fetch the extension
-
installation_mode - instructs the operating system on how to handle the extension. Can be either force_installed (for install) or blocked (for uninstall).
Copy
Key: HKEY_CURRENT_USER\Software\Mozilla\NativeMessagingHosts\com.abr.startapp
Data: C:\ProgramData\FastTrack Software\Admin By Request\firefox.json

Key: HKEY_CURRENT_USER\Software\Policies\Mozilla\Firefox\ExtensionSettings\com.abr.startapp@adminbyrequest.com
Data: install_url: https://addons.mozilla.org/firefox/downloads/latest/admin-by-request/latest.xpi
Data: installation_mode: force_installed or blocked -
Unique IDs Summary
-
Edge: epedcemobfdkplllcmmillfgcommghhi
-
Chrome: plpgadlcmhefelnckjaaggemagdpoeen
-
Firefox: com.abr.startapp@adminbyrequest.com
Tray Tools Settings
Portal menu: Endpoint Privilege Management > Settings > Windows Settings > App Control > TRAY TOOLS
Tray Tools are items that appear when users click the Admin By Request system tray icon. As well as executable files, these tools could be web links with instructions, Control Panel applets or program shortcuts.
Minimum requirements
Tray Tools require Admin By Request version 7.1 or newer. Control Panel tools require Windows 10 version 2004 (build 19041) or newer.
New Tray Tool
Click button New Tray Tool to create a new entry in the tray tools menu.
|
Setting |
Type |
Description |
|---|---|---|
|
Application |
Text |
The caption used for the system tray menu item. Enter the text to be used for the name or caption. Does not have to match the executable File name. Note that any webhooks you have created appear in a selection list when you click this field. The list is for convenience only and simply "pastes" the webhook caption into the field - no other fields are populated. |
|
File |
Text |
The name of the executable file, including it's full path. You can also specify a web address (i.e. URL) in this field, in which case the Run As Admin toggle should be Off for security reasons. |
|
Parameters |
Text |
Text values entered here are appended to the File as parameters during execution. |
|
Run As Admin |
Toggle Default: On |
On - Allows the executable file named in File to be Run As Admin (i.e. run as an administrator). Off - Does not allow the executable file named in File to be Run As Admin. This should be the option selected if the entry in File is a web address. |
|
Pre-approve |
Toggle Default: Off |
On - Pre-approves the file specified for elevated execution, by-passing normal approval flow. Off - Approval flow is not by-passed for this file. If approval is required, users must still submit a request to run even though the file is added as a tray tool item. |
|
Menu Separator |
Toggle Default: Off |
On - Inserts a line above this menu item. Allows tray tool menu items to be grouped. Off - No line is inserted. |
|
Save |
Button |
Saves customization and changes to any fields. Note that reloading any defaults does not take effect until Save is clicked. |
|
Cancel |
Button |
Cancels all work done in this setting and returns to the |
Quick add list
The Quick add list is a preset list of common Control Panel applets. It is a selection list, accessed by clicking the drop-down arrow at the right of the field. You can add other Control Panel applets by creating a tool that runs control.exe followed by a .cpl file.
If all entries in the Quick add list have already been added as tray tools, the Quick add list field does not appear at all.
Pre-Approval Settings
Portal menu: Endpoint Privilege Management > Settings > Windows Settings > App Control > PRE-APPROVE
Pre-Approval (known sometimes as Whitelisting) refers to the method of working out which applications are trusted and frequently used, and adding them to a list that automatically allows users to elevate those applications when they need to. This is essentially the opposite of Blocklisting/Blacklisting – creating a list of applications that cannot be elevated.
This method of “allow most, deny some” has proven to be extremely resource-efficient for large enterprises compared to the method of denying all applications and only allowing elevations on a case-by-case basis.
Pre-approval allows users to run some applications without approval, typically used to define exceptions when approval is required.
Pre-approved applications are
When an application is on the pre-aproval list, the difference is:
-
The application is auto-approved, so the approval flow is bypassed
-
A reason is not required
-
You have the option to not log to the Auditlog (e.g. for trivial data)
-
If Run As Admin is disabled, a pre-approved application will still run
-
A pre-approved application will overrule Deny elevating system files
-
You can force applications to always run elevated (legacy applications)
Enabled toggle
A global setting that indicates whether pre-approved applications are allowed at all (On) or not at all (Off).
New entry (APPLICATION tab)
Click button New entry to create a new pre-approved application.
|
Setting |
Type |
Description |
|---|---|---|
|
Type |
Selection Default: Run As Admin application pre-approval |
Run As Admin application pre-approval - Pre-approve this application for Run As Admin. Run As Admin vendor pre-approval (digital certificate) - Pre-approve all applications based on the specifiedVendor digital certificate. Selecting this option enables the Vendor field and hides all other fields. Run As Admin location pre-approval (all files in folder tree) - Pre-approve all applications in the specified folder, including any sub-folders. Selecting this option enables the Directory field and hides all other fields. Force running application elevated (legacy application) - Pre-approve this application to run elevated regardless of any other conditions. |
|
Vendor (enabled when Run As Admin vendor pre-approval |
Read-only selection (via Button) Text |
Use the Browse button to select a valid Vendor certificate file. Enter vendor name. Adding the app via the Auditlog will auto-populate this field. |
|
Protection |
Selection Default: File must be located in read-only directory |
Prevent users from bypassing pre-approval by file renaming. File must be located in read-only directory - The recommended method. File must be in a read-only location. You only need to know the name and location and you are not bound to a specific file version. File must match digital certificate and application name - Vendor digital certificate of a file AND the exact name of the application. File must match digital certificate and file name - Vendor digital certificate of a file AND the exact name of the file. Recommended if you have a copy of the file. File must match checksum - A checksum of a specific file version. If the file is updated, the checksum no longer matches and a new one must be collected. No protection (not recommended) - Not recommended for anything except testing. The file can be located anywhere and is a file renaming vulnerability, in case a user is aware of (or can guess) the file name. |
|
File location |
Selection Default: Program Files or subfolder |
Program Files or subfolder - The Program Files folder, typically either Windows directory or subfolder - The Windows system folder, typically Custom read-only location - Shows an additional field labeled Directory if selected. |
|
Directory (enabled when other selections are in effect):
|
Text |
A read-only location where the application to be added is stored. Can include the following environment variables:
If the directory entered is not on the local machine, a UNC path can be used. The endpoint software will automatically translate drive letters to UNC path. |
|
Application name |
Text |
The name of the application. Mandatory, although used for convenience only to help identify applications in the list. |
|
File name |
|
Use the Browse button to open an operating system File open dialog box. Locate and select a file with one of the following extensions:
Note that adding the app via the Auditlog will auto-populate this field. |
|
Internal comments (optional) |
Text |
Notes about this pre-approval. |
|
Version (optional) |
Text (Min. version) Text (Max. version) |
Version works as starting with, meaning Min. version can be specified as Max. version is less than, meaning that |
|
Parameters (optional) |
Text |
Parameters entered on the command line after the application name. |
|
Save |
Button |
Saves customization and changes to any fields. Note that reloading any defaults does not take effect until Save is clicked. |
|
Cancel |
Button |
Cancels all work done in this setting and returns to the |
New entry (ADVANCED tab)
Additional toggle settings that apply to the pre-approval entry being created.
|
Setting |
Type |
Description |
|---|---|---|
|
User confirmation |
Toggle Default: On |
On - The user must confirm elevation on the endpoint before the application can be run. This is the typical Off - The user does not need to confirm elevation on the endpoint before execution. Hides the Log to auditlog field. |
|
Log to auditlog (hidden if User confirmation is Off) |
Toggle Default: On |
On - Relevant details about the application are logged. Off - No logging is performed for this application. |
|
Block subprocesses |
Toggle Default: Off |
On - Any subprocesses spawned by this application that require elevated privileges will not be pre-approved for execution. Off - Subprocesses spawned by this application that require elevated privileges will be allowed to execute. |
|
Save |
Button |
Saves customization and changes to any fields. Note that reloading any defaults does not take effect until Save is clicked. |
|
Cancel |
Button |
Cancels all work done in this setting and returns to the |
Quick add list
The Quick add list is a preset list of common applications. It is a selection list, accessed by clicking the drop-down arrow at the right of the field.
If all entries in the Quick add list have already been added and are visible in the list of applications, the Quick add list field does not appear at all.
Export buttons
Four export buttons are also provided:
-
Export to PDF
-
Export to XLSX
-
Export to CSV (;)
-
Export to CSV (,)
These buttons export all entries in the list.
Machine Learning
Portal menu: Endpoint Privilege Management > Settings > Windows Settings > App Control > MACHINE LEARNING
The idea behind Machine Learning Auto-Approval is to kill two birds with one stone by allowing customers to build a Pre-Approved list as their employees use the software. This removes the need for enterprises to spend considerable amounts of time and effort figuring out and manually configuring which applications should be pre-approved ahead of time.
The way it works is, it allows you to create a simple rule that says:
“If approval for elevation of an application is granted X times, that application is now automatically approved for incoming requests from then on.”
This allows the system to handle creating the list of applications that are safe for approval as applications are used.
For more information, including step-by-step procedures, refer to Machine Learning.
Privacy Settings
Portal menu: Endpoint Privilege Management > Settings > Windows Settings > Privacy > PRIVACY
The PRIVACY tab provides a way to anonymize data collection, so that data is still logged and available for analysis, but identification of individual users is not possible.
Key points:
-
Obfuscation creates an alias for each user. You can track activity, but you cannot decode the true identity of any user.
-
Collection of data should be left on unless you have a reason not to do this. If disabled, you will have to find contact information elsewhere.
-
Inventory collects both hardware and software inventory. If disabled, only the computer name is collected and shown in the "Inventory" menu.
-
Geo-tracking maps the endpoint IP address to location using a public IP-to-location database to show in inventory and reports.
Changes apply only to new data. This is by design to avoid accidentally deleting existing data.
|
Setting |
Type |
Description |
|---|---|---|
|
Obfuscate user accounts |
Toggle Default: Off |
On - Create an alias for each user. Off - Do not create aliases for users. |
|
Collect user names |
Toggle Default: On |
On - Record the name of each user associated with an ABR event. Off - Do not record user names. |
|
Collect user email addresses |
Toggle Default: On |
On - Record email addresses associated with a user. Off - Do not record email addresses. |
|
Collect user phone numbers |
Toggle Default: On |
On - Record phone numbers associated with a user. Off - Do not record phone numbers. |
|
Collect inventory |
Toggle Default: On |
On - Record hardware and software inventory data. Off - Do not record inventory data. |
|
Allow geo-tracking |
Toggle Default: On |
On - Record the location of the public IP address associated with the user’s endpoint. Off - Do not record IP addresses. |
|
Save |
Button |
Saves customization and changes to any fields. Note that reloading any defaults does not take effect until Save is clicked. |
Connecting Remotely
Remote Support is a feature of "Secure Remote Access", the refreshed and enhanced product previously called "Remote Access".
There are three features (i.e. components) to Secure Remote Access - Unattended Access, Vendor Access and Remote Support:
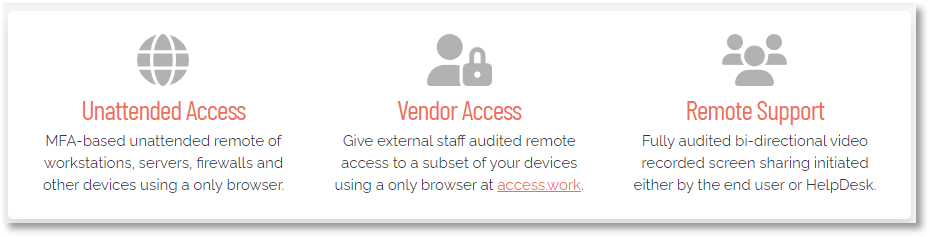
From version 8.4, Admin By Request for Windows provides support for the Remote Support component, which allows portal admins to establish a connection to an endpoint, initiated either by the admin from the portal or by the user at the endpoint.
Once connected, the session can be controlled in two ways:
-
By either party, simply by using mouse and/or keyboard
-
By the user only, with the admin effectively watching in "view-only" mode
The session is fully audited and can also be recorded for later playback.
Refer to Secure Remote Access for more information.
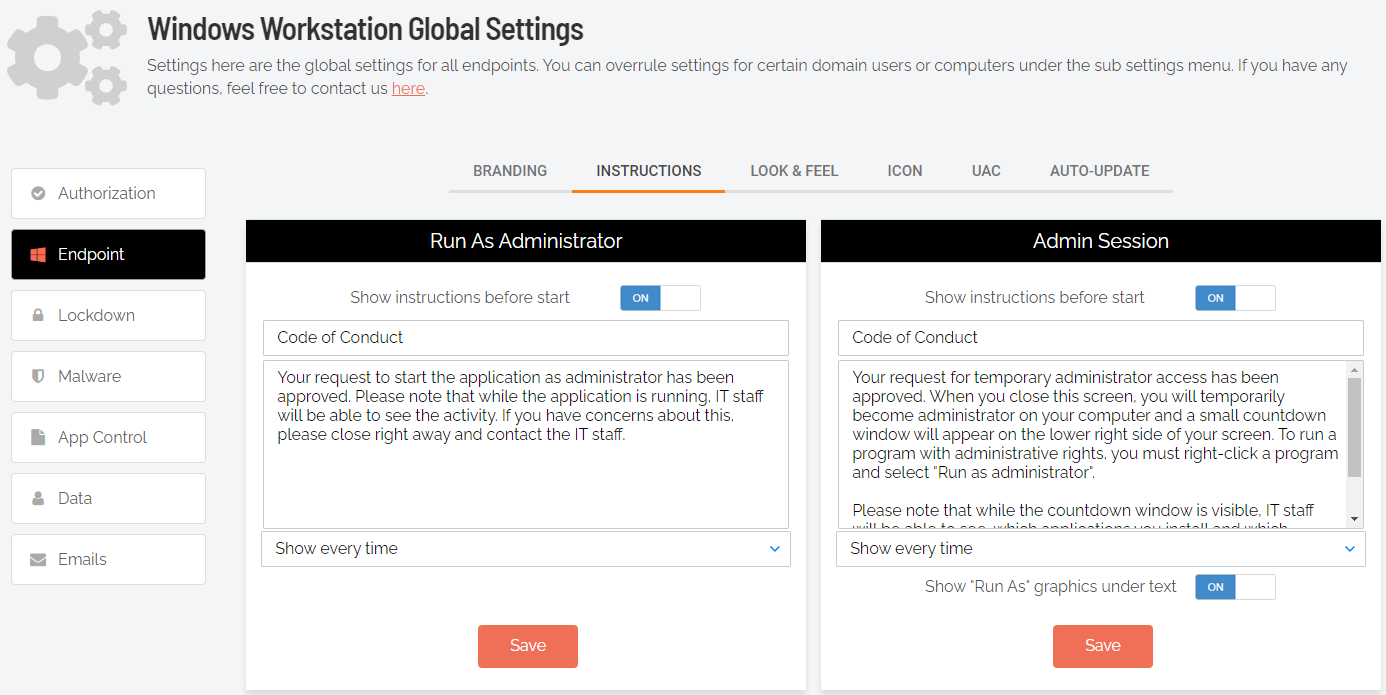
Preventing Abuse
So what prevents the user from abusing an Admin Session? The fact that the user has to ask IT for access will in itself prevent the most obvious abuse. But as part of your settings, you can also configure a Code of Conduct page. Here you customize wording that suits your company policy. For example, what the penalty is for using the administrator session for personal objectives. You can also choose to explain the things you can monitor from the portal.
When you enable the Code of Conduct ("instructions") screen in the settings, this screen appears right before the administrative session starts. You can also customize company name and logo for all screens, so there is no doubt this message is authentic and indeed from the user’s own company. This is the configuration part of the portal, where you set authorization, company logo, policies, email communications, etc.
For example:
Offline Computers
Admin By Request works the same whether the computer is online or offline. Portal settings, domain groups and OUs for the currently logged-in user are cached on the client and data going the other way are queued, so the user experience is exactly the same when a computer is away from your LAN or even when it has no internet connection.
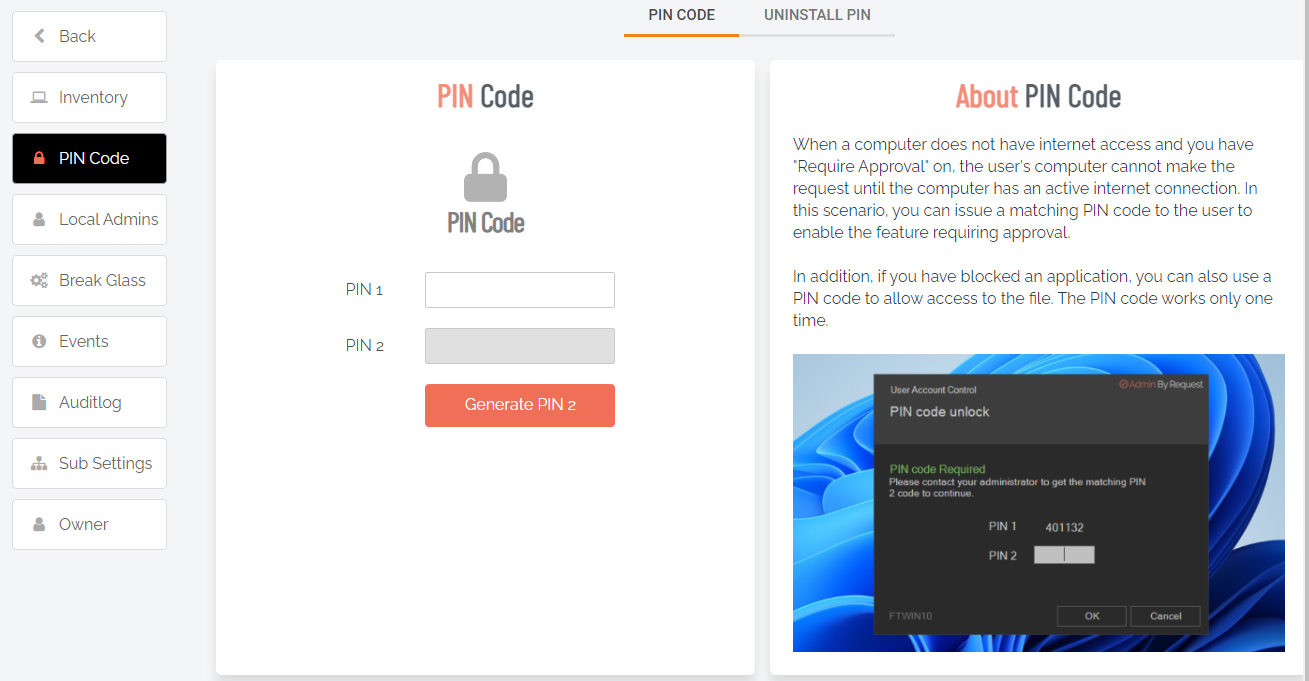
PIN Code
Computers work the same online or offline – except of course, if you require approval and the computer is offline. Then no one will know the user has a pending request until the computer has an internet connection, at which time it will flush its upload queue. This would rarely be a real-world problem, but there are examples, where a computer is offline for a long period of time with no option to get online.
A good example is our customer Red Cross, which has workers going offline for weeks to a village in Africa. This is not a problem in itself, because the computer will just collect data and flush the queue later – but if approval is required, the user is stuck. If the user makes a request and approval is required, the user is informed that they have to either wait and queue the request until there is internet access, or seek internet access now (for example by connection sharing on a phone).
Or - request a PIN code in case of urgency and internet connectivity is impossible. If the user requests a PIN code, the user will see a 6 digit “PIN 1” code and must call, say, your Help Desk over the phone and get the matching 6 digit “PIN 2”. PIN 2 is a one-time PIN code that is hashed from PIN 1, customer id and computer name. Therefore, in the odd chance the same PIN 1 appears on a different computer, PIN 2 is different.
For example:
Policies for Windows
Settings in the Admin By Request client application are controlled in the portal under “Windows Settings” (Portal > Settings > Windows Settings). You can also define sub settings based on Computer or User Groups and/or OU.
It is highly recommended that you configure settings in the portal instead of using Group Policy Objects. If, for what-ever reason, you still want to overrule settings wholly or in part, you can set Policy keys either by using an ADMX file or by setting registry keys using GPO or by other means. Policy settings always overrule web settings.
Please note we do not recommend that you use
If you have any questions about portal settings or would like a demo of these, please feel free to contact us.
The Local Administrator's Group
If the computer is in a domain, the Domain Users group will be removed from the local administrator’s group right away. That is all that happens initially. When a user logs on, the user is removed from the local administrator’s group, unless:
-
You have unchecked the “Revoke admins rights” in the portal settings (see screenshot below)
-
The user is in the list of excluded accounts in the portal settings
-
The user is member of a group that is the local administrator’s group (such as domain admins)
The reason all users are not removed right away is to only remove accounts that are interactive user accounts and not accidentally remove service accounts used to deploy software or similar.
Domain groups (except Domain Users) are not removed from the local administrator’s group. This means that if a domain user logs on and is member of a domain group that is in the local administrator’s group (for example, a Help Desk domain group), the user is always local administrator. In this case the tray icon is red and, mousing over it, you can see the tool tip saying “You are logged on as administrator”.
The following graphic shows Revoke Admin Rights ON, except for user accounts Steve, Jo and Mary:
Entra ID / Azure AD and computers outside domains
The software works exactly the same for computers without a domain or for computers joined to Azure AD. For Azure AD, you can set up a connector in the portal settings. You do not need to do this for Azure AD, unless you need to use sub-settings, in which case you can set up the connector to create sub-settings based on Azure AD groups.
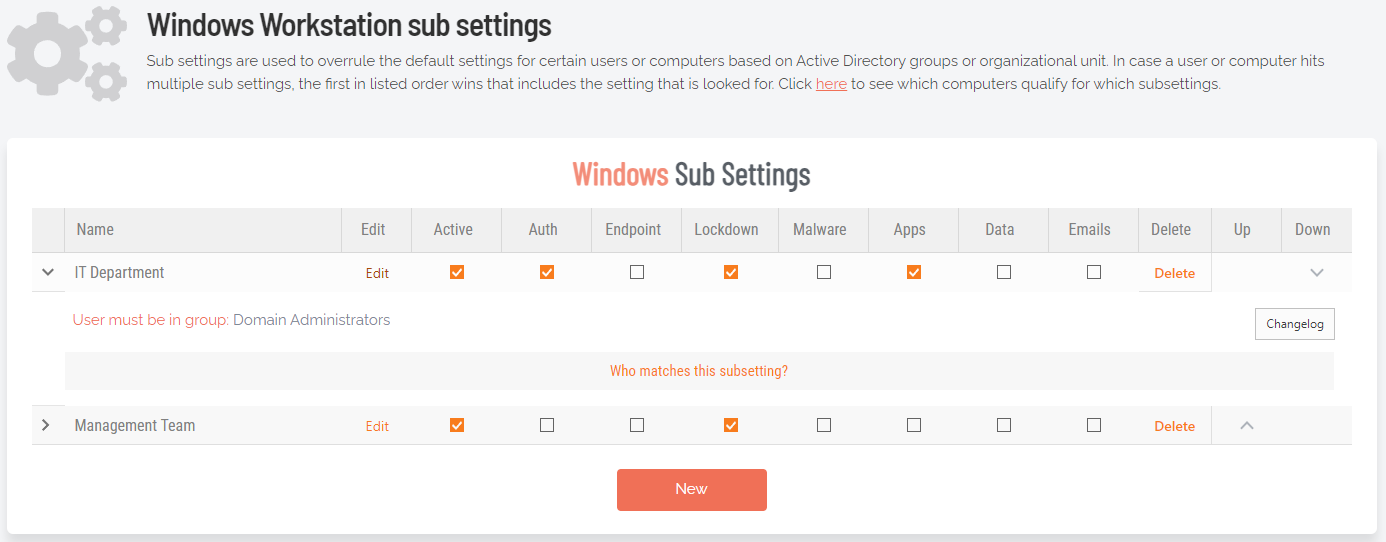
Sub-Settings
The portal has two levels of settings:
-
Windows Settings (also known as Global Settings) apply to all users by default, except those settings overridden under Sub Settings.
-
Windows Sub Settings, where you can define special settings based on Active Directory computer or user groups and/or Organizational Unit(s).
Settings here are the global settings for all endpoints participating in the feature. You can overrule settings for listed domain users or computers under the sub-settings menu.
Sub settings will overrule the global settings for the users or computers to which they apply. Both users and computers can be in Active Directory groups or organizational units.
If a user or computer hits multiple sub settings, the first in listed order that includes the setting concerned wins. Furthermore, it is better to use a full OU path rather than a partial OU path.
For example:
-
When Scope is set to \CloudObjects\GROUP1, \CloudObjects\GROUP2, only devices from GROUP1 will be shown, because it comes first in the list.
-
When Scope is set to \CloudObjects\GROUP2, \CloudObjects\GROUP1, only devices from GROUP2 will be shown, because it comes first in the list.
-
If scope is set to the full OU path \CloudObjects\GROUP1\Workstations, \CloudObjects\GROUP2\Workstations, then devices from both groups will be shown.
-
If scope is set to Workstations, then devices from both groups will be shown.
Sub-settings portal example
A common scenario would be to require approval for all users – except users in the IT Department, who are allowed to elevate without permission:
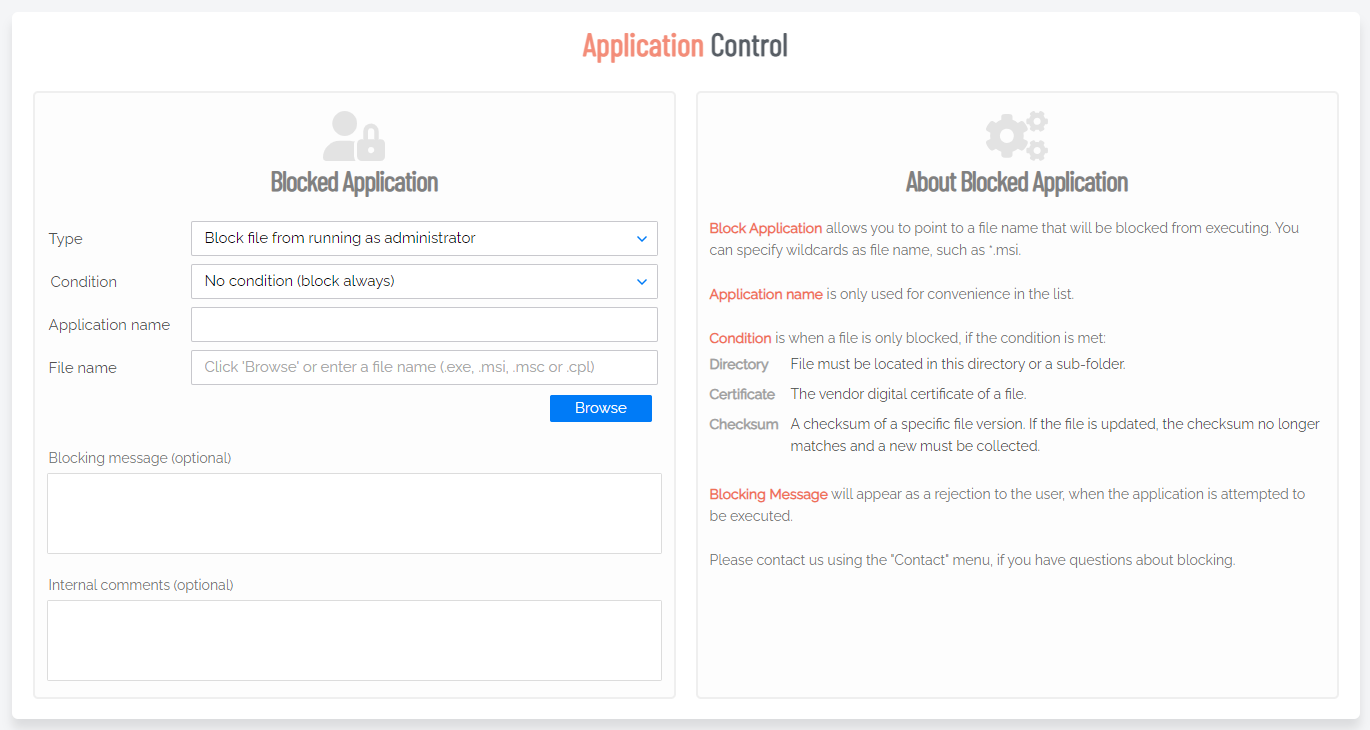
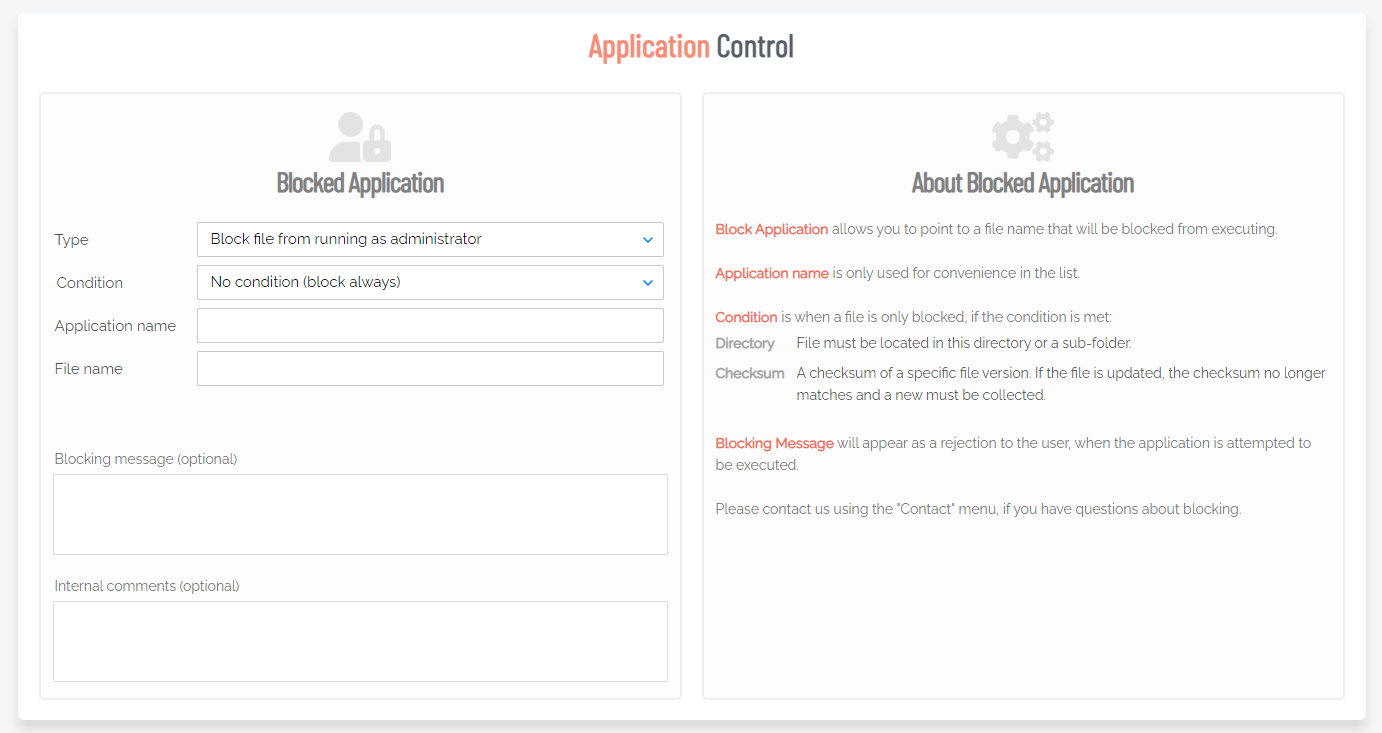
Blocking
You can specify programs and applications that you wish to prevent users from executing with administrator privileges. You can block applications based on one or more of the conditions: file name, checksum, vendor or file location.
You should never block solely based on the file name, as this will open up the endpoint to simple file renaming to bypass the blocking.
PIN code exceptions: The option is available to use a PIN code in case you allow the execution as an exception - simply retrieve the PIN code from the computer's inventory. If you do not wish to offer a PIN option, you can disable this under the Run As Admin tab.
-
Block file from running as administrator
-
Block vendor files from running as admin (digital certificate)
-
Block location from running as admin (all files in folder tree)
-
Block always
-
No condition (block always)
-
Block if located in directory
-
Block if matching digital certificate
-
Block if matching checksum
Application name is a label only - used for convenience in the overview list.
File name allows you to point to a file name that will be blocked from executing. You can specify wildcards in the file name, such as *.sh.
Blocking message will appear as a denial message to the user when execution of the application is attempted.
You can also block users from elevating any Windows system file, which prevents users from running cmd.exe, regedit.exe, mmc.exe, etc as administrator.
Tampering
The software has built-in measures to avoid tampering with the software to become permanent administrator. The users and groups administration will be removed entirely from Computer Management during an administrator session. Even if the user still manages to tamper the local administrator’s group, the administrator’s group is snapshotted before the session starts and restored after the session ends.
If the user tries to add other users or groups to the administrator’s group, these will simply be removed at the end of the session. If the user tries to uninstall Admin By Request during a session, Windows Installer will show an error message saying that Admin By Request cannot be uninstalled during an active session. If the user tries to tamper policy keys, these are also snapshotted and restored after sessions.
User Account Control
User Account Control (UAC) is still enforced (if enabled) to maintain the extra layer of security. If the user needs to run an application during an Admin Session, the user still has to envoke “Run as administrator” directly or indirectly and enter own credentials. This is intentional to avoid reducing the security level. Admin By Request does not replace or tap into UAC for the reasons stated in the previous section.
Admin By Request does not replace User Account Control, like some other solutions do. This is a design choice. Replacing Windows system files or components is dangerous and can lead to future problems because of Windows Updates, which could ultimately break your OS installs to the extent that computers can no longer boot. This is especially true with Windows 10 feature updates that often change basic functioning of the operating system. A significant advantage to the Admin By Request endpoint software is that it does not change or replace any system files or components and only uses what is already built into Windows. Because of this, it also does not consume any resources at all, unless the user invokes the software.
Windows Subsystem for Linux
Windows Subsystem for Linux (WSL) can be used with ABR installed on the endpoint and ABR handles this as it does other applications.
