The Windows Client User Interface
Introduction
A regular user's first experience with Admin By Request is likely to be the little
Either way, there is a new app on the desktop that users must learn to work with. The Admin By Request app is pretty simple and very intuitive, but, if it's new, it still needs explaining so users can get the best out of it and maximize their productivity.
This blog dives deeply into the Admin By Request user interface for the
Audience
The blog is aimed at IT administrators responsible for installing and managing Admin By Request endpoint clients, so that they might more easily provide training to their users and minimize inbound support calls.
In this topic
About the User Interface
Once installed, Admin By Request is running in the background for as long as the endpoint is powered-on. It monitors the actions taken by users, allowing non-privileged tasks to run freely, and intercepting those that require elevated privileges while it checks predefined global settings that govern what is (and is not) allowed by the user running the task.
The user interface is graphical and is accessed via the tray icon on the task bar.
The color of the tray icon depends on the currently logged-in user: if the user is an administrator, the icon is red, whereas if the user is a standard user, the tray icon is green. The difference is illustrated below, when the logged-in user mouses-over the tray icon:
![]()
Clicking (rather than mousing-over) the icon displays a menu, which again depends on the currently logged-in user:
![]()
App Panels
Selecting About Admin By Request from the tool tray (or launching from the desktop if the shortcut is installed) launches the app home screen, which comprises a simple window with five buttons down the left-hand side:
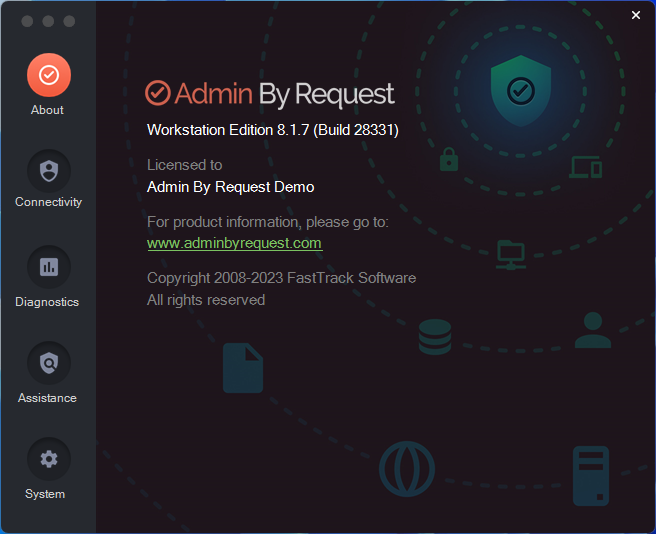
The default panel is About Admin By Request, which is accessed via the top button. It shows the current workstation edition, license details, website link, and copyright information.
Click the About button to get back to this panel if viewing one of the other panels.
-
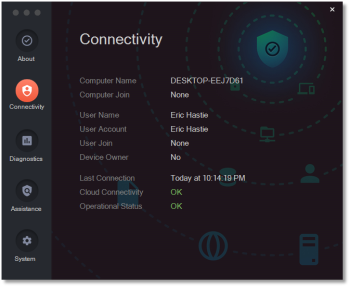
Connectivity – displays the current operational status of the Admin By Request system, including Internet and Cloud connectivity, and details about the current workstation and user (see Connecting via a Proxy Server for more information):
-
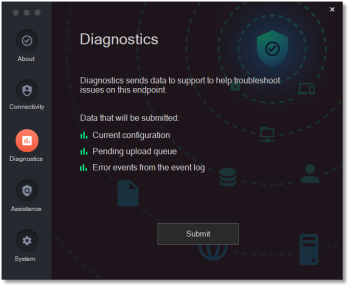
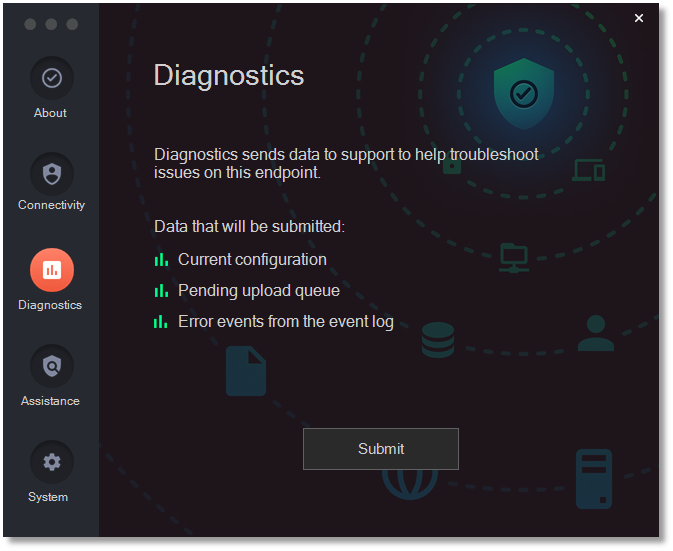
Diagnostics – provides a way to send useful diagnostic data on this workstation to the ABR support team (see Submitting Diagnostics for more information):
-
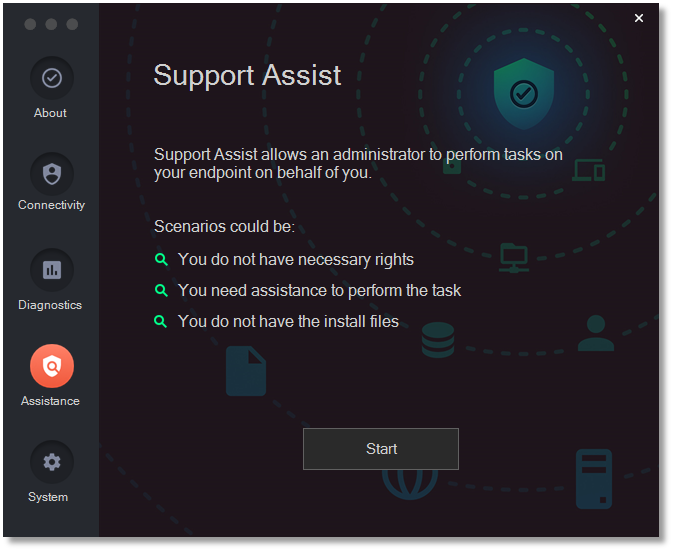
Assistance - (Standard User only) allows users to ask an IT administrator to access the endpoint remotely and carry out tasks on the user's behalf (see Requesting Assistance (Support Assist) for more information):

-
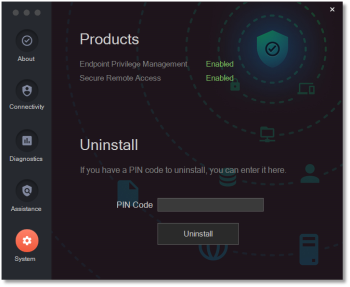
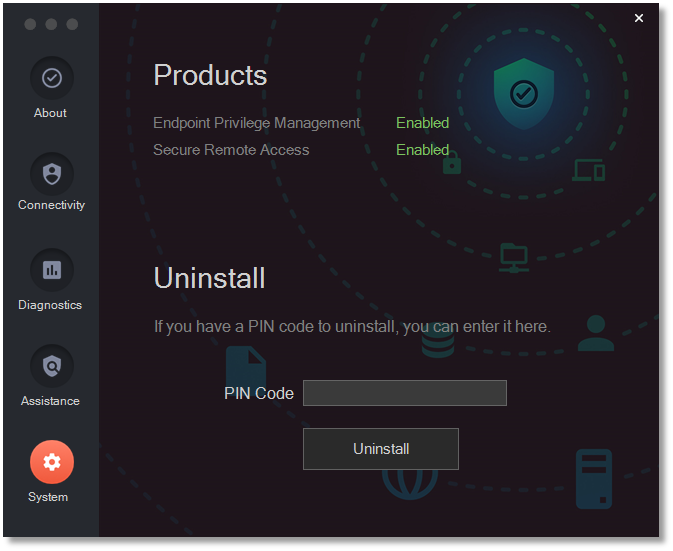
System – shows the products that are enabled. Also allows users to request a PIN Code that can be used to uninstall Admin By Request from this workstation. See Uninstalling via PIN Code for more information:
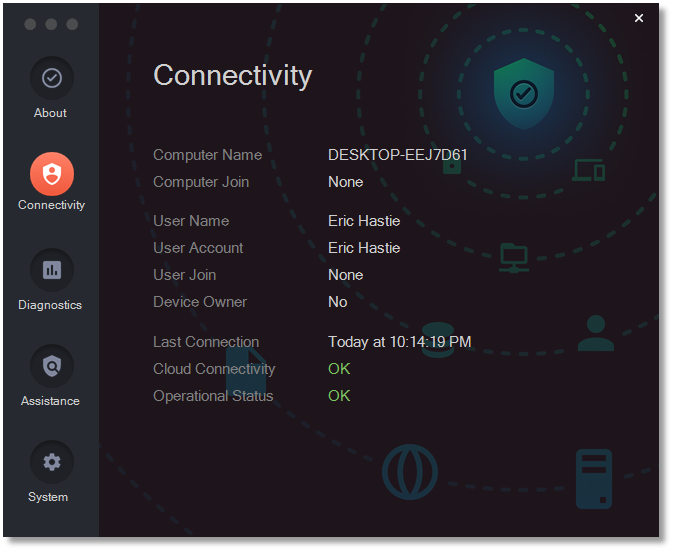
Connecting via a Proxy Server
Endpoints can be configured to route privilege requests through a proxy server, which works transparently with Admin By Request.
If the user does have a proxy server enabled, its configuration is passed to the underlying service that will in turn use this proxy for cloud service communications. The proxy traffic uses NO-AUTH (no credentials) and will be seen as the computer account generating the traffic.
The Connectivity panel shows a proxy server and AD information only if they are used for the connection. This is different from previous versions of the client, where, if none were found, proxy server and AD connector were indicated with "None" and "Not applicable" respectively.
 Ports and IP addresses
Admin By Request uses port 443 and the IP addresses and URLs that need access through firewalls are as follows.
If your data is located in Europe:
-
IP: 104.45.17.196
-
DNS: api1.adminbyrequest.com
If your data is located in the USA:
-
IP: 137.117.73.20
-
DNS: api2.adminbyrequest.com
If you wish to remotely access endpoints using Unattended Access and Remote Support (refer to Unattended Access Prerequisites and Remote Support Prerequisites for more information):
-
Outbound MQTT broker connectivity via Websockets- port 443 for the following:
-
FastTrackHubEU1.azure-devices.net (if your data is located in Europe)
-
FastTrackHubUS1.azure-devices.net (if your data is located in the USA)
-
-
For Unattended Access, RDP needs to be enabled on port 3389 on the device
When the endpoint starts up, Admin By Request checks to see if it can connect directly to its host cloud server. If it can, then no proxy server is required and no proxy server details are shown in the Connectivity panel.
The application that you see in the system tray (AdminByRequest.exe, which is running in the user space), detects whether or not the current user has a proxy server enabled for the IP addresses that are used for the cloud service.
Refer to How We Handle Your Data for more information.
Submitting Diagnostics
Diagnostic information is available on each endpoint that has Admin By Request installed. The details recorded help IT administrators and the Admin By Request support team to troubleshoot issues that might be occurring.
The following data is recorded and submitted:
-
Current configuration
-
Pending upload queue
-
Error events from the event log
To send diagnostic information about how Admin By Request is running on this workstation, select the Diagnostics button on the About Admin By Request panel and click Submit:
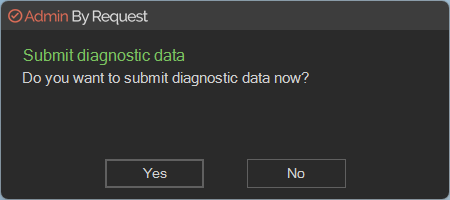
Click Yes to confirm. An "in progress" message at the bottom right corner of the screen appears during diagnostics collection
When done, the following message confirms that collection is complete and diagnostics have been submitted:
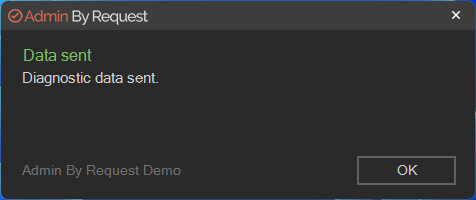
It's a good idea to submit diagnostics when raising a support ticket for a new issue. The Admin By Request support team will frequently ask for diagnostics when responding to tickets if the information is not already available.
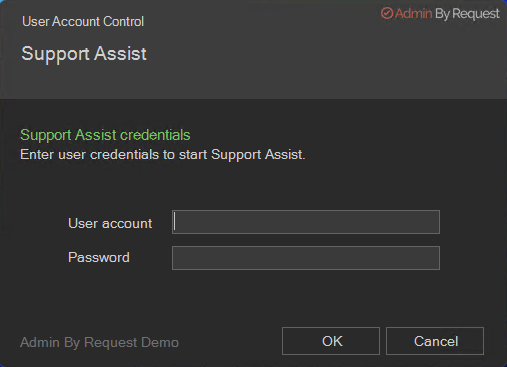
Requesting Assistance
Assistance (also known as Support Assist or Remote Assist) is a feature that allows users to ask for help from someone who can connect remotely to the user's computer and provide technical assistance with tasks that the logged-on user would not normally be able to complete.
Support Assist has been designed to be used with a non-admin user, so that customers can apply the best practice principle of least privilege also to help desk staff, not just end users.
The feature is not designed to be used with full admin credentials. Rather, it is designed for a non-admin user, who is helping the logged-on user and can carry out a task with less restrictive settings than the logged-on user during a remote control session.
Support Assist does not establish a remote control session - a third-party tool must be used for that.
The following scenarios are examples of when this might be useful:
-
End users who are not allowed to install software at all (i.e. both Run As Admin and Admin Sessions are disabled).
-
End users who don’t know where to get the software they need to use.
-
End users who are not IT savvy enough to self-service.
-
End users who refuse to take on the responsibility of installing software on their work computer, knowing they will be audited.
Assistance example scenario
An example of the first scenario could be in Customer Relations, where users do not need to install software by default. When the time inevitably arrives that new or upgraded software is required, they have to call your help desk. If the request is accepted, a help desk staff member can assist by connecting remotely and using screen sharing with the end user.
Let’s take this scenario and say Customer Relations employee, Peter Bloggs, calls Steve at the help desk to assist with a task for which Peter does not have privileges.
There are several ways this could be solved without the Support Assist feature, with or without Admin By Request:
-
Steve could have a local administrator account to all computers. However, this is an absolute security no-no and there is no auditing.
-
You could have Microsoft’s Local Administrator Password System (LAPS) in place, but this also lacks proper auditing and doesn’t work without a LAN or VPN connection.
-
Peter and Steve could agree to use the Admin By Request feature Run As Admin and use Peter’s credentials, but then Peter gets audited for Steve’s changes.
-
Steve could log on and use Run As Admin, but then Steve gets audited for Peter’s request and furthermore, Peter cannot see Steve executing the request.
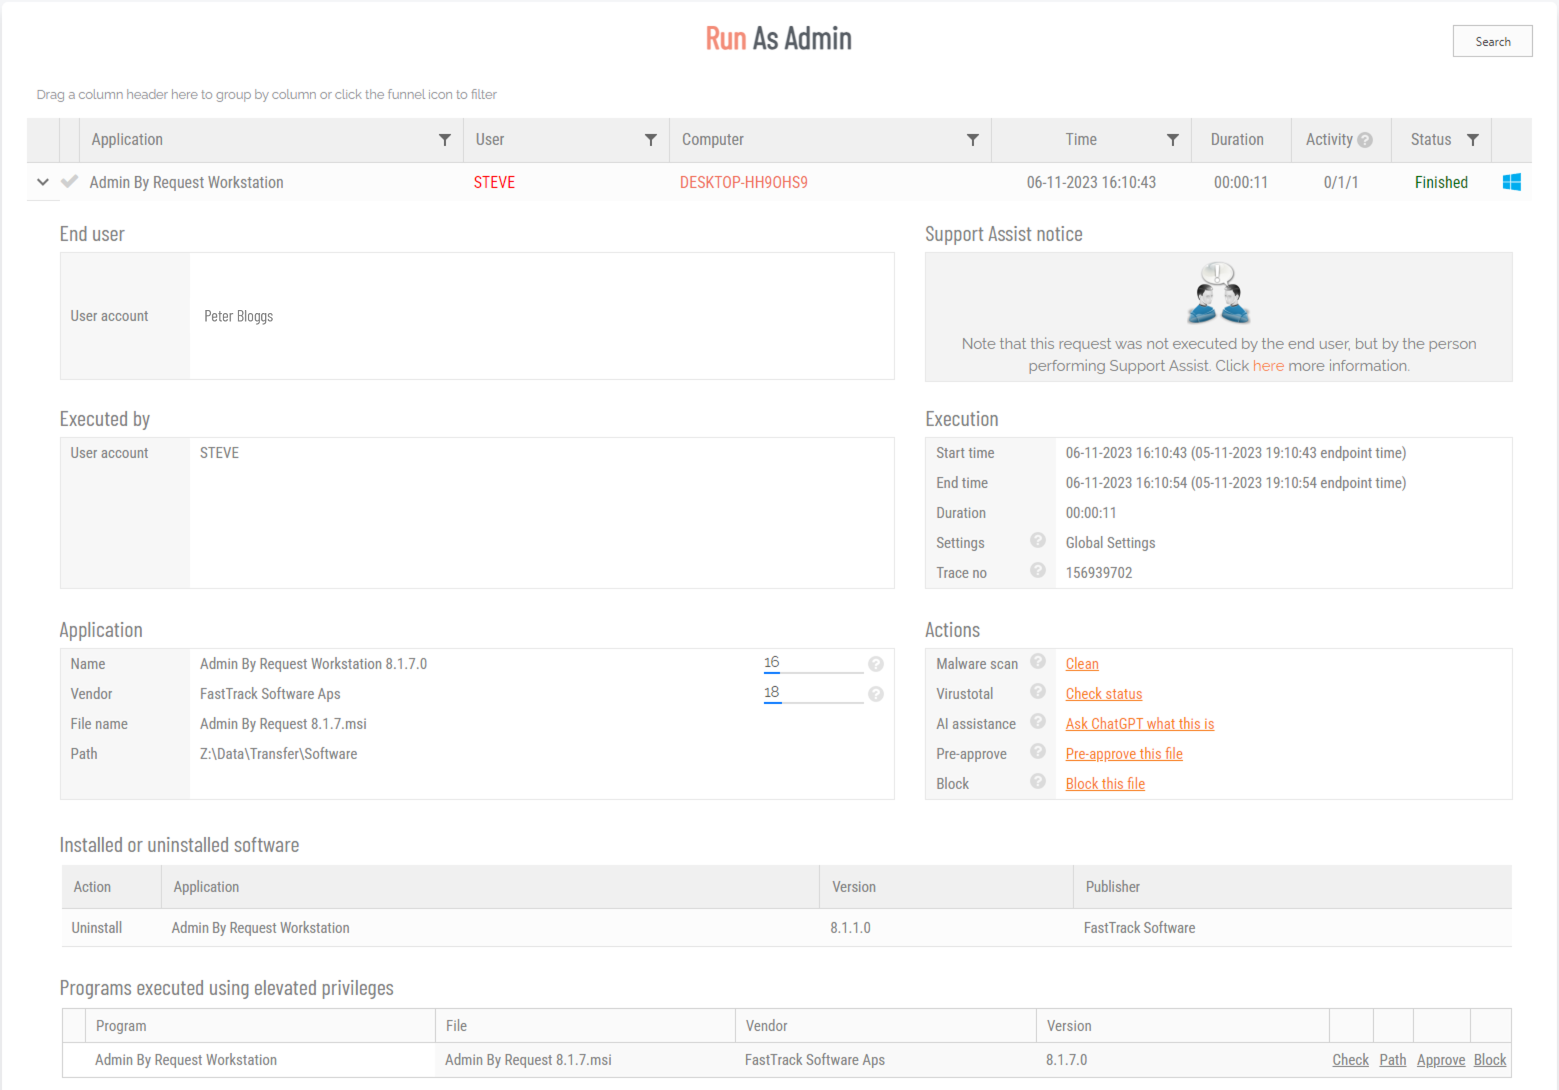
Ideally, Steve should execute the request with Peter watching. Further, auditing should clearly show that Peter requested the change and Steve executed it.
If you have a change management or ticketing system, you would also want a reference to document this change. This is exactly what the Support Assist feature does, as shown in the Run As Admin screenshot after step 6 below.
Assistance sequence
-
-
Steve is assigned the task and connects remotely to
-
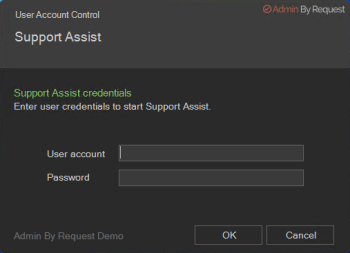
Steve starts Admin By Request, selects Assistance from the About panel and clicks Start:
-
At the
-
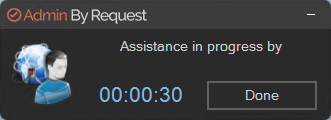
The session starts, indicated by a progress timer, which displays for the duration of the session
-
When the assist task is complete, Steve clicks Done. If he forgets,

You can see clearly in the Auditlog that Steve executed Peter’s change request with the reference 156939702 (field Trace no under Execution in the Run As Admin screenshot below):
Security checks
Is it risky if a user finds and clicks the Start button from the Assistance panel? No - the UAC window at step 4 checks the credentials supplied to see if the person logging-on has the necessary privileges to carry out the task. If they don't, the task is denied and this is logged.
For Help Desk employee Steve, it is essentially the same as logging in to Windows: whatever Admin By Request settings are in effect for Steve are also in effect when he uses Support Assist. For example, if Steve is not allowed to start an Admin Session, he is also not allowed to while using Support Assist.
Think of Support Assist as a shortcut to logging in to Windows and starting Admin By Request. If someone who is not from the Help Desk uses this feature, nothing is achieved as this would be the same as if this user was simply logging in to Windows.
Uninstalling via PIN Code
Offline users can obtain a challenge/response PIN, which allows the user to perform tasks requiring elevated privileges. A PIN Code can also be used to uninstall Admin By Request when online and this is the purpose of the Uninstall panel in the About Admin By Request window.
The first few steps in this procedure require access to the portal.
-
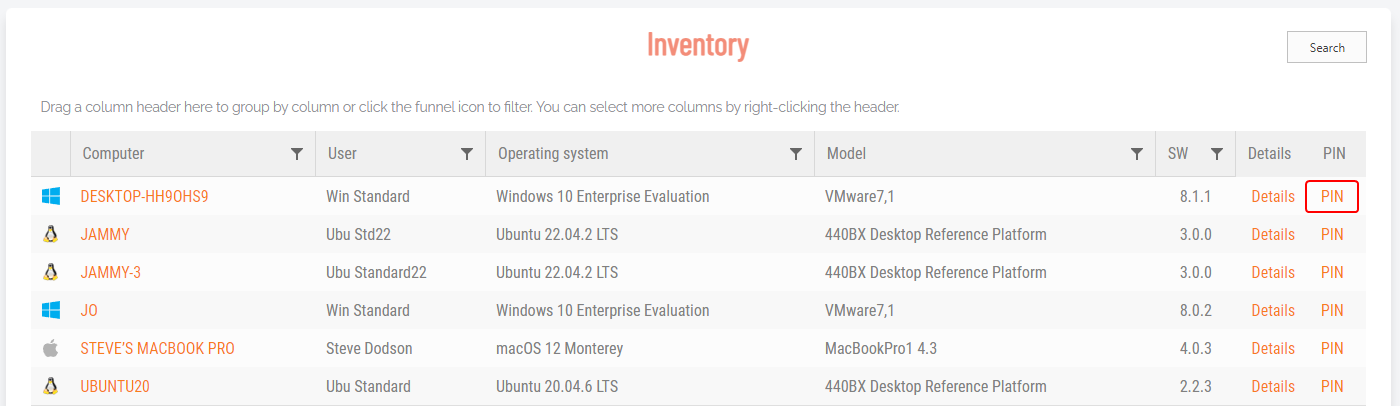
In the Admin By Request portal, navigate to the Inventory page and identify the device on which to perform the uninstall.
-
Locate the device in the inventory list - in the PIN column, click PIN for that device (columns can be switched around - the PIN column in your portal might not be the right-most column):
-
Click tab UNINSTALL PIN and then click button Generate PIN:

Note that clicking UNINSTALL PIN also displays a list of previous uninstall events on this computer (below the Uninstall Pin Code window):
-
Copy the PIN.
-
Back on the device on which you want to uninstall Admin By Request, go to the About panel (i.e. select the Admin By Request icon from the

Using Tray Tools
Tray Tools are items that appear when you click the Admin By Request system tray icon:
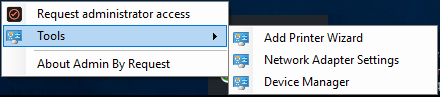
The items in the list of tools can be executable programs (or apps), web links with instructions, Control Panel applets or program shortcuts. They are generally tools that perform useful, routine tasks that have been pre-approved and thus do not require requests for administrator access.
-
The Tools menu shown in the image is what a Standard User sees - an Administrator has no need of pre-approved access to tools and so the menu is not shown to users logged in as administrators.
-
The IT administration team uses the portal to add or remove items from the Tools list, which is done via Tray Tools Settings. You need access to the portal to view or change any of these settings.
Tray Tools Settings in the Portal
Tray Tools are items that appear when users click the Admin By Request system tray icon. As well as executable files, these tools could be web links with instructions, Control Panel applets or program shortcuts.
Minimum requirements
Tray Tools require Admin By Request version 7.1 or newer. Control Panel tools require Windows 10 version 2004 (build 19041) or newer.
New Tray Tool
Click button New Tray Tool to create a new entry in the tray tools menu.
|
Setting |
Type |
Description |
|---|---|---|
|
Application |
Text |
The caption used for the system tray menu item. Enter the text to be used for the name or caption. Does not have to match the executable File name. Note that any webhooks you have created appear in a selection list when you click this field. The list is for convenience only and simply "pastes" the webhook caption into the field - no other fields are populated. |
|
File |
Text |
The name of the executable file, including it's full path. You can also specify a web address (i.e. URL) in this field, in which case the Run As Admin toggle should be Off for security reasons. |
|
Parameters |
Text |
Text values entered here are appended to the File as parameters during execution. |
|
Run As Admin |
Toggle Default: On |
On - Allows the executable file named in File to be Run As Admin (i.e. run as an administrator). Off - Does not allow the executable file named in File to be Run As Admin. This should be the option selected if the entry in File is a web address. |
|
Pre-approve |
Toggle Default: Off |
On - Pre-approves the file specified for elevated execution, by-passing normal approval flow. Off - Approval flow is not by-passed for this file. If approval is required, users must still submit a request to run even though the file is added as a tray tool item. |
|
Menu Separator |
Toggle Default: Off |
On - Inserts a line above this menu item. Allows tray tool menu items to be grouped. Off - No line is inserted. |
|
Save |
Button |
Saves customization and changes to any fields. Note that reloading any defaults does not take effect until Save is clicked. |
|
Cancel |
Button |
Cancels all work done in this setting and returns to the |
Quick add list
The Quick add list is a preset list of common Control Panel applets. It is a selection list, accessed by clicking the drop-down arrow at the right of the field. You can add other Control Panel applets by creating a tool that runs control.exe followed by a .cpl file.
If all entries in the Quick add list have already been added as tray tools, the Quick add list field does not appear at all.
Conclusion
Although the Admin By Request app is very easy to navigate, a little explanation goes a long way and users will feel much more comfortable if their expectations are set correctly. This blog explains in some detail what the app can do and how the user interface works. Use it to train your users and provide them with the best possible start to working with Admin By Request.
Next time, we'll take a deep dive into the Mac and Linux endpoint clients.
Admin By Request is available for download at no charge for up to 25 endpoints - download the Admin By Request Free Plan today or book a demo - no strings attached!