Getting Started
Introduction
Web Access Management is Admin By Request's browser and download governance capability. It gives your endpoints a lightweight, cloud-managed layer of control over what users can browse to and, more importantly, what software they can download onto their machines.
Web Access Management records executable downloads in an audit log, lets you pre-approve trusted software, block unwanted sites, require admin approval or MFA before a download completes, and scan incoming files with OPSWAT malware detection. Because it runs inside the same agent and portal you already use for Endpoint Privilege Management (EPM), there is no new infrastructure to stand up.
This guide walks you through getting Web Access Management running from scratch: confirming or upgrading to the v9.0 agent, turning Web Access Management on in the portal, and configuring your first policies. It follows a "start open, observe, then tighten" approach so that your first controls are grounded in real download activity rather than guesswork.
Platform support
The initial release of Web Access Management is available on Windows endpoints only. Mac and Linux support is planned, but no timeline is available at the time of writing.
This admin guide is available in PDF format:

How do I get started?
The first thing is to make sure the Admin By Request (ABR) agent installed on your endpoints is version 9.0 or later - this is the first version that includes Web Access Management support.
If you are already using Endpoint Privilege Management (EPM), the agent is already installed on the endpoints in your portal Inventory. Check the agent version and upgrade any endpoints below v9.0 before proceeding. Skip to Enabling Web Access Management.
If this is your first use of Admin By Request, sign up for the Free Plan at adminbyrequest.com. The Free Plan includes 25 Web Access Management licenses at no cost, with no time limit. Once signed up, install the v9.0 agent on your endpoints - start with a small number of test machines.
Installing on a single endpoint
Login to the ABR portal, download the installer from the portal top menu under Downloads and run it on the endpoint. This installation file is unique to your tenant.
Installing on multiple endpoints
The agent supports bulk deployment via msiexec command line or via Intune package. Both options use the same file downloaded from Downloads in the portal. Refer to Installing Admin By Request for full installation details.
Upgrading existing endpoints to v9.0
If you already have the Admin By Request agent deployed and need to upgrade to v9.0, you have two options:
-
Download and deploy manually - download the v9.0 installer from Downloads in the portal and push it to endpoints using your existing software deployment tooling.
-
Request an immediate tenant upgrade - contact Admin By Request and request that Support starts the upgrade for your tenant. If you do not request this, the upgrade will be applied automatically during the regular update cycle, which typically takes 4–6 weeks.
Remember, Web Access Management requires agent version 9.0 or later. Endpoints running older agent versions will appear in the portal Inventory but will not receive Web Access Management policy or enforcement until they are upgraded.
Enabling Web Access Management
Once your endpoints are running v9.0, turn Web Access Management on:
-
Log in to the Admin By Request portal and click the Web Access Management tile on the Summary page.
-
Select Settings from the top menu and choose Web Access Settings.
-
Select Authorization in the left menu and open the AUTHORIZATION tab.
-
Ensure that both Allow browsing and Allow downloads are turned ON.
-
Click Save.
Web Access Management is now active. Policy is distributed to each endpoint the next time the agent checks-in to the portal.
IMPORTANT
Turning on Allow browsing and Allow downloads with no other restrictions means all web access and downloads are permitted - this is intentional for first-time setup. The recommended approach is to start in this open mode and use the download audit log to understand what software enters your environment before applying controls. Note that ordinary allowed browsing is not logged.
First-Time Configuration
The recommended approach for new Web Access Management administrators is: start open, review what users download, then tighten.
Jumping straight into restrictive policies risks blocking legitimate business activity before you know what normal looks like in your environment.
Rather, the suggested process is:

The recommended first-run path: start open, observe real download activity, then tighten with controls grounded in what you actually saw:
-
Enable Allow browsing and Allow downloads as described above - leave all other controls off for now.
-
Let Web Access Management run in this open, observing mode for a period. Executable downloads are recorded in the audit log automatically - every download (and, once you turn on Require approval, every approval decision) is captured, giving you a picture of what software your users are actually pulling onto their machines, who is requesting it, and from where.
-
Review the download audit log and identify patterns: frequently downloaded applications, vendors that appear in volume, and any downloads that look suspicious or out of place. The portal splits this into a Downloads tab (browser downloads, the ones you usually care about) and a Tools tab (background and command-line fetchers such as updaters, winget, and PowerShell).
-
Use those observations to build your first round of controls:
-
Add known-safe software to the Pre-Approved Downloads list so it downloads without intervention.
(Settings > Web Access Settings > App Control > Pre-approved) -
Add any clearly unwanted sites to the Blocked Sites list.
(Settings > Web Access Settings > App Control > Blocked) -
Enable Require approval for downloads if you want admin sign-off on anything not pre-approved. By default this covers downloads from browsers and known tools.
(Settings > Web Access Settings > Authorization > Authorization) -
Turn on Malware Detection under Malware settings to add OPSWAT scanning.
(Settings > Web Access Settings > Malware > Detection)
-
This staged approach means your first controls are grounded in real download data rather than guesswork, and it avoids a flood of approval requests or user complaints on day one.
A typical pop-up if Require reason is ON:
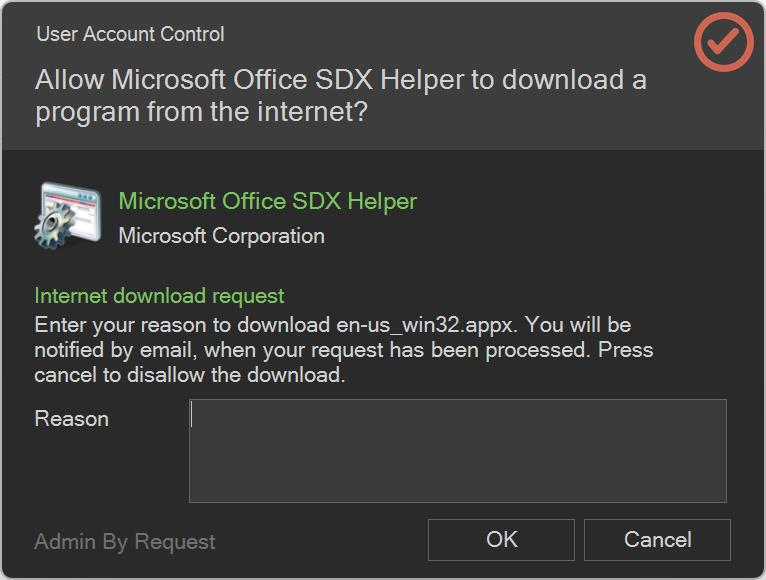
Once Require approval is on, an unapproved download prompts the user like this. If Require reason is also on, the Reason field is mandatory before the request is submitted.
What Web Access Management does and does not log
Web Access Management does not log ordinary allowed browsing. By design (a deliberate privacy choice), the audit log records only executable download activity, blocked site visits, and visits to sites you have pre-approved with logging enabled.
There is no setting that logs all browsing, and no wildcard such as *.com to capture every site. So the "observe first" approach above works for downloads, not for general web browsing - you will not see a list of every site each user visited.
If you need a record of access to specific sensitive sites, pre-approve those sites with Log to auditlog turned on; to confirm a site is being blocked, blocked visits are logged. A broader browsing "learning" or log-only mode is on the product roadmap, not a current feature.
Prerequisites for Advanced Features
The core Web Access Management features (browsing controls, download governance, browser lockdown, malware scanning) work with the v9.0 agent and no additional setup. Some advanced features have additional prerequisites:
|
Feature |
Prerequisite |
|---|---|
|
MFA-protected downloads |
Entra ID Connector configured; Microsoft 365 / Entra ID SSO in use |
|
Intune compliance gating |
Entra ID Connector configured; devices enrolled in Microsoft Intune |
|
Entra ID group-scoped sub-settings |
Entra ID Connector configured |
|
Owner-only downloads |
Device ownership assigned in ABR Inventory |
|
AI / ML auto-approval |
Require approval must be enabled under Authorization |
Setting up the Entra ID Connector
If your organization uses Microsoft 365 or Entra ID for identity, configure the Entra ID Connector before enabling MFA-gated downloads, Intune compliance gating, or sub-settings scoped to Entra ID groups. Refer to the Entra ID Connector setup guide for configuration steps.
Applying Policies to Specific Groups (Sub-Settings)
Once your global settings are stable, you can use sub-settings to apply different policies to different user populations and device groups within the same tenant - without creating separate portals or duplicating configuration.
Sub-settings are managed under Settings > Web Access Sub Settings. Each sub-setting group:
-
Scopes to one or more Active Directory or Entra ID groups, and/or one or more Organisational Units. A user/device must satisfy all defined scope conditions to be matched.
-
Selectively overrides any of Web Access Management's six policy sections (Authorization, Lockdown, Malware, App Control, Site Control, Emails). Sections not enabled in the sub-setting inherit from global policy (i.e. Web Access Management Global Settings).
-
Wins by first match - when a user/device matches multiple sub-settings, the first match in listed order takes effect per section. Order is adjustable by dragging in the portal.
When to use sub-settings
The table lists typical use cases for sub-settings.
|
Scenario |
Sub-setting approach |
|---|---|
|
Finance team needs MFA + approval for all downloads |
Enable Authorization and Lockdown > MFA in a sub-setting scoped to the Finance group |
|
IT staff can download freely |
Enable Authorization in a sub-setting scoped to the IT group; set Allow downloads ON, Require approval OFF |
|
Kiosk devices restricted to pre-approved sites only |
Enable Authorization in a sub-setting scoped to the Kiosk OU; set Allow browsing OFF, Allow downloads OFF |
|
High-risk team needs separate malware alert emails |
Enable Malware Notification in a sub-setting with their SOC address |
|
A team needs a browser extension that Web Access Management removes |
Enable Lockdown > VPN in a sub-setting scoped to that group; set Remove browser VPNs OFF |
Verifying sub-setting scope
Before activating a sub-setting, verify in the portal which devices it will match using:
Settings > Web Access Sub Settings > [Expand sub-setting name] > [Click "Who matches this subsetting?"]
This shows which sub-settings each device in your inventory currently qualifies for, making it easy to confirm targeting before rolling out new policies.
Licensing
Web Access Management is available on a Free Plan that includes 25 licenses at no cost, with no time limit. This follows the same model as the EPM and SRA Free Plans. Additional licenses are available on paid plans.
Each endpoint running the v9.0 agent and enrolled in Web Access Management consumes one license. License usage is visible in the portal. Refer to Licensing for more information.