Single Sign-on Setup
Introduction
If your company uses Microsoft Active Directory (on-premise), or Entra ID (cloud-based), or any other identity provider (IdP), whether on-prem or cloud-based, you can enhance security and make life easier for yourself and your portal users with our single sign-on (SSO) support. We support all common identity providers either directly or through generic SAML 2.0.
When you add a portal user and assign them a single sign-on option, there is no password to worry about – and if your identify provider supports IdP-initiated login, they will not even need to know their username.
We currently support:
-
Microsoft 365 / Entra ID (formerly Azure AD)
-
Active Directory Federation Services (ADFS)
-
Okta
-
SAML 2.0 (any other identity provider using our generic SAML integration)
The procedures in this section work well for a small number of users entered manually. If you need to assign a large number of users using SCIM, refer to SCIM.
Enterprise Applications
Enterprise application access is not just about "can users log in?" It is about:
-
where authentication happens
-
which identity provider (IdP) controls policy
-
how MFA is enforced, and
-
how access is separated between admin workflows and end-user workflows.
For Admin By Request (ABR), this is important because ABR has two different identity interfaces:
-
Portal access (administrators and portal users)
-
Endpoint access (standard user elevation approval/authentication, i.e. for end users requesting admin rights)
These two interfaces require different trust paths, different IdP app settings and, in many enterprises, different risk policies.
What is an Enterprise Application?
In Entra ID, Okta, and similar IdP platforms, an Enterprise Application is the local "identity object" that governs how your organization interacts with a specific service.
It functions as the Service Principal (the term Microsoft uses in Entra ID), which is a security identity that defines:
-
Authentication Protocol: The "language" used (SAML 2.0, OIDC, or Password Vaulting).
-
Security Boundaries: The "redirect/reply URLs" that ensure data is only sent to trusted endpoints.
-
Data Payload: The specific "user attributes" (i.e. Claims) the app needs to function (e.g. Email, EmployeeID, or Role).
-
Access Control: The specific "users or groups" assigned to the app and the "conditional access policies" they must meet.
-
Permissions: The "level of consent" granted to the app to read your organization's data (e.g. "Read your calendar").
In other words: an enterprise app is the "identity contract" between your IdP and a particular service.
What is SSO?
Single Sign-On (SSO) means users authenticate once with the IdP, then use trusted tokens/assertions to access one or more apps without retyping credentials each time.
Common protocols:
-
OIDC/OAuth 2.0: used for modern web sign-in and APIs
-
SAML 2.0: used for enterprise federation and policy-controlled sign-in
Why do enterprises sometimes use two apps for one vendor?
A standard pattern is:
-
App A for admin/portal access
-
App B for endpoint/client/user workflow authentication
This split exists because requirements differ:
-
Different protocols
-
Different redirect URLs
-
Different consent models
-
Different conditional access policies/MFA requirements
For ABR, this split is normal and you should expect to see two apps created.
How SSO works in Admin By Request
ABR typically appears as two apps (they are more like "integration paths") in Entra/IdP contexts:
-
ABR Web Portal admin login app
-
ABR SSO endpoint app for elevation authentication
Another way to think about it:
-
Portal SSO: "How admins and portal users sign in to the ABR web portal"
-
Endpoint SSO: "How endpoint users satisfy identity + MFA for elevation requests"
ABR SSO types: Portal vs Endpoint
ABR supports two SSO use cases that are easy to confuse if they are configured in the same tenant at the same time:
-
Portal SSO and Endpoint SSO require different SAML URLs and metadata.
-
Reusing the wrong app metadata/URLs in Endpoint setup can trigger errors (for example, auth context mismatch errors).
ABR SAML endpoint values
Use the values that match the ABR SSO type you are configuring.
1. Portal SSO
-
Single sign-on URL:
https://www.adminbyrequest.com/saml -
Audience URI (SP Entity ID):
https://www.adminbyrequest.com/samlmeta
2. Endpoint SSO
-
Single sign-on URL:
https://sso.adminbyrequest.com/saml -
Audience URI (SP Entity ID):
https://sso.adminbyrequest.com/samlmeta
Architecture and security implications
Using separate enterprise apps gives ABR deployments cleaner control:
-
Isolation: Endpoint SSO misconfiguration does not have to break portal login (and vice versa)
-
Policy granularity: stricter controls can be applied to privileged/portal admins
-
Auditable separation: clearer logs for admin console authentication vs elevation authentication
This is consistent with enterprise "management vs execution" best practice.
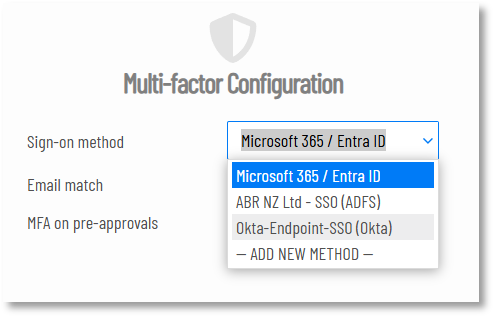
The MFA Requirement
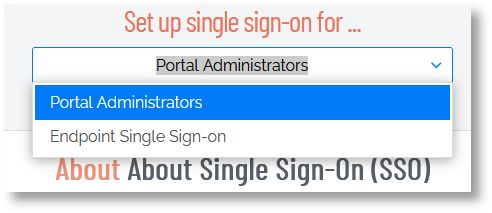
If configuring SSO for both Portal Administrators and Endpoint Users, Multi-Factor Authentication (MFA) is required. If MFA is not configured, the drop-down menu at the top of the Single Sign-on (SSO) Setup page is not available:
To check your MFA setting in the portal, go to Endpoint Privilege Management > Settings > Windows Settings > Endpoint > UAC.
At the time of writing, MFA must be enabled in Windows Settings to enable the SSO drop-down menu, even if MFA is already enabled under Mac and/or Linux settings. The Windows setting can be either global or a sub-setting.
General prerequisites (before starting any procedures)
Decide your ABR SSO model before configuration:
-
List your ABR use cases:
-
Portal login only
-
Endpoint elevation SSO only
-
Both
-
-
Identify IdP(s) in scope (Entra ID, Okta, other SAML provider).
-
Decide if the same IdP tenant will host both Portal and Endpoint apps.
-
Create naming standards up front (for example: Portal SSO, Endpoint SSO).
-
Document which ABR URL set belongs to which app (Portal vs Endpoint).
This ensures no ambiguity when admins copy metadata and settings into ABR.
Microsoft 365 / Entra ID
Microsoft 365 supports integration with your in-house Active Directory, enabling users to access Microsoft 365 services using their standard AD login credentials. This connection is established through SAML authentication.
To add a Microsoft 365 login, you simply pick it as the sign-on method in the portal when adding a new user without any further configuration. The portal menu option to add a new user is Logins > User Logins.
Microsoft 365 login requires that users are allowed to consent to apps. You can enable this under Users and groups / User settings in the Azure Active Directory (Entra ID) Admin Center. Once all portal users have logged into the portal, the option to consent to apps can be disabled without affecting future logins.
Refer to Entra ID Support for more information.
Entra ID without Microsoft 365
It is possible to login using Entra ID without using Office 365.
Prerequisites
-
A user account in the ABR portal, with sufficient rights to configure SSO:
-
Read-only view: OFF
-
Manage Settings: ON
-
Manage portal users: ON
-
-
A valid account for the Entra ID portal as well as the ABR portal. Make sure you are logged-in to both portals - you will switch between them during the configuration procedure.
-
All your users who intend to login using Entra ID SSO must have their accounts and/or email addresses entered into your Entra ID portal. This makes them available to be assigned to the Admin By Request app once it is configured.
Procedure
The tasks below are labeled the same as the sections in the ABR portal. Each task comprises a number of steps.
-
In the ABR portal, go to Logins > Single Sign-on Setup.
-
Click New entry.
-
In field Name (e.g. domain):, enter the domain you want to use (usually your Active Directory or company domain name), select ADFS as Provider: and click Update:

The entry will be created and Status will be "Waiting for IDP metadata". Move to your ADFS server - we'll come back to the ABR portal later.
-
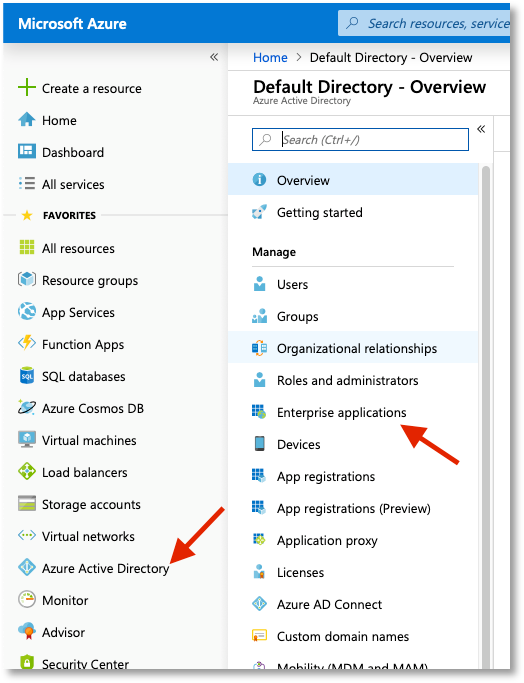
In the Microsoft Azure Portal go to Azure Active Directory / Enterprise Applications:
-
Select New Application (Non-gallery application) and enter Admin By Request as the name.
-
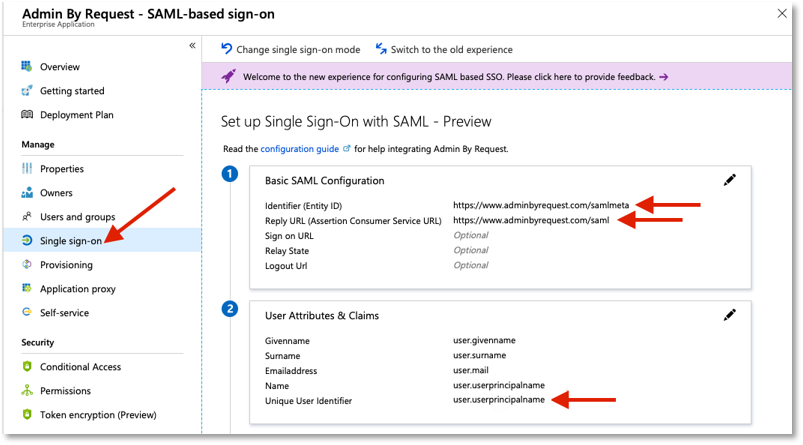
Go to Single sign-on and select SAML. Enter the following values under Basic SAML Configuration:
-
Identifier (Entity ID): https://www.adminbyrequest.com/samlmeta
-
Reply URL (Assertion Consumer Service URL): https://www.adminbyrequest.com/saml
-
-
Now edit User Attributes & Claims to set Unique User identifier value to user.mail:
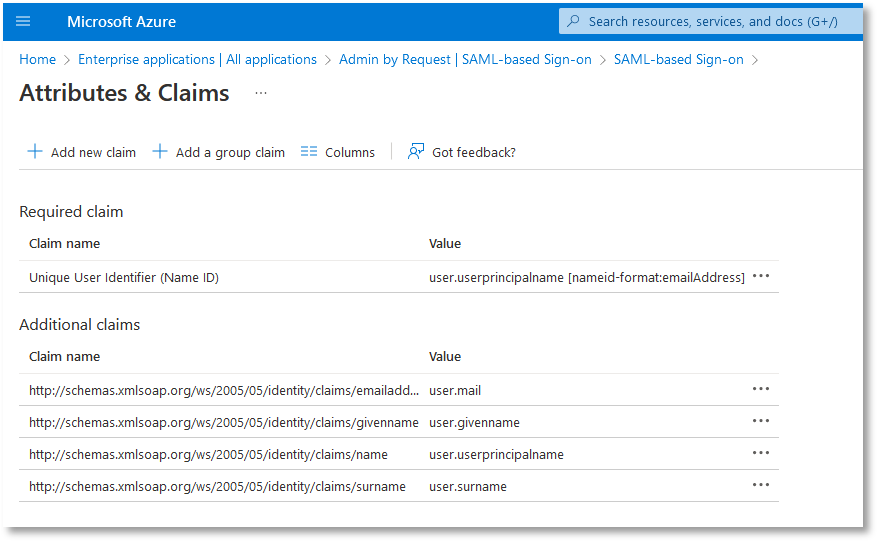
-
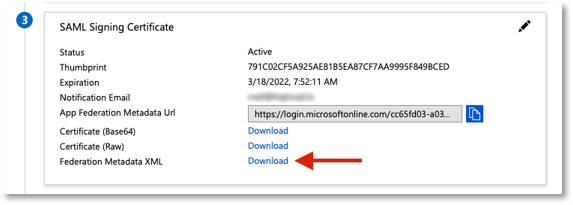
Now download your Federation Metadata XML and add it to Admin By Request under the Add Identity Provider (IDP) Metadata section:
-
Finally, assign users that need access to the application. This is done in the ABR portal User Logins page. Simply add a user and select ADFS Single sign-on for [domain name] as Sign-on method.
-
In Microsoft Azure, you need add the same user under Users and Groups for the Admin By Request application:
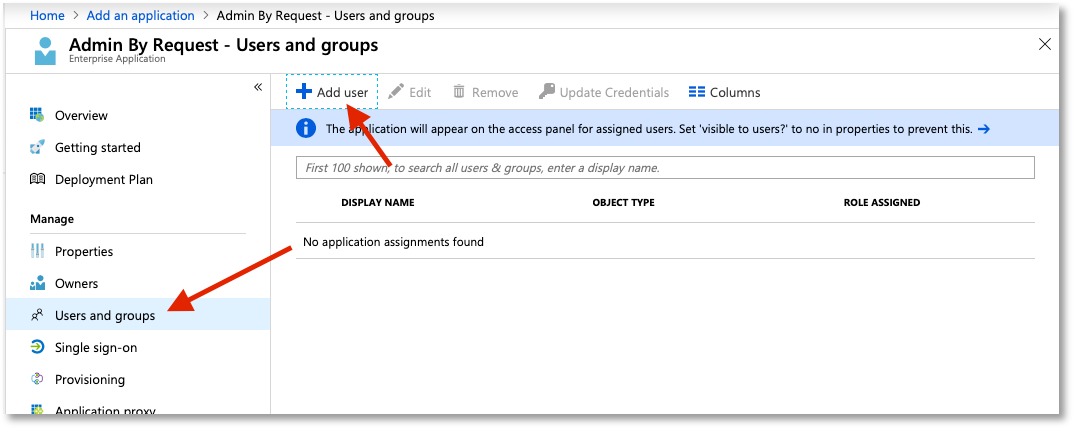
Test your SSO configuration by logging-in as several users and verify that they can login successfully.
Active Directory Federation Services (ADFS)
Active Directory Federation Services (ADFS) is a Windows Server feature that enables your in-house Active Directory users to authenticate with external web applications via SAML, allowing them to log in using their regular AD credentials.
Prerequisites
-
A user account in the ABR portal, with sufficient rights to configure SSO:
-
Read-only view: OFF
-
Manage Settings: ON
-
Manage portal users: ON
-
-
A functional ADFS setup within your Windows server environment, including administrative access to the ADFS server.
Make sure you are logged-in to both the ADFS server and the ABR portal - you will switch between them during the configuration procedure.
Procedure
The tasks below are labeled the same as the sections in the ABR portal. Each task comprises a number of steps.
-
 Portal - create a new SSO entry
-
In the ABR portal, go to Logins > Single Sign-on Setup.
-
Click New entry.
-
In field Name (e.g. domain):, enter the domain you want to use (usually your Active Directory or company domain name), select ADFS as Provider: and click Update:
The entry will be created and Status will be "Waiting for IDP metadata". Move to your ADFS server - we'll come back to the ABR portal later.
-
-
ADFS server - add a Relying Party Trust
-
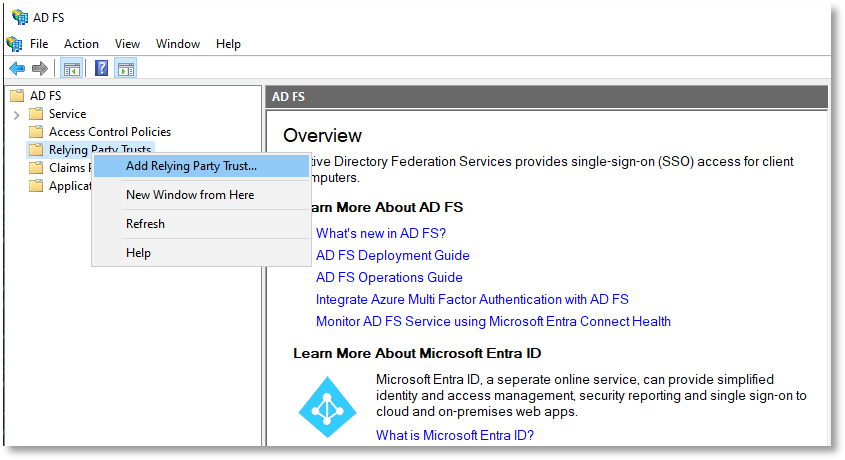
In the ADFS server, start AD FS Management and add a Relying Part Trust:
-
At the Welcome step, select Claims aware and click Start.
-
At the Select Data Source step, choose either of the first two options and click Next:
-
For the top option, enter the Admin By Request SAML metadata URL:
https://www.adminbyrequest.com/samlmeta -
For the second option, save the contents of this URL to a file (e.g. abrsaml.xml) and select the file using the Browse button.
You can obtain the contents by pasting the URL into the address bar of a browser and pressing Enter. The contents will appear in the page body.
-
-
At the Specify Display Name step, enter a name and click Next.
-
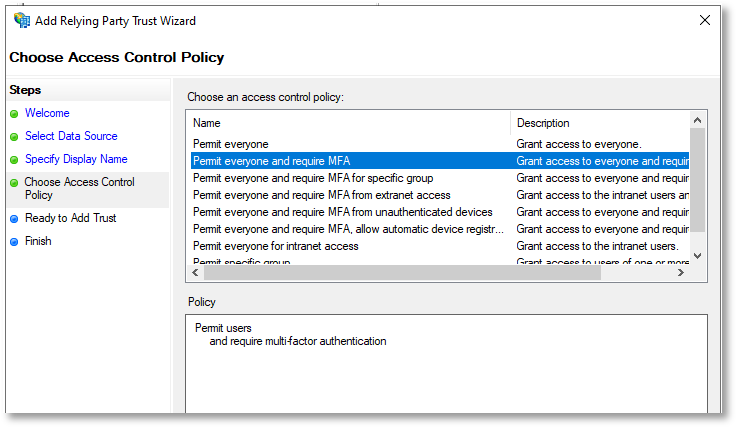
At the Choose Access Control Policy step, select the type of access control required and click Next.
The following example requires users to sign-in with MFA:
-
At the Ready to Add Trust step, review settings under each of the tabs and click Next, then Close.
-
-
ADFS server - edit Claim Issuance Policy
-
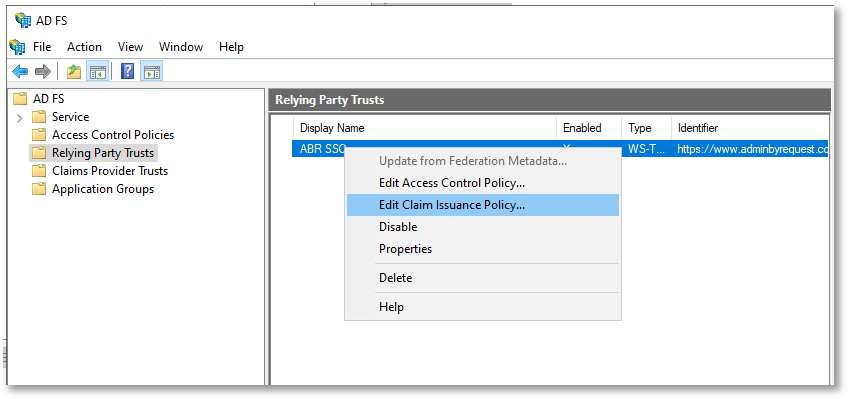
Right-click the newly created Relying Party Trust and select Edit Claim Issuance Policy...:
-
On the Issuance Transform Rules dialog, click button Add Rule....
-
At the Choose Rule Type step, select Send LDAP Attributes as Claims for the Claim rule template (this should be the default) and click Next.
-
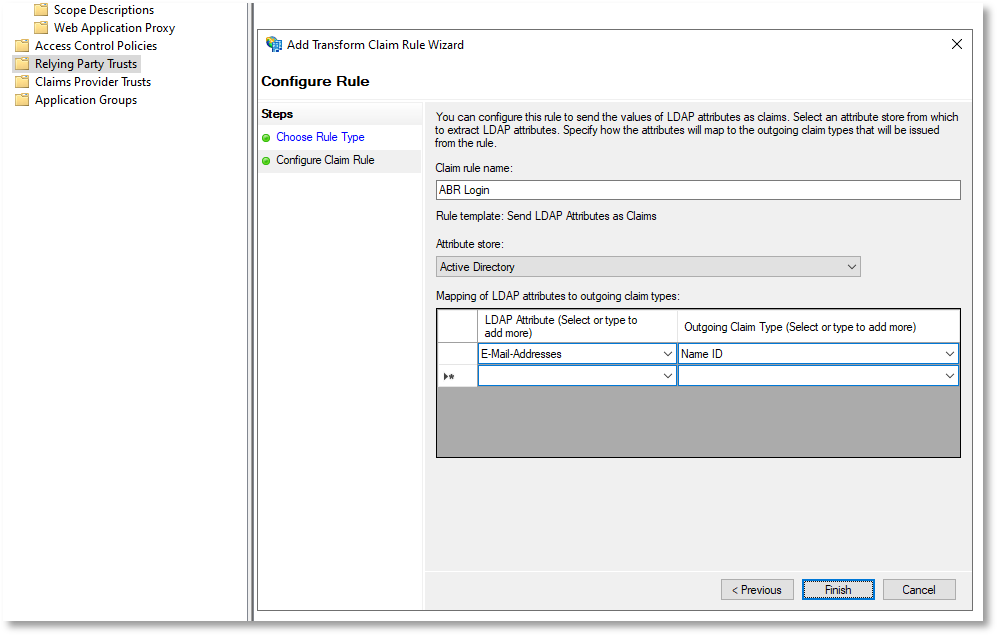
At the Configure Claim Rule step, enter the following:
-
Claim rule name: ABR Login (example only - type any name here)
-
Attribute store: select Active Directory
-
LDAP Attribute: select E-Mail-Addresses
-
Outgoing Claim Type: select Name ID
For the last two, the LDAP Attribute is mapped to the Outgoing Claim Type. This means that email addresses in Active Directory are matched to email addresses in the ABR portal (User Logins). If you do not have email addresses for your users in Active Directory, you will need to choose another LDAP attribute for the mapping.
The completed dialog should look like this:
-
-
Click Finish, followed by OK.
-
-
On your ADFS server, enter the following URL into a browser (substituting your ADFS server's fully qualified domain name):
https://<your.adfs.server>/FederationMetadata/2007-06/FederationMetadata.xmlThis downloads the file FederationMetadata.xml to your Downloads folder.
-
Open the file in a browser or text editor.
-
Select and copy all the XML code.
-
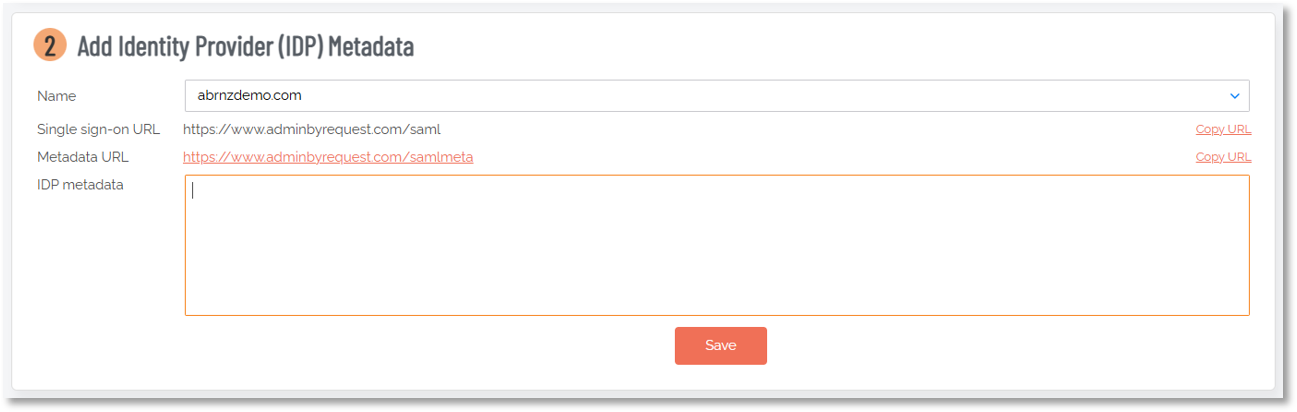
In the ABR portal, scroll down to section 2 Add Identity Provider (IDP) Metadata:
-
Make sure the correct Name is selected and paste the XML code into field IDP metadata.
-
Finally, click Save.
The Status of your entry should now be "Single sign-on enabled".
-
In the ABR portal, select Logins > User Logins.
-
For each user that will login to the ABR portal via ADFS:
-
Click EDIT.
-
Change the Sign-on Method to ADFS Single sign-on for <Name>, where <Name> is your Active Directory or company domain name entered earlier.
-
Click Save.
-
Test your SSO configuration by logging-in as several users and verify that they can login successfully.
Okta
Okta is an identity management platform that can connect your in-house Active Directory to external web applications using SAML. This integration allows users to authenticate with their usual AD credentials when accessing the portal.
Prerequisites
-
A user account in the ABR portal, with sufficient rights to configure SSO:
-
Read-only view: OFF
-
Manage Settings: ON
-
Manage portal users: ON
-
-
MFA configured as the authentication mechanism under Endpoint Privilege Management > Settings > Windows Settings > Endpoint > UAC (global or a sub-setting).
-
A valid account for the Okta portal as well as the ABR portal. Make sure you are logged-in to both portals - you will switch between them during the configuration procedure.
-
All your users who intend to login using Okta SSO must have their accounts and/or email addresses entered into your Okta portal. This makes them available to be assigned to the Admin By Request app once it is configured.
-
Windows endpoints:
-
8.5 or later
-
On-premise or Active Directory
-
-
macOS endpoints:
-
5.2 or later
-
Platform SSO
-
Procedures
-
If using MFA, make sure it's configured in the ABR portal under Windows Settings (Endpoint Privilege Management > Settings > Windows Settings > Endpoint > UAC).
-
In the ABR portal, go to Logins > Single Sign-on Setup.
-
Under Set up single sign-on for ..., select either Portal Administrators or Endpoint Single sign-on.
The remainder of this procedure is based on selecting Portal Administrators, to create the ABR Portal SSO app in Okta.
-
Click New entry.
-
In field Name (e.g. domain):, enter the domain you want to use (usually your Active Directory or company domain name, but it can be any name), select Okta as Provider: and click Update:

The entry will be created and Status will be "Waiting for IDP metadata". Move to your Okta portal - we'll come back to the ABR portal later.
NOTE
The procedure following needs to be run twice - once for portal admins and once for endpoint users. The end result in the Okta portal is two apps:

The configuration steps are almost the same for both, the main exception being the choice of SSO URL and metadata:
1. Portal SSO
-
Single sign-on URL:
https://www.adminbyrequest.com/saml -
Audience URI (SP Entity ID):
https://www.adminbyrequest.com/samlmeta
2. Endpoint SSO
-
Single sign-on URL:
https://sso.adminbyrequest.com/saml -
Audience URI (SP Entity ID):
https://sso.adminbyrequest.com/samlmeta
When you return to the ABR portal, make sure you match the correct Okta app with it's corresponding ABR URL and metadata.
-
-
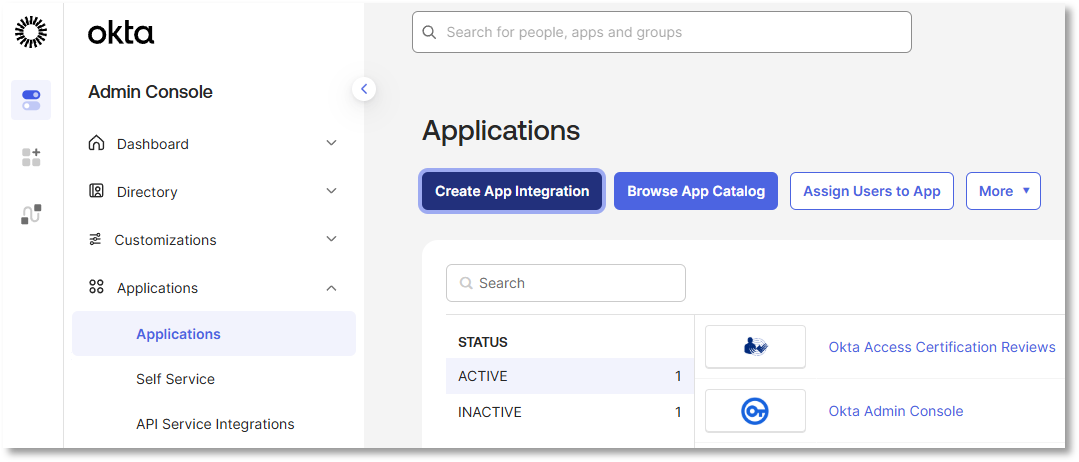
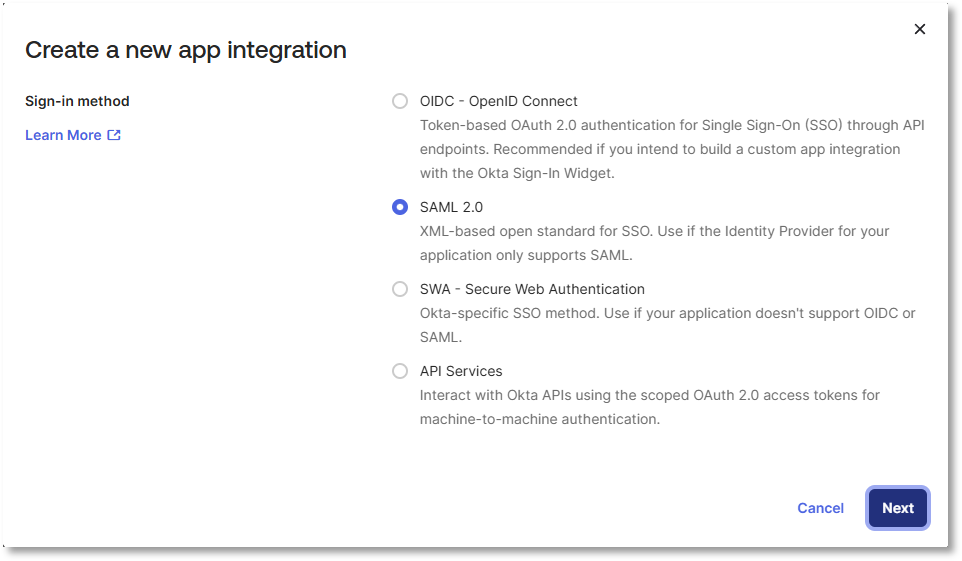
In the Okta portal, go to Admin Console > Applications > Applications and click Create App Integration:
-
Select SAML 2.0:
-
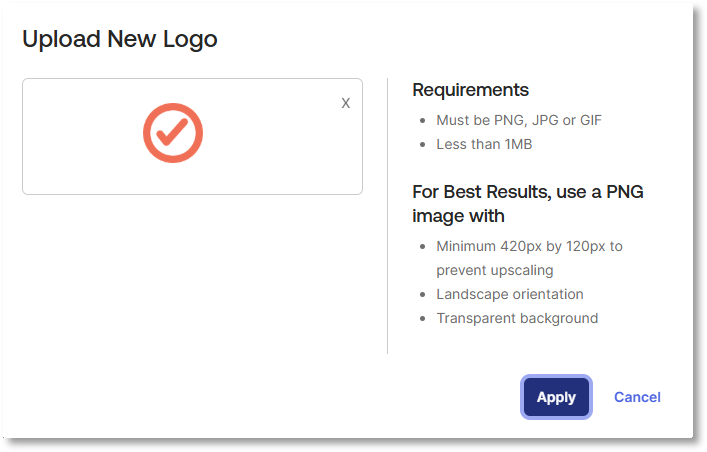
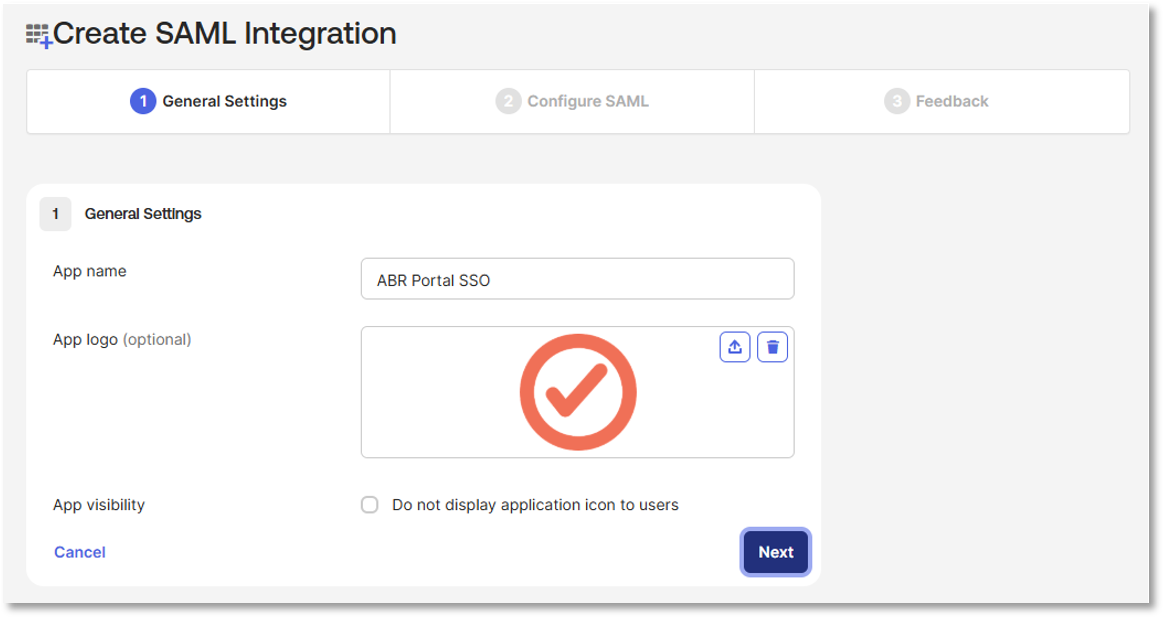
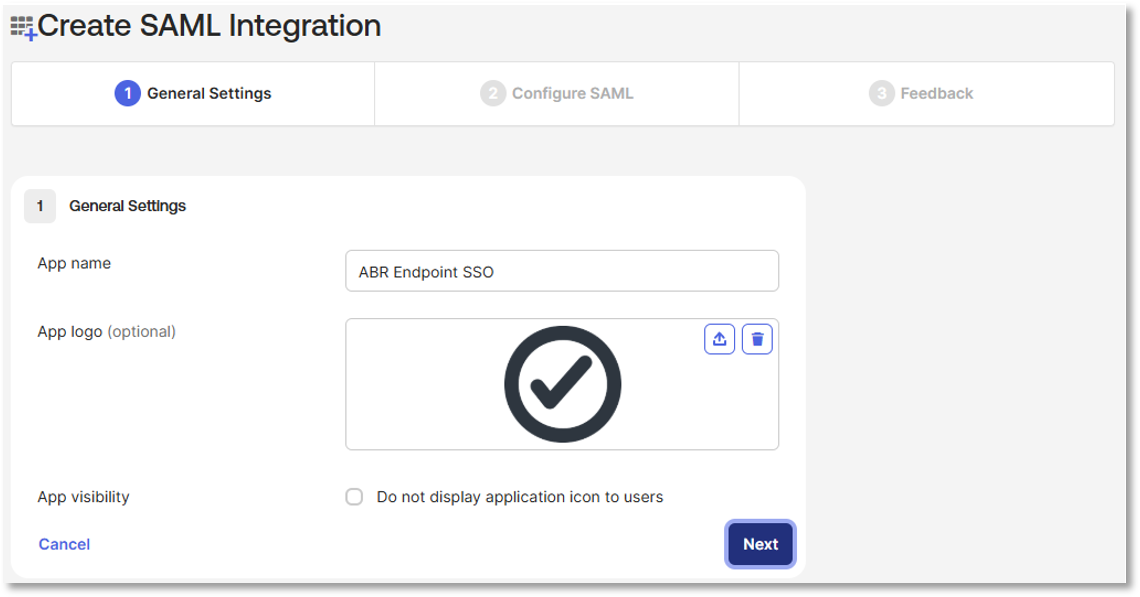
Name the app and (optionally) add a logo:
-
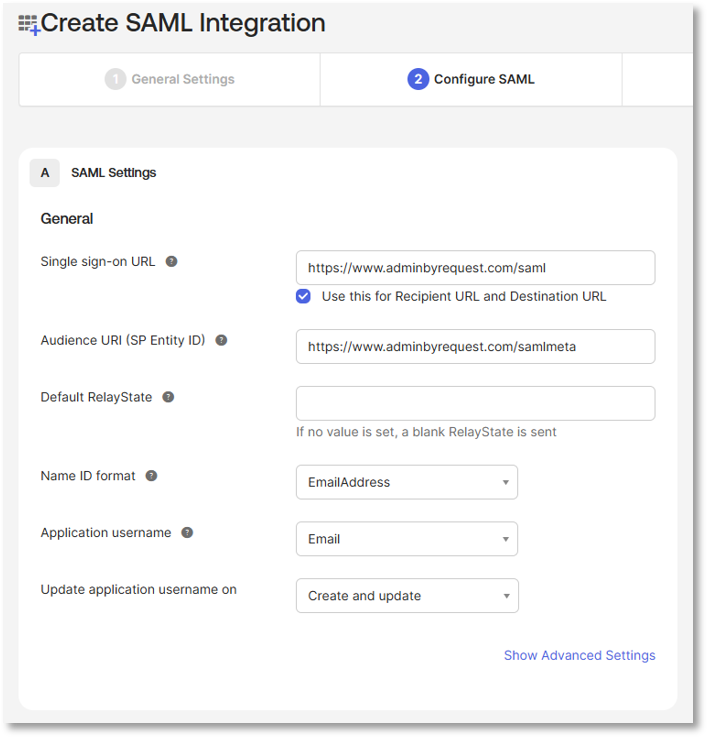
Configure SAML settings as indicated for Portal SSO (i.e. portal admins):
Single sign-on URL:
https://www.adminbyrequest.com/saml
Audience URI (SP Entity ID):
https://www.adminbyrequest.com/samlmeta
Name ID format:
EmailAddress
Application username:
Email
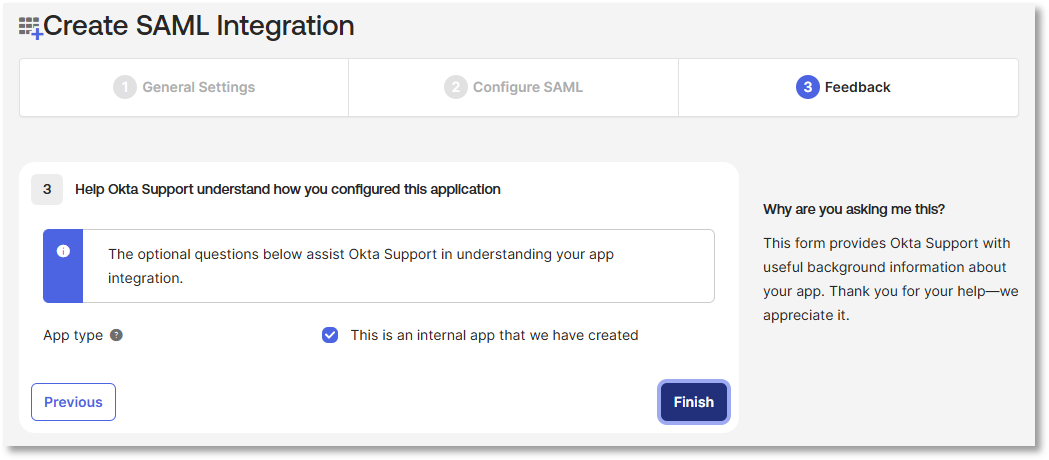
-
In the Feedback panel select This is an internal app that we have created and click Finish:
-
In the ABR Portal SSO page Sign On tab, click View SAML setup instructions to find the IDP metadata that needs to be provided to your Admin By Request tenant:
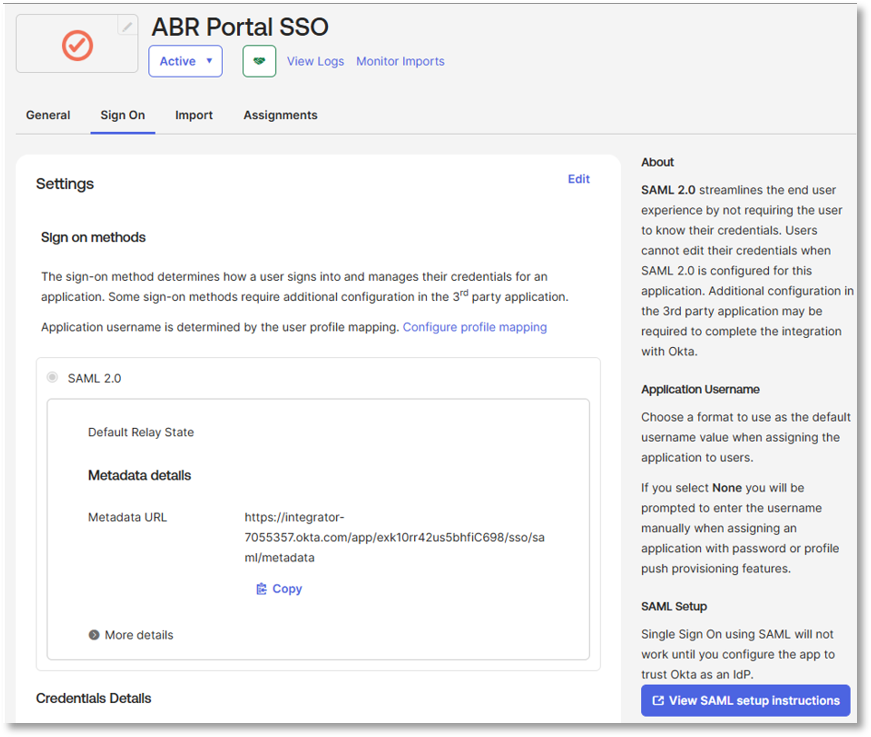
-
Scroll down to the section named Optional and copy everything within the text field below it.
The field is multiline - to ensure everything is copied correctly it is recommended to click inside the text box, hit Ctrl+a then Ctrl+c (or Command+a and Command+c if on macOS):

-
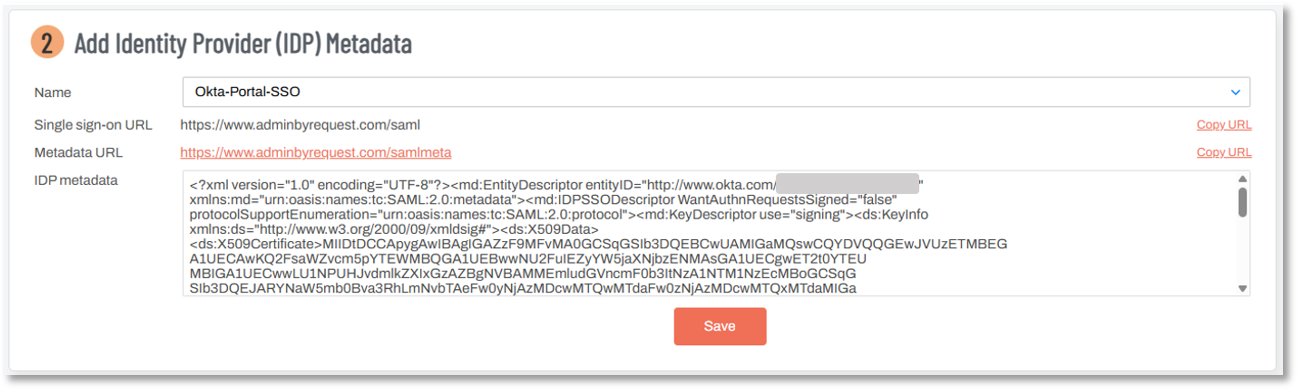
Go back to the Admin By Request portal, select the entry created at step 5 and paste the copied IDP metadata into the IDP metadata field:
-
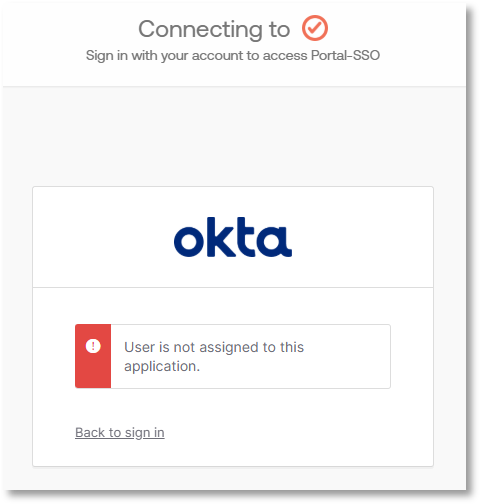
The entry should now display Single sign-on enabled:

The application is now active, but it has not yet been assigned to any users. If an Admin By Request portal user tried to sign-in now using Okta SSO, this would be the result:
-
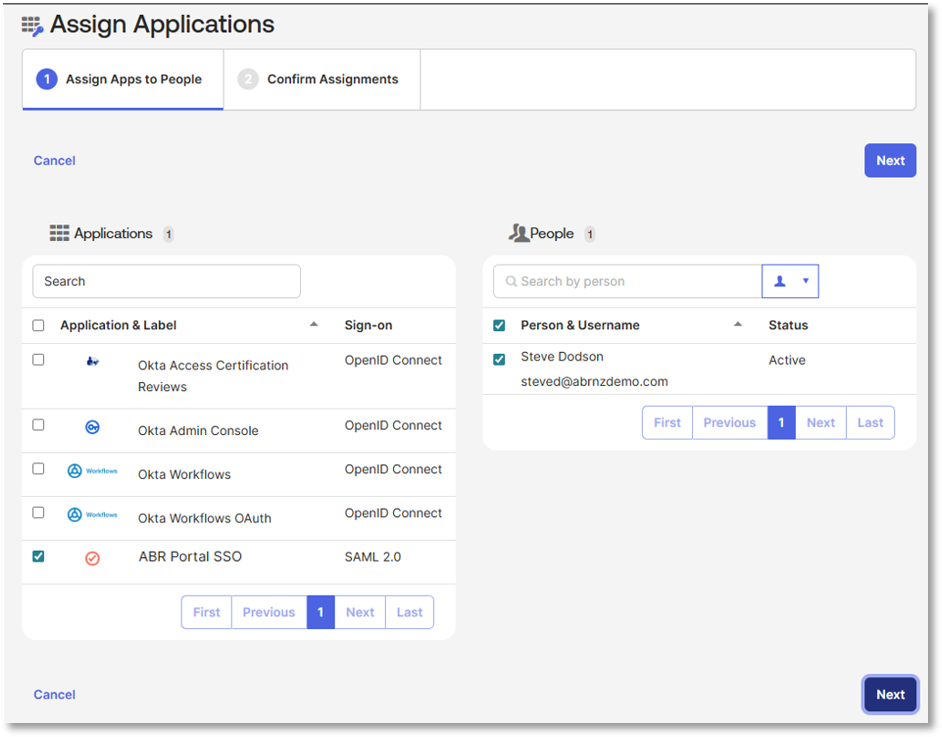
Back in the Okta portal, in panel Assign Apps to People, make sure the new app is selected (ABR Portal SSO in this case) and search for and select the people to be granted Okta SSO capability via this app. Note that these people must exist in both your Okta environment and the Admin By Request portal (under User Logins):
-
Once finished selecting people, review and Confirm Assignments.
-
Finally, go back to the Admin By Request portal and select the correct Sign-on method (i.e. the entry created at step 5) for each user permitted to login using this app:

Repeat procedure A. Create single sign-on for ABR portal users (Portal SSO) for Endpoint-SSO, with the following differences:
-
At step 3, select Endpoint Single sign-on (this app is for regular users of Okta SSO, not ABR portal users).
-
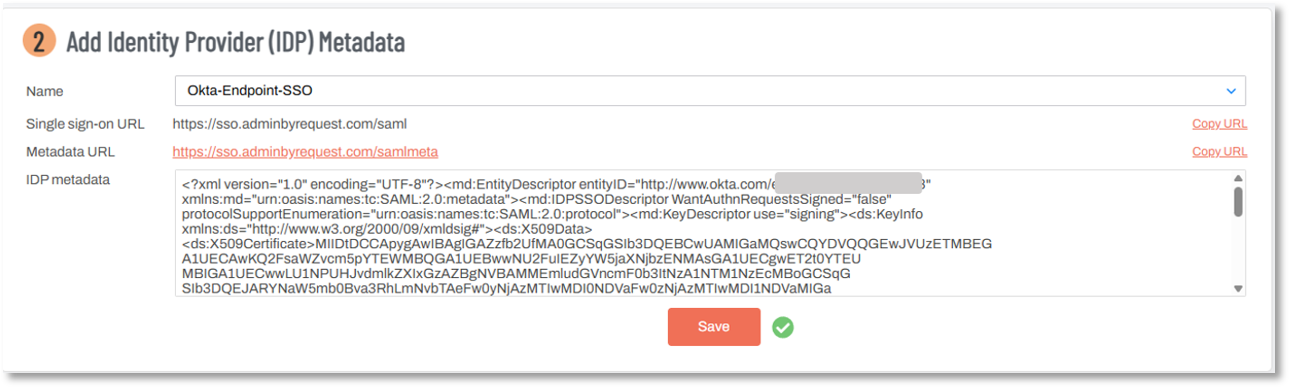
At step 5 (Admin By Request portal), create an entry that reflects endpoint SSO (Okta-Endpoint-SSO in this case):

-
At step 8, use a different name (e.g. ABR Endpoint SSO) and choose a different icon:
-
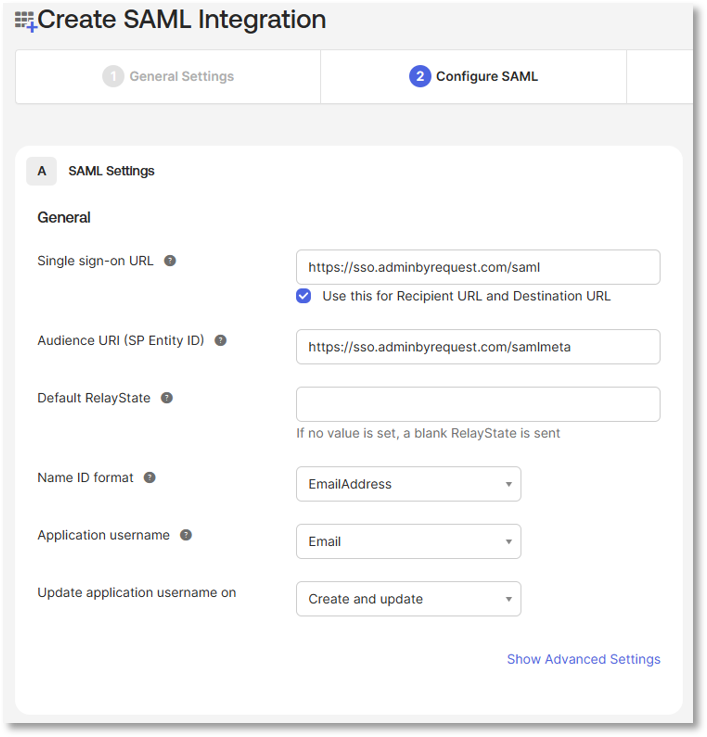
At step 9, configure SAML settings as indicated for Endpoint SSO (i.e. regular users):
Single sign-on URL:
https://sso.adminbyrequest.com/saml
Audience URI (SP Entity ID):
https://sso.adminbyrequest.com/samlmeta
Name ID format:
EmailAddress
Application username:
Email
-
At step 12, it will be different IDP metadata that you need to copy to the Admin By Request portal.
-
At step 13, make sure the app name, the URLs and the IDP metadata all match the new app (ABR Endpoint SSO <-> Okta-Endpoint-SSO).
-
At step 15, assign people in the Okta portal to the Endpoint SSO app. Once finished selecting people, review and Confirm Assignments.
-
There are additional steps required for Endpoint SSO:
-
In the ABR portal, go to the MFA setting for the relevant operating system:
- Windows: Endpoint Privilege Management > Settings > Windows Settings > Endpoint > UAC
- macOS: Endpoint Privilege Management > Settings > Mac Settings > Authorization > AUTHORIZATION.
- Linux: Endpoint Privilege Management > Settings > Linux Settings > Endpoint > UAC -
Make sure Multi-factor Authentication is selected and, under Multi-factor Configuration, select the app for Endpoint SSO (in this case, Okta-Endpoint-SSO):
-
These steps describe setting-up Group Identities with the Okta Connector. They cover getting the API from Okta and applying it to the Admin By Request Portal:
-
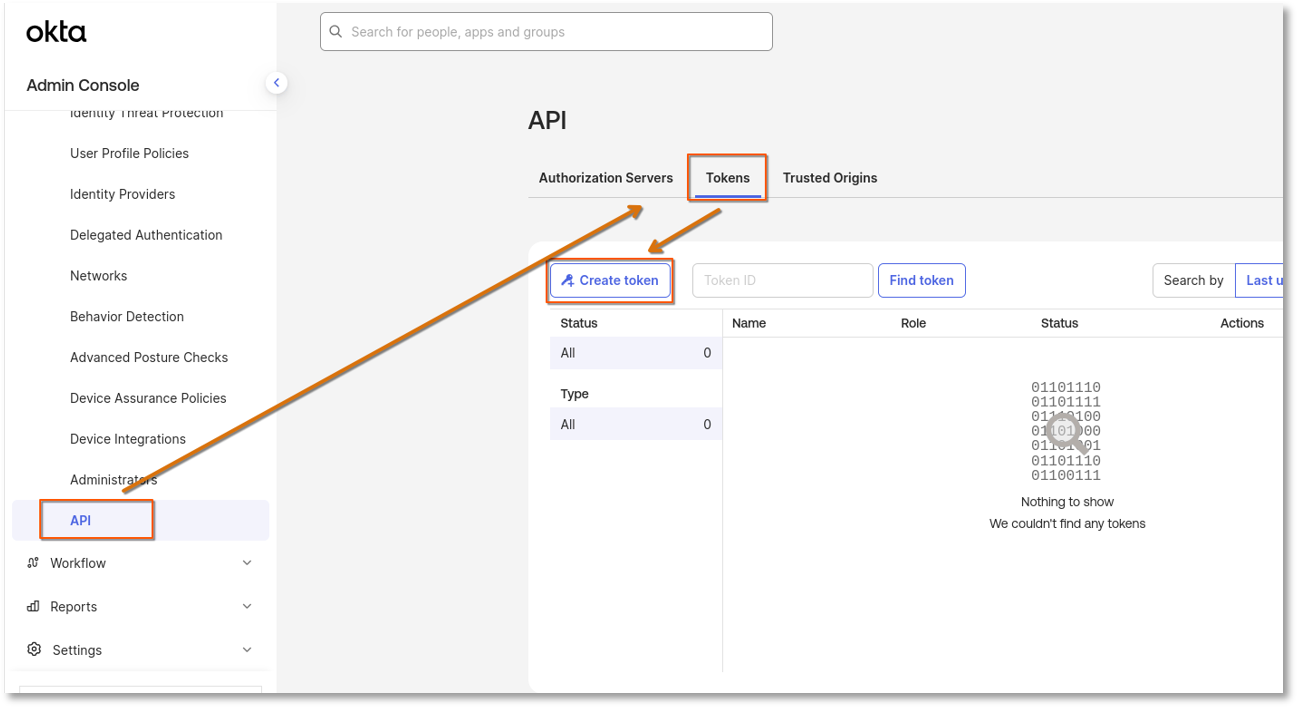
If you haven't already, login to Okta and navigate to the Admin Console.
-
On the left-hand side menu, scroll down and expand Security.
-
Under Security, towards the bottom, select API.
-
Go to the Tokens tab and click Create token:
-
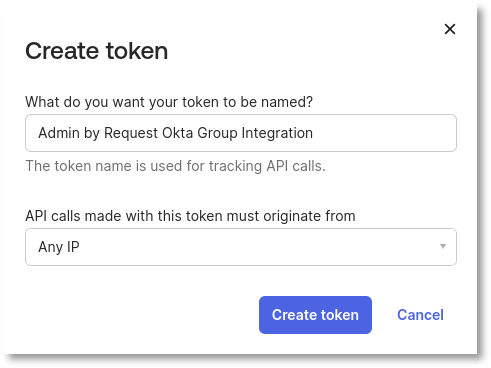
Name the token and click Create token:
-
Copy the created token to the clipboard. You can also save it if you wish.
-
If you haven't already, login to the ABR Portal.
-
Go to main menu Settings > Tenant Settings > Identity > OKTA and paste the Okta token into field Secret Key:
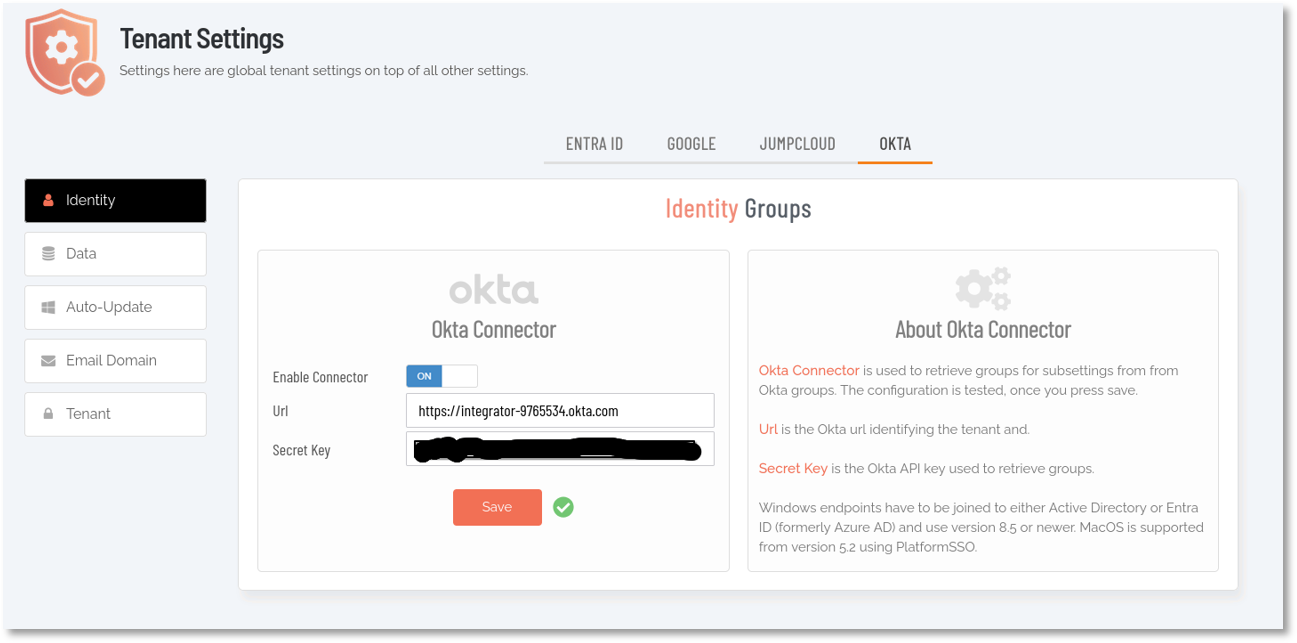
Make sure that Enable Connector is ON and that the Url matches your Okta tenant URL from the Okta Admin Console.
-
Click Save.
-
The ABR portal might show Entra Joined, but the Groups tab will show the correct groups.
-
Disable Entra from the ABR portal if you are using Entra/On-premise.
Test your SSO configuration by logging-in as several users and verify that they can login successfully.
Generic SAML
Security Assertion Markup Language (SAML) is an open standard that allows your in-house Active Directory to authenticate users with external web applications. This enables users to log in to the portal using their standard AD credentials.
If you are not using O365, Azure AD, AD FS or Okta, we do support SSO with any SAML identity provider. This means you can easily integrate with any SAML single sign-on provider, such as DUO, F5, Netscaler, One login, Idaptive or RSA.
Prerequisites
-
You need valid accounts for both the ABR portal and the SAML portal you intend to use. Make sure you are logged-in to both portals - you will switch between them during the configuration procedure.
-
Check login requirements for users - it's likely that all your users who intend to login using SAML must have their accounts and/or email addresses already entered into that system and available to be assigned to the Admin By Request app once it is configured.
Procedure
-
To set up generic SAML SSO, you simply create a SAML single sign-on domain with Generic SAML as the provider in the Single Sign-on Setup page in your ABR portal.
-
If your IdP supports automatic configuration, download our metadata at https://www.adminbyrequest.com/samlmeta.
If not, then use the following settings:-
Consumer URI: https://www.adminbyrequest.com/saml
-
Service Provider Entity ID: https://www.adminbyrequest.com/samlmeta
-
NameID format: E-mail address
-
-
After setting up the service provider, download the IdP / Federation metadata as XML and upload it to on the Single Sign-on Setup page and assign the login to users.
Operational best practices
-
Keep Portal and Endpoint SSO app registrations separate and explicitly named.
-
Use change control with screenshot capture of SAML settings.
-
Pilot with a small user group before tenant-wide rollout.
-
Keep one rollback method (temporary ABR MFA fallback) during cutover.
-
Track ABR release notes before major SSO changes.
Questions?
If you have questions not answered on this page, please contact us using the chat or the contact menu at the top.
References
Admin By Request
-
ABR SSO setup (this page)