Integration Tasks (V2)
Introduction
The following tasks are covered in this section:
A. Create a Channel
This integration requires a dedicated Admin By Request Slack channel for requests to be sent to and managed from.
Planning your channel layout
-
A channel with no Sub Settings Name set receives all requests — from both global settings and all sub-settings. This is the simplest configuration and suitable for most deployments.
-
A channel with a specific Sub Settings Name set will only receive requests whose settings name matches. Requests from global settings are not sent to a scoped channel.
-
You can have multiple channels with no scope (catch-all), multiple scoped channels, or a combination of both. When a request matches a channel's scope, it is sent there — and all matched channels remain synchronized. See Task C for details.
In V2, the integration cannot be installed directly to a private channel. You must install to a public channel first, and then change the channel to private in Slack after the installation is complete.
-
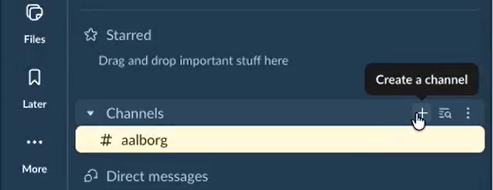
In the left-hand menu in Slack, under Channels, click + to Create a channel:
-
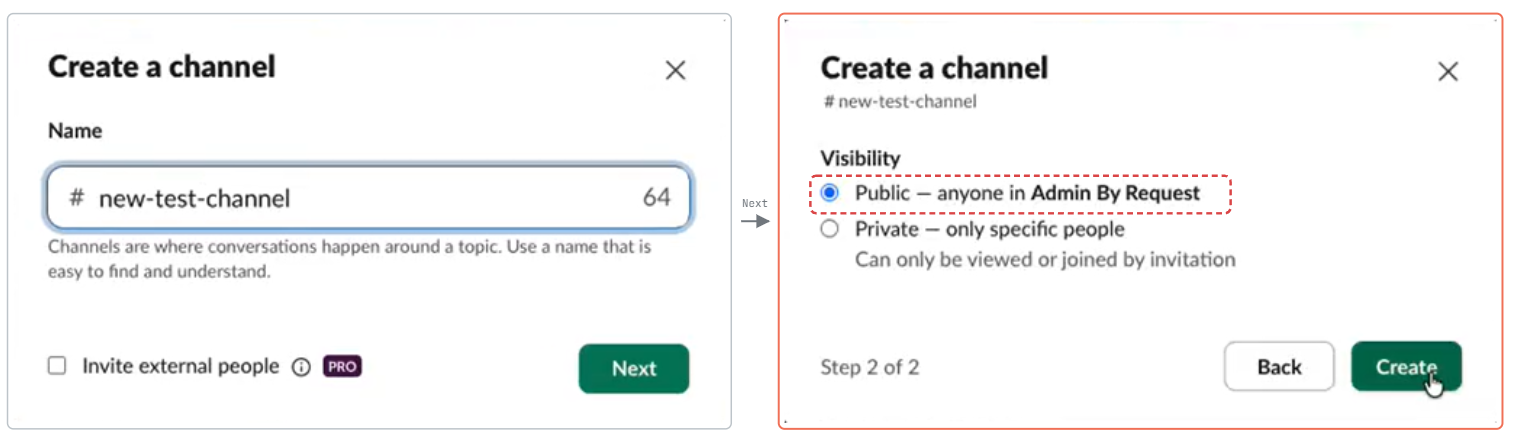
In the Create a channel pop-up, give the channel your desired name and click Next. At Step 2, leave the Public toggle selected for now, and click Create:
-
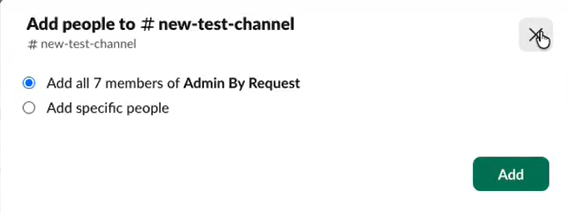
Skip adding members for now. You will add members after the installation is complete:
-
If you plan to route requests to multiple channels (for example, by Sub Settings Name), repeat steps 1–3 to create each additional channel. You will configure the scope of each channel in Task B.
Remember that this integration overrides User Portal settings, so all users with access to the Slack channel(s) created above will have the ability to approve or deny requests via Slack, regardless of whether they have been granted these abilities in your portal Sub-Settings.
B. Install the Integration
The V2 integration is installed via a web-based setup flow, accessed from your Admin By Request User Portal. Each channel requires its own installation run. The same API key can be reused across all channels.
-
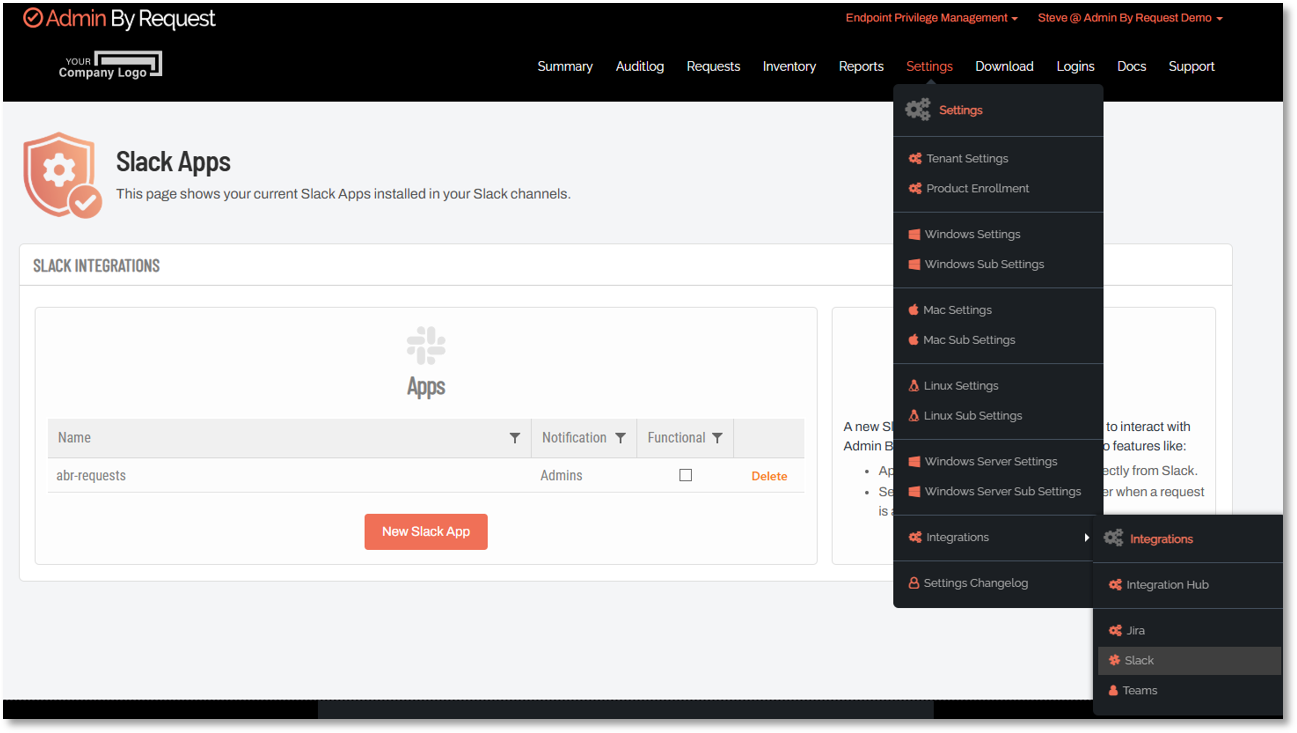
In your Admin By Request User Portal, navigate to Settings > Integrations > Slack and click New Slack App:
-
On the Install Admin By Request app for Slack page, click button Add to Slack.
-
You will need to sign-in to Slack at this point (if you are not already).
-
Enter your Admin By Request API Key (which you should already have from Prerequisites) in the field provided:

The same API key can be reused when installing the integration to additional channels.
-
(Optional) Enter a Sub Settings Name for this channel.
Sub Settings NameThe Sub Settings Name controls which requests are routed to this channel. It must match the
settingsNamevalue returned in the Admin By Request Audit Log API for a request to be delivered here.-
Leave this field blank (or enter Global) to receive all requests, including those from sub-settings and global settings.
-
Enter a specific sub-settings name (e.g., Finance) to receive only requests originating from that sub-setting. Requests from global settings will not be sent to this channel.
-
To confirm the correct Sub Settings Name to use, check your audit log entries - the
settingsNamefield in the JSON payload is the value to enter here.
-
-
Ensure the Send new requests to Slack channel toggle is set to on.
When this toggle is off, incoming requests are logged in the integration's internal database but are not posted to the Slack channel.
-
(Optional) Set the Attempt to send chat message when a request has been handled toggle to on.
When enabled, the requesting user receives a direct message in Slack notifying them of the outcome of their request. The message is only sent if the user's endpoint email address matches their Slack account email address.
-
Click Continue Installation.
-
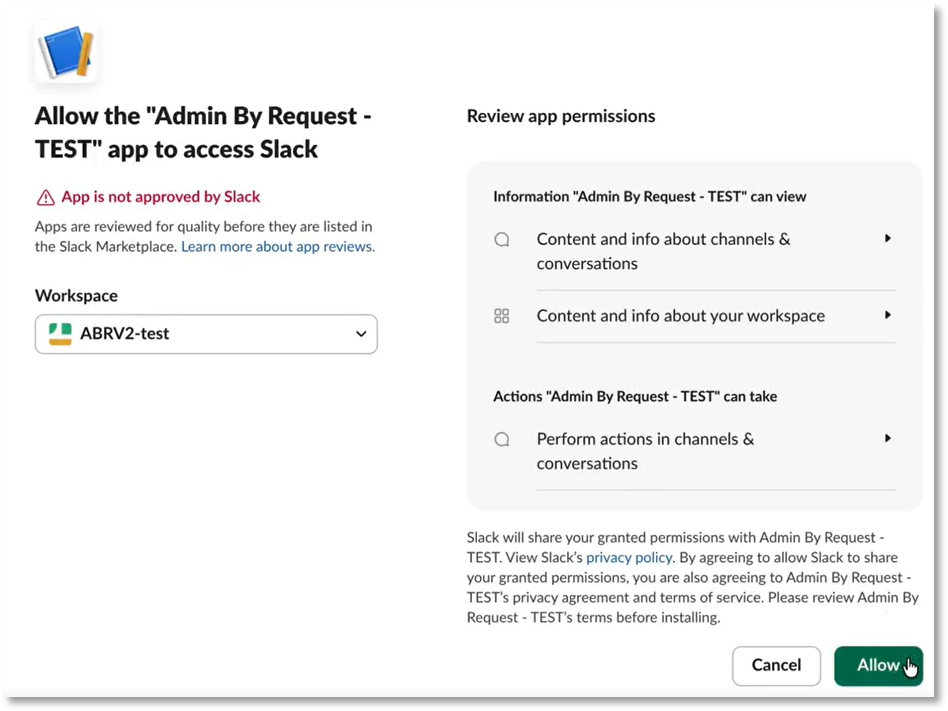
When prompted, sign in to Slack and choose the workspace in which you created the channel in Task A, then review the permissions requested by the Admin By Request app and click Allow:
-
From the channel list, select the channel created in Task A and click Submit:
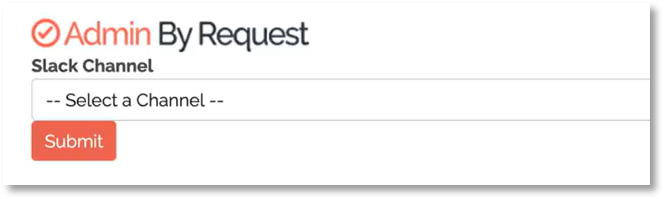 NOTE
NOTEOnly public channels are shown in this list. If the channel you created does not appear, confirm it is currently set to public in Slack.
-
The installation is now complete for this channel. To make the channel private, navigate to the channel settings in Slack and enable the Make private option.
IMPORTANTOnce a Slack channel is changed from public to private, this action cannot be undone. Ensure you have completed the installation and verified it is working before converting the channel to private.
Installing to additional channels
To install the integration to additional channels, repeat steps 1–11 for each channel, selecting a different channel in step 10. Use the same API key for all channels.
Updating settings
To update the settings (for example, to change the Sub Settings Name or toggle states) for an existing channel, repeat the installation steps using the same API key and select the same channel in step 10. The existing configuration will be updated.
C. Manage Requests
This task demonstrates how to use the Slack channel(s) to handle and keep track of requests made by your users.
Receiving requests
-
New and pending requests appear in the appropriate Slack channel(s) as a message, displaying the request type, the time the request was made, the name of the user, the computer name, and the reason provided (if the Reason feature is enabled in your ABR settings):
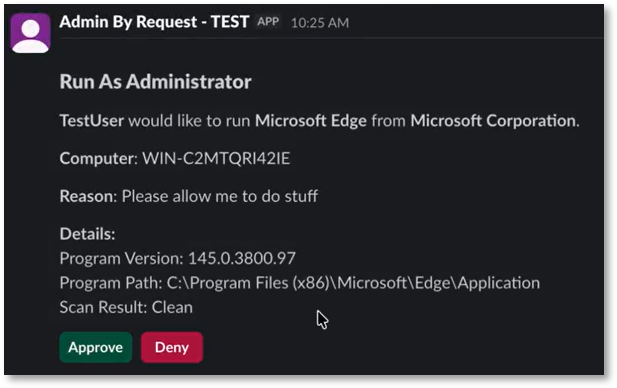
A request is delivered to every channel whose Sub Settings Name matches the request's
settingsName. Channels with no scope set (or with "Global" as their value) receive all requests. Channels scoped to a specific sub-setting receive only requests from that sub-setting.NOTEFor Run As Admin requests, the Slack message also displays the Program Version, Program Path, and Scan Result for the application being elevated. Admin Session requests display the standard request information only.
Approving or denying a request
-
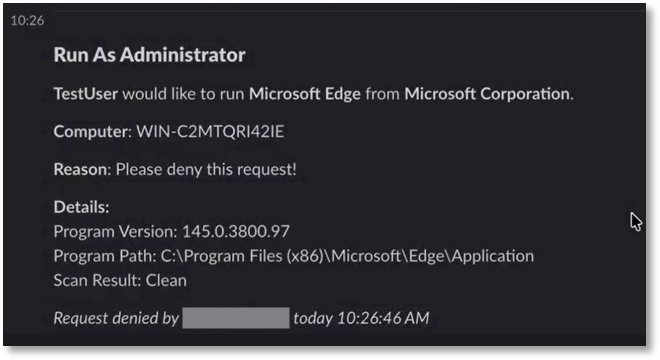
Click Approve or Deny on the request message - the same way you would in the Requests page of the Admin By Request portal.
-
If denying, you may optionally enter a Deny Reason. The deny reason is recorded in the Admin By Request audit log for the request.
The action taken is reflected in the channel message, along with the name of the person who handled the request and the time it was handled:
Multi-channel synchronization
If the same request was delivered to more than one Slack channel, approving or denying it in any channel automatically updates the messages in all other channels. Each updated message reflects the outcome and identifies who handled the request and where.
The message displays the Slack display name of the user who handled the request.
In the Admin By Request audit log, if the Slack user's email address matches a portal admin's email address, the portal admin's name is recorded as the approver. If no match is found, the "Approved by" field is omitted from the audit log entry.
Requests handled outside of Slack
If a request is approved or denied in the Admin By Request portal or through any other integration (rather than through Slack), all Slack channels that received the request message are updated to indicate it was handled outside of Slack, along with the portal admin's username and the time of the action.
User notification
If the Attempt to send chat message when a request has been handled option was enabled during installation (Task B, step 4), the requesting user receives a direct message in Slack when their request is approved or denied. This message is only sent if the user's endpoint email address matches their Slack account email address.