SCIM
Introduction
Admin By Request supports SCIM integration. Chances are, your enterprise is already making the most of the reusable, normalized, open standard that is SCIM (System for Cross-Domain Identity Management). It's lightweight, simple, and growing in popularity and it can be integrated with Admin By Request.
This topic covers our implementation of the standard, including an example step-by-step procedure for configuring it with Okta.
Overview
If you’re new to SCIM, the protocol was created to help manage user identity information. In simple terms, it does this by defining how an Identity Provider (IDP) and supported applications talk to each other.
The SCIM protocol provides standard definitions for users and groups, i.e. a schema with a default set of values for what should be defined for users, and what should be defined for groups.
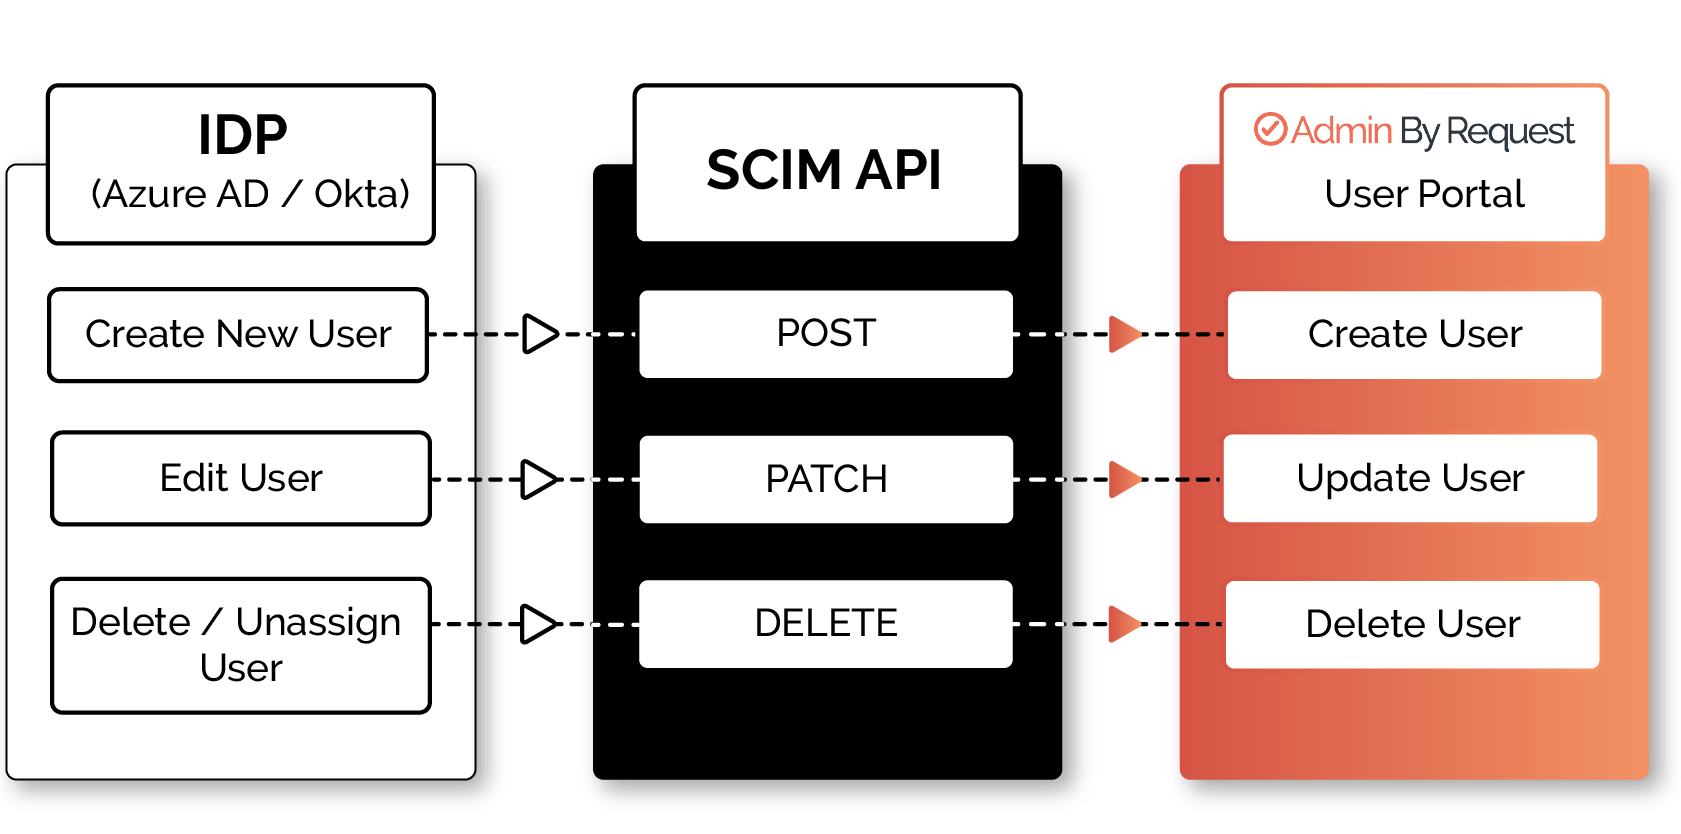
With this, comes a set of standard operations and a RESTful API which translates these operations into GET, POST, PUT, PATCH and DELETE HTTP requests. These HTTP requests run the typical operations involved in user and group management, such as Create, Update, and Delete, with responses returned in JSON data format.
Benefits of SCIM Integration
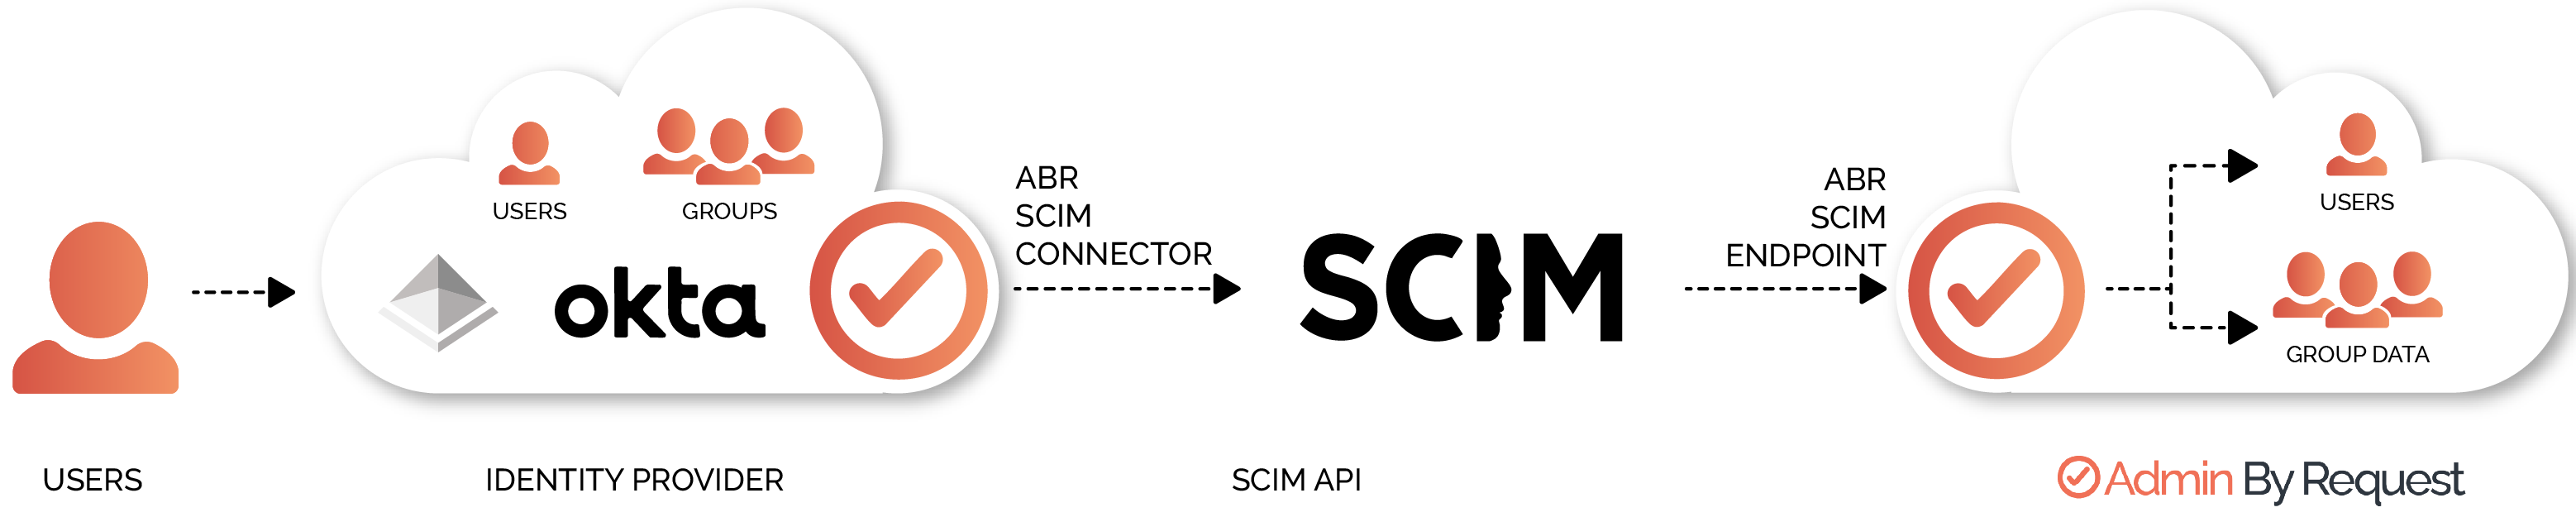
At one end you have your IDP environment – such as Entra ID or Okta – used to create, maintain, and manage user information: the central hub for all things user-identity related.
At the other end, you have the many applications to which you want your users to have easy and secure access.
In between, there is SCIM: the communication channel used to provision users by pushing the actions undertaken on the IDP side, to connected applications.
The main goal is to save IT admins from having to onboard and manage user identities and user access manually on multiple different applications. With SCIM, you can do it all from the IDP side, with changes automatically reflected on integrated applications when the provisioning cycle runs.
What the integration offers
-
Identity Provider Support: The Admin By Request implementation of SCIM provisioning supports the Entra ID and Okta IDP environments, and is designed for portal users (i.e. your company admins - this implementation is not intended to integrate with end users).
-
Provisioning Access: Provisioned users are able to access the Admin Portal using their IDP credentials and selecting the appropriate option from the Corporate Sign-in menu of the log in page, or from within the IDP.
-
User Portal Permissions: Roles can be assigned to groups of users, specifying the permissions they have within the Admin By Request Admin Portal based on their Entra ID or Okta source group.
-
SCIM Operation Support: The Admin By Request integration supports the Create, Update, and Delete operations for user provisioning.
How it works
-
The integration comprises an Admin By Request application on the IDP side, which acts as the SCIM Connector.
-
The connection between the SCIM Connector and the SCIM Endpoint is established using a SCIM API key and URL.
-
When the connection is authorized, actions within Entra ID or Okta are pushed through the SCIM Connector to the SCIM API, which makes HTTP requests (POST, PATCH, DELETE) to the Admin By RequestSCIM Endpoint according to the protocol.
-
These requests run the appropriate operations in the Admin By Request Admon Portal: Creating, Updating, or Deleting user and group data.
-
Create: Users are created in the Admin By Request Admin Portal based on user and group values and assignments in the IDP. In this case, a POST request is pushed to the application (i.e. pushed to Admin By Request).
-
Update: Existing user and group attributes are updated in the Admin By Request portal to match changes to their corresponding user profile or group in the IDP. In this case, the application receives a PATCH request.
-
Delete: Users or groups that are deleted or deprovisioned / unassigned in the IDP are deleted from the Admin By Request portal. In this case, SCIM sends a DELETE request to the application.
Configuring the Integration
The task breakdown for configuring the integration is as follows:
-
Create the SCIM Connector on your IDP side (i.e. Entra ID or Okta). This is done by creating a new Admin By Request SCIM application.
-
Authorize the connection between the Admin By Request SCIM application and the SCIM Endpoint (created by us, on the Admin By Request side). This involves plugging in the SCIM API Key and URL, available in your Admin By Request portal.
-
Set up provisioning and assign users and groups to the Admin By Request SCIM application in the IDP. (For Okta users, Single Sign-On (SSO) needs to be set up prior to provisioning.)
-
Initiate provisioning to synchronize assigned users and groups to your Admin By Request portal.
Integration with Entra ID
Download the SCIM manual for integration with Entra ID (Azure AD)