OPSWAT MetaDefender
Integration Overview
The malware-scanning capability in Admin By Request is delivered through a transparent integration with OPSWAT’s MetaDefender Cloud Service. Whenever a file is downloaded or elevated, its checksum and (optionally) the file itself can be submitted to MetaDefender for analysis. This workflow is seamless to the user and requires no additional software beyond the Admin By Request client.
About OPSWAT MetaDefender
OPSWAT is a leading provider of critical infrastructure protection (CIP) cybersecurity solutions, with its MetaDefender platform widely adopted in industries where trust and reliability are paramount. MetaDefender employs a multi-scanning architecture, using dozens of commercial antivirus and anti-malware engines to analyze files. By leveraging multiple engines, it drastically improves the detection rate of both known and zero-day threats compared to a single-vendor approach.
In addition to signature-based AV, MetaDefender provides heuristics, machine learning, and sandboxing for advanced threat detection. It can also strip or sanitize embedded threats from documents (content disarm and reconstruction, or CDR).
OPSWAT technology is trusted by 98% of U.S. nuclear power facilities, and its solutions are embedded in products from vendors such as Cisco and other global technology providers.
Benefits of integration with Admin By Request
-
Automatic protection: All file elevations are scanned by default, giving administrators assurance that elevated installs do not introduce malware.
-
Customization: Customers can opt to disable OPSWAT scanning or adjust settings in the Admin By Request portal.
-
Continuous improvement: The MetaDefender engine list is updated frequently as OPSWAT signs new vendor partnerships, ensuring wider coverage and stronger detection over time.
-
Global threat intelligence: Leveraging the OPSWAT network, detection signatures and analytics are continually enriched with global telemetry.
Strategic Partnership
Admin By Request and OPSWAT maintain a formal partnership to deliver enterprise-grade malware detection to customers. As well as the information provided in this article, more details can be found in OPSWAT’s own MetaDefender product resources.
Real-time detection
Admin By Request takes away users’ admin rights, but allows them to run some applications with administrative privileges. When a user requests to run a file, malware checks are performed using 30+ anti-malware engines before it is executed. MetaDefender's use of these engines delivers exceptionally high detection rates - over 99% for known threats.
The current list of engine vendors includes (but is not limited to):
AhnLab, Antiy, Avira, Bitdefender, Bkav Pro, ClamAV, CMC Internet Security, Comodo, CrowdStrike Falcon ML, Cylance, Emsisoft, ESET, Filseclab, Huorong, IKARUS, K7, Lionic, McAfee, Microsoft Defender, NanoAV, Netgate, Quick Heal, RocketCyber, Scrutiny, Sophos, Systweak, Tachyon, Varist, Vir.IT, VirusBlokAda, Webroot SMD, XVirus Anti‑Malware, Zillya.
If a file is flagged as malicious, execution is blocked in real-time on the endpoint before it runs with administrative privileges and does any damage. In many cases, malicious files will be caught by your endpoint anti-virus product, but as everyone knows – no single anti-virus product is perfect and if it doesn’t catch it, the result is disastrous.
If a program passes through all engines without any flags raised, you can reasonably assume that the file is not malicious and is safe to run.
Example 1: Block malware using Admin By Request
Malware is often hidden in “too good to be true” freebies, such as free PDF generators, ISO tools or cleaner tools. Let’s take a real-world example shown in the video below.
One of your users forgot the password for an Outlook PST file and Googles a free tool for this one-time problem. The user tries to install a PST password recovery tool and luckily this is caught by Admin By Request. The file passed Windows Defender on the endpoint, but was caught by MetaDefender. Have a look at the video to see how shockingly fast (~1 minute) it is to get malware.
Blocking malware with Admin By Request
Knowing that you are scanning a target file against so many engines means you can be reasonably sure those files run with administrative privileges are not malicious. With this assurance in mind, it is not necessary to enable approval for every request from end users, unless you have other reasons to do so. Furthermore, you can set up an email notification to yourself in portal settings that will advise when malware is blocked.
Example 2: Catch malware during Admin Session
If you allow admin sessions for expert users, the malware checks are also performed when they use Run As Administrator during the session. This is transparent to the end user (i.e. no splash screen), simply because it so fast that the splash screen would just be a quick flicker.
Catching malware during an Admin Session
If we run the same scenario in an Admin Session running the same PST password recovery setup file, not only is it still blocked, but it also kills off the entire session right away, as shown in the video, and your email notification will notify you.
How it works
How is it possible that this can magically be done without any performance or time penalty for the end user?
When a user attempts to run a file with administrative privileges using Run As Administrator, an API call is made from the endpoint to our backend servers. This call includes the SHA-256 checksum of the file the user intends to run. At this time, the file is not yet executed.
A checksum is an industry-standard way to uniquely identify a file by making a hash of the binary content of the file. This means you cannot rebuild the original file, but you do get a world-unique identification of the file.
If the checksum of the file is known by MetaDefender and is flagged as malicious, the endpoint gets the message back to block the file and stop the process. You will see an entry in the auditlog that the file was blocked, and which engine(s) flagged it. This checksum lookup takes less than 0.1 seconds, because the file itself is not scanned – the checksum is simply looked-up in a MetaDefender central database of current scan results across all their customers globally. This means there is no time penalty for your end user at all, no matter how many engines there may be in the future.
Cloud file scanning
MetaDefender Cloud maintains a hash reputation database that exceeds 40 billion entries (as of December, 2020 - almost certainly more at the time of writing).
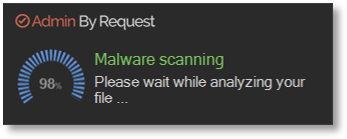
Statistically, about 75% of checksums of files are known. But the more common a file is, the more likely it is to be known. If a checksum falls into the unknown 25%, you can opt to run a real-time cloud scan of the files. If you use this setting, the splash screen on the endpoint changes to look like this after a few seconds and the user has to wait for a MetaDefender cloud file scan:
What happens is that the actual file is sent to the MetaDefender Cloud service for real-time scanning using all the engines available. The upload time depends on the file size and bandwidth on the endpoint, but the scanning itself typically takes less than 10 seconds. If the file is flagged, its execution is blocked.
Please note that:
-
The file never resides or passes the Admin By Request cloud service in any form; the file goes directly to MetaDefender.
-
MetaDefender does not store your file - it exists only as long as the file is scanned. Please refer to MetaDefender Cloud Privacy Policy for more information.
-
Once the file has been uploaded, the checksum is known and it will not be scanned again until it falls under aging of 7 days.
-
If anyone else in the world uploads the same file before aging, the result is updated and aging is reset.
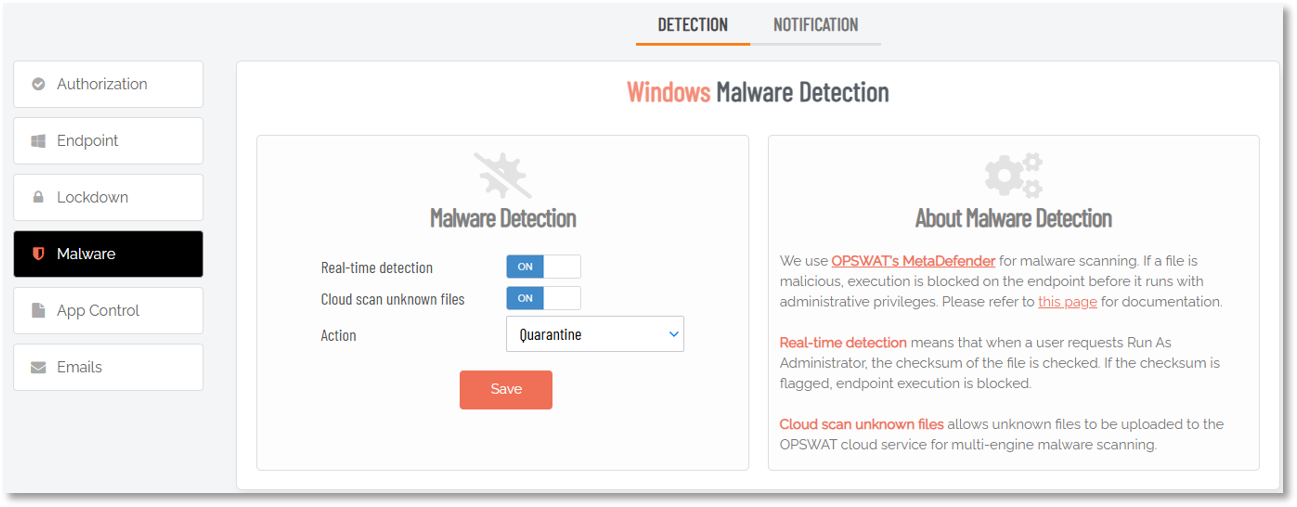
The option to upload unknown files to MetaDefender is the Cloud scan unknown files option in your portal settings (for Windows endpoints: Endpoint Privilege Management > Settings > Windows Settings > Malware > DETECT):
A similar setting is available for Mac endpoints.
If you turn off “Cloud scan unknown files” but leave “Real-time detection” on, only checksum lookup for the known 75% is performed and the rest must be handled by your local endpoint anti-virus product.
It is not recommended to ever disable the “Real-time detection” option, simply because there is no drawback to having it on. The extra wait time for the end user is a tenth of a second.
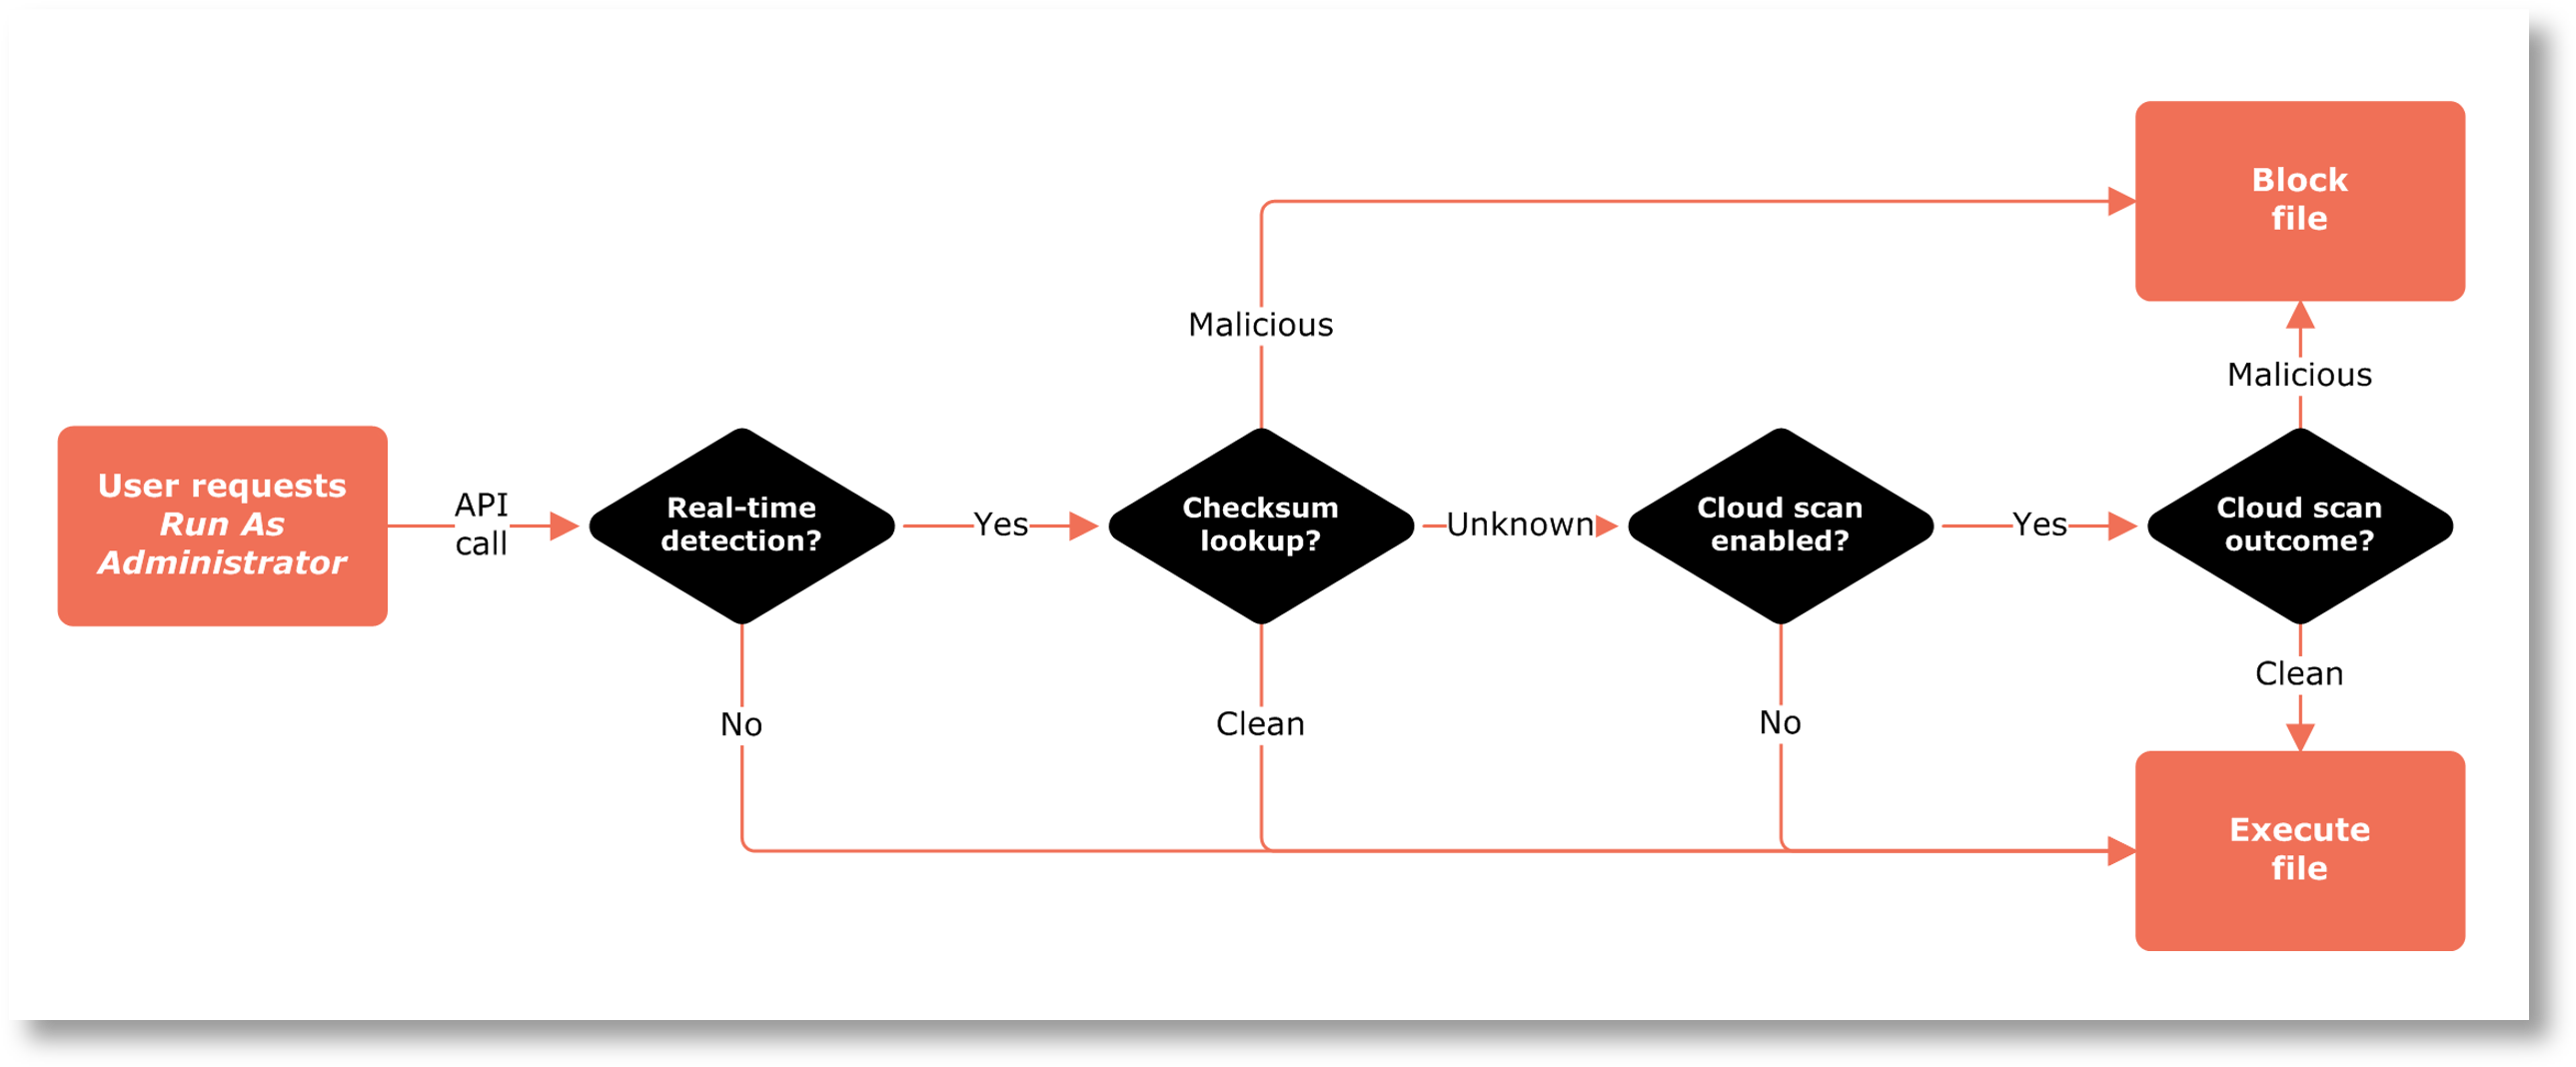
The file scanning flow looks like this:
Using the Auditlog to check scan outcomes
If a file is flagged as malicious, what happens next depends on your Action setting:
-
If you set Action to Quarantine, the file will be blocked and put into the “Quarantined” tab under “Requests” in the top menu. This allows IT staff to look at the reported data and make the judgment, if this file should be allowed or not.
-
If you set Action to Permanently block, the file cannot be approved to run at all. In the Auditlog, you will see the request with status being “Quarantine” or “Blocked”.
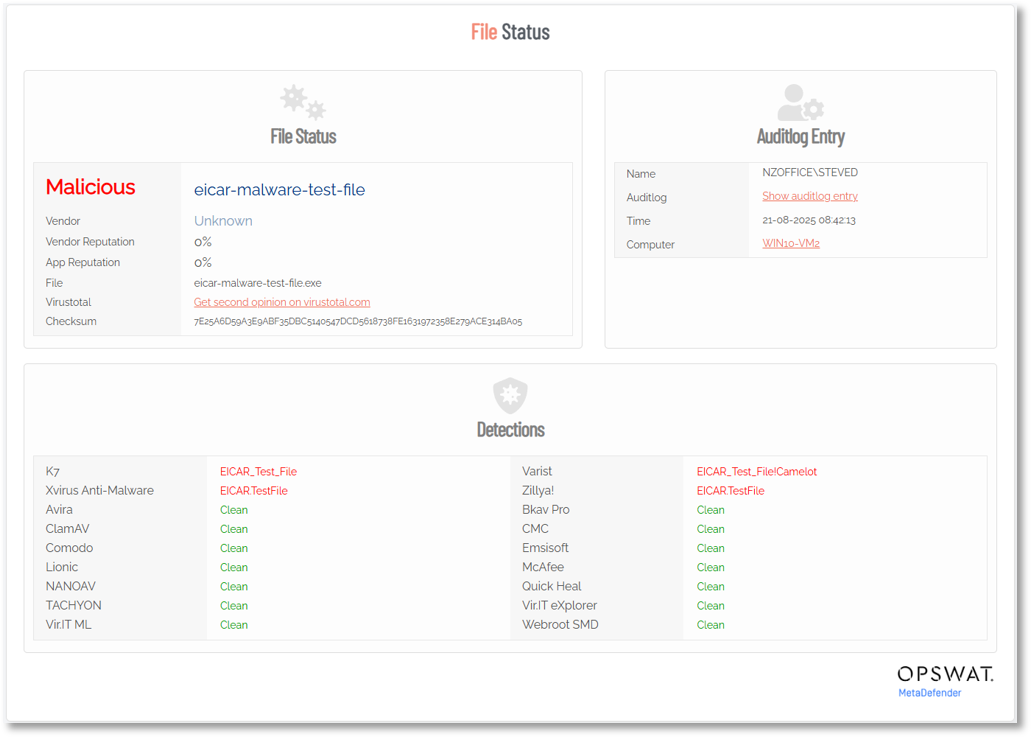
The following example shows a test file flagged as Malicious and marked with Status Quarantine, matching the portal setting:
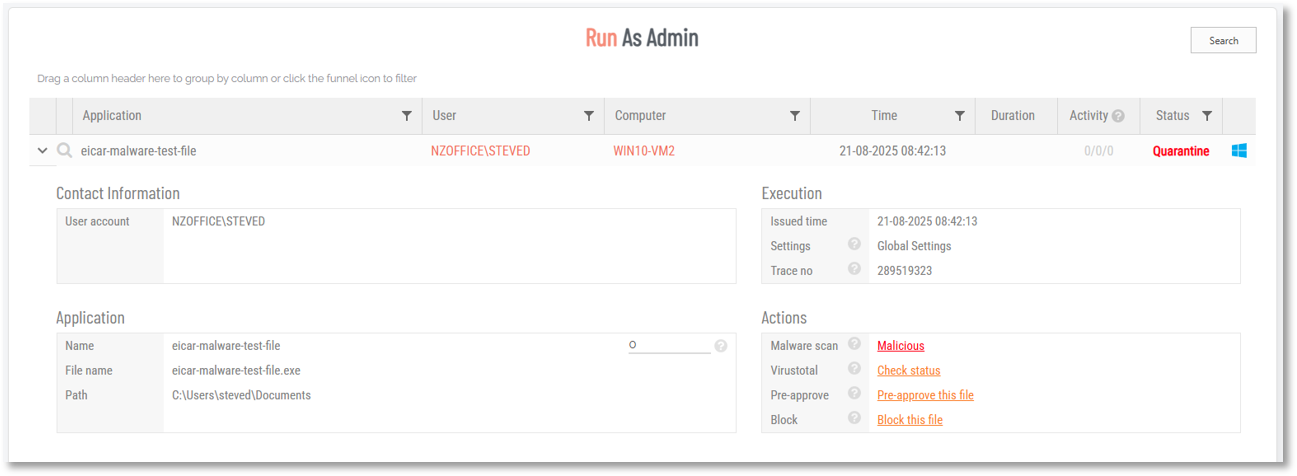
Clicking the Malicious link to drill-down further shows detailed information about the problem file, including another link offering a second opinion from Virustotal::
Handling false positives
It is commonly known that anti-virus engines sometimes report false positives. When the file is scanned with so many engines, the likelihood of this happening increases, especially when using AI-based engines like CrowdStrike. The way we handle this is by applying this simple ruleset:
-
The file is flagged if one of the major engines using classic pattern recognition flags it (for example BitDefender or McAfee)
-
The file is flagged if more than one engine flags it
Testing without using malicious files
To test how the flow works and to verify your settings work as you expect, you need to be able to simulate a malware situation without using a malicious file. An industry standard file called Eicar exists (shown in the example above), but it will most likely be blocked by your local anti-virus program. Therefore, you can create an Admin By Request simulation file.
A simulation file is an XML file with the extension .abrsim. You can double-click an .abrsim file on an endpoint with the Windows version 6.3 or newer client and it will process the file as if it was the file with this checksum, but will not execute anything. The backend will behave exactly the same as if it was a real file, which allows you to test the entire flow.
You can download some simulation files that we have created by clicking the link below. What is interesting about these simulation files is that they are checksums that are collected from real customers. These files have all passed the local endpoint anti-virus solution (!!), but were blocked in real-time by one or more of the other engines. These files appeared to be common files like WinRAR, PowerISO, Messenger, Media Player, PDF Creater, Cleaner tools and so forth.
You can also create an .abrsim file yourself based on a checksum you wish to try:
<MalwareAttackSimulator>
    <SHA256>275A021BBFB6489E54D471899F7DB9D1663FC695EC2FE2A2C4538AABF651FD0F</SHA256>
</MalwareAttackSimulator>